Gimpdiggity
Master Member
Hi everyone.
In an effort to cut back on the new threads that I've been making, I will be making one "consolidated" build thread for my costume. I'll update it as I go, and add pictures and stuff as I can.
Some back story. A friend of mine suggested that we go to the Comic Con in Detroit (Novi) together. I told her I would, but that I would want to go in a costume. She's pretty into that kind of stuff, so she asked what I would want to do. I told her I would probably want to go as Captain America. She told me that if I put that together, she'll put together a Black Widow costume, red hair dye and all, and we can go to the show next spring. So, I have a while before the show, so I will be constantly doing things to the costume...changing, upgrading, adding, things like that.
I started doing some research, and ended up deciding that I didn't really want to go with one particular version of the Cap from any one particular source. I decided that I kind of wanted to do my own take on the character...something that would take bits and pieces from different sources and put them all together...but something that to me was still very obviously Cap.
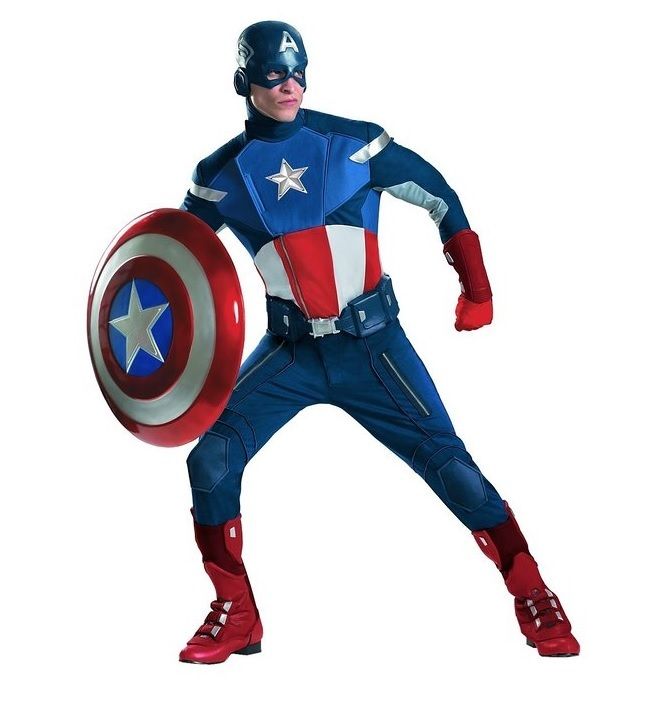
So, the first thing that I did was buy a bodysuit. I can sew...but I can't do really intricate designs and patterns, so I figured I should start out with a premade suit with the intention of possibly trying to put a "Stealth Suit" type suit together myself once I had gotten the majority of the basic costume finished...basically, I'd have something that was premade just in case what I try to put together turns out terribly. I started looking around trying to find a suit that had good reviews without being too ridiculously expensive. I settled on a suit from "Avengers," knowing that I would have to replace most of the accessories that came with it due to the low quality of those pieces. This is the suit, here:
As soon as I got it, I thought it was pretty nice. It has one seam that needs to be sewn again, but that's no big deal. As I suspected, however, the rest of the stuff with it would definitely need replacing. The mask, belt, boot covers, gloves, and gauntlets are all pretty poor quality.
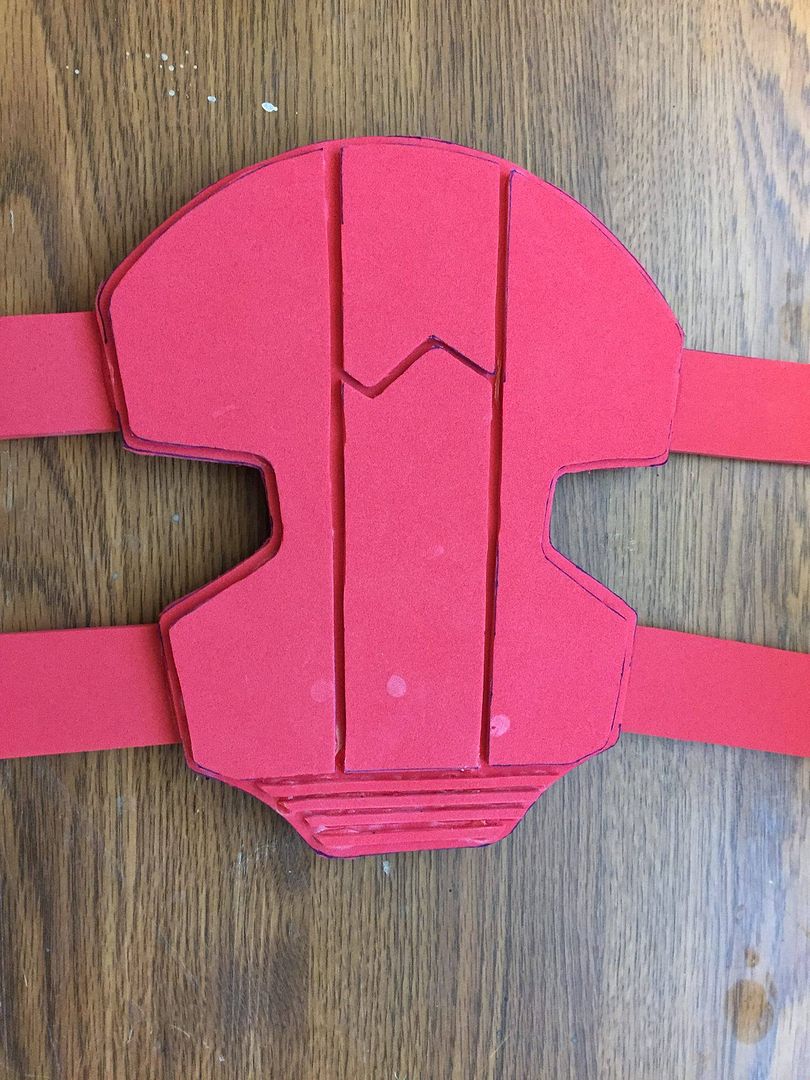
I started looking for things to replace them with, and found TheFoamCave. I downloaded the plans for the gauntlets, boot covers, and utility belt and set about my first attempts at using EVA foam to do anything. At this point in time, I got the stuff all from the "Avengers" version of the suit, but my plan was still to modify some of the stuff to be my own. These were just what I was going to use as the building blocks of the costume.
After the first attempt, I had this...
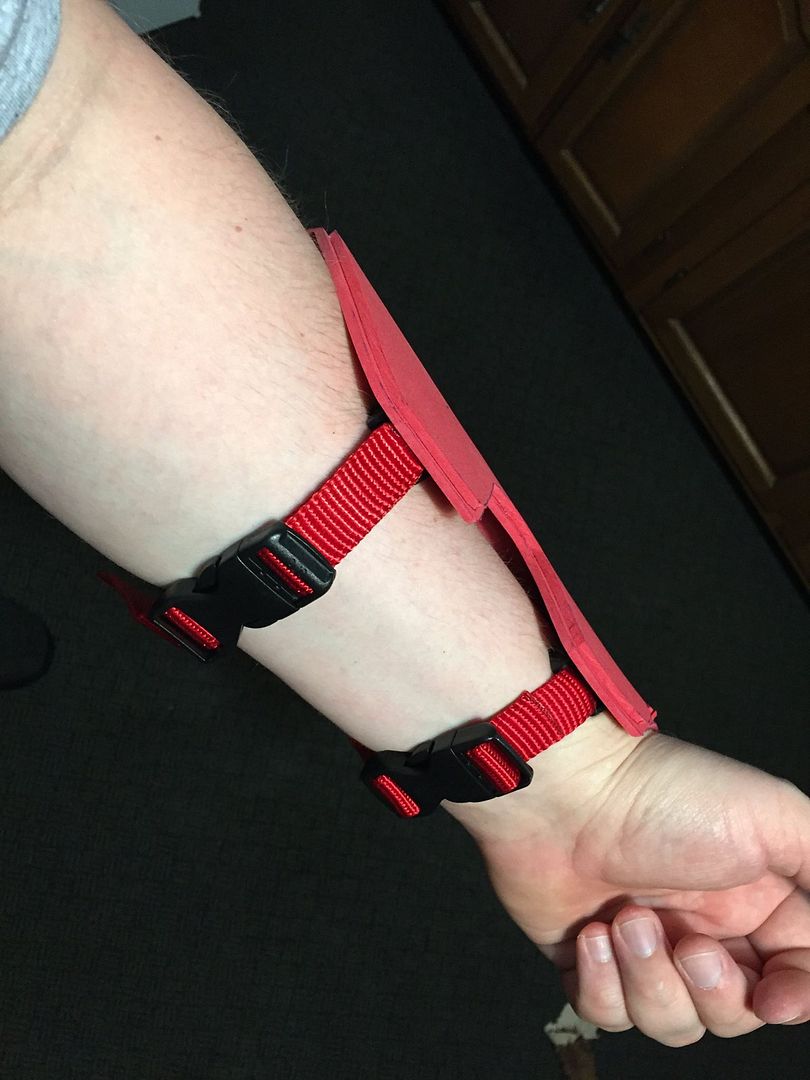
I didn't like the way that the pattern had the gauntlets mount to the arms...it was just using thicker foam and Velcro. I wanted something that looked a bit "nicer," for lack of a better word. The rest of the pattern, I thought, was great. With the help of Strapworks.com I was able to get some webbing straps and some side release clips, and I ended up with some pretty workable gauntlets.
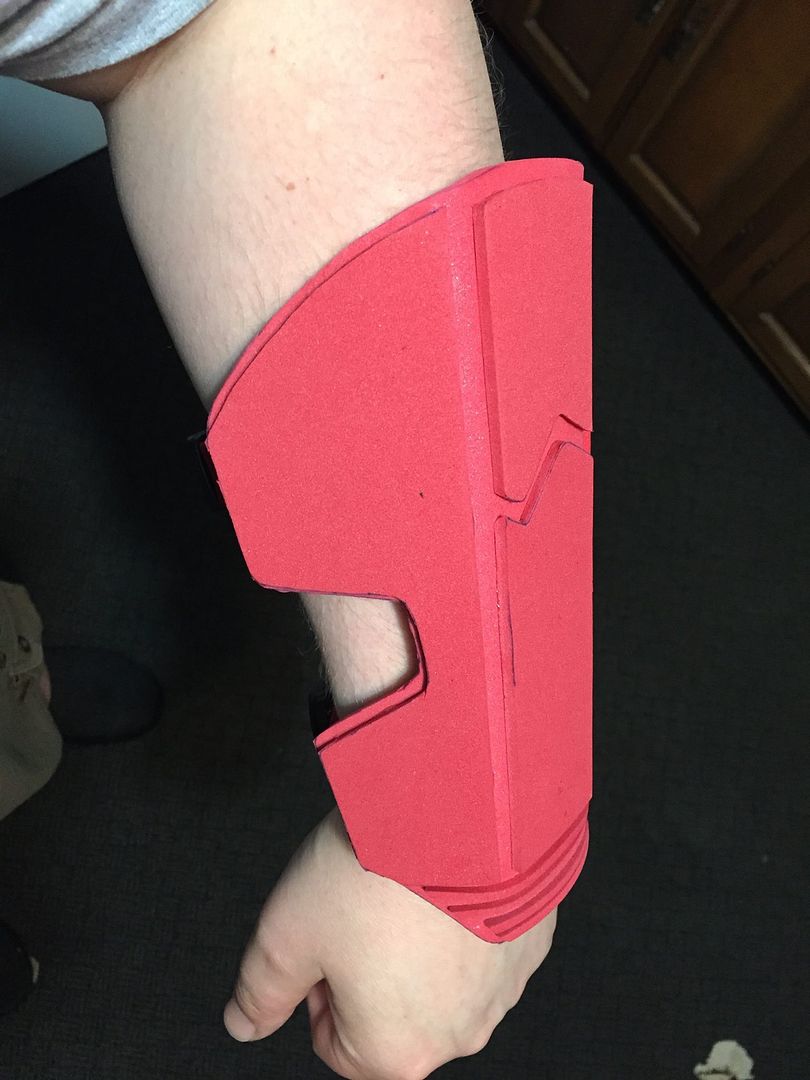
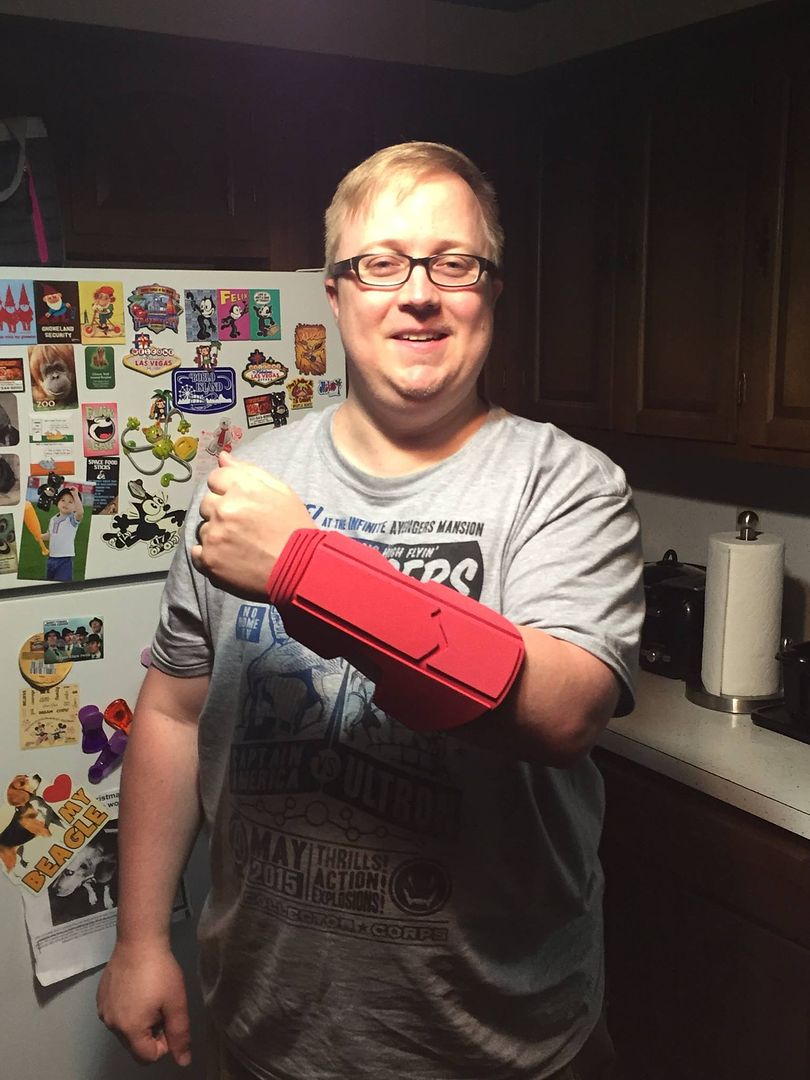
I was happy with how they turned out, and went with some red PlastiDip to finish them and add some protection.
I'm not sure why they appear so dark in this picture...it was something to do with my iPhone's auto selection of settings...
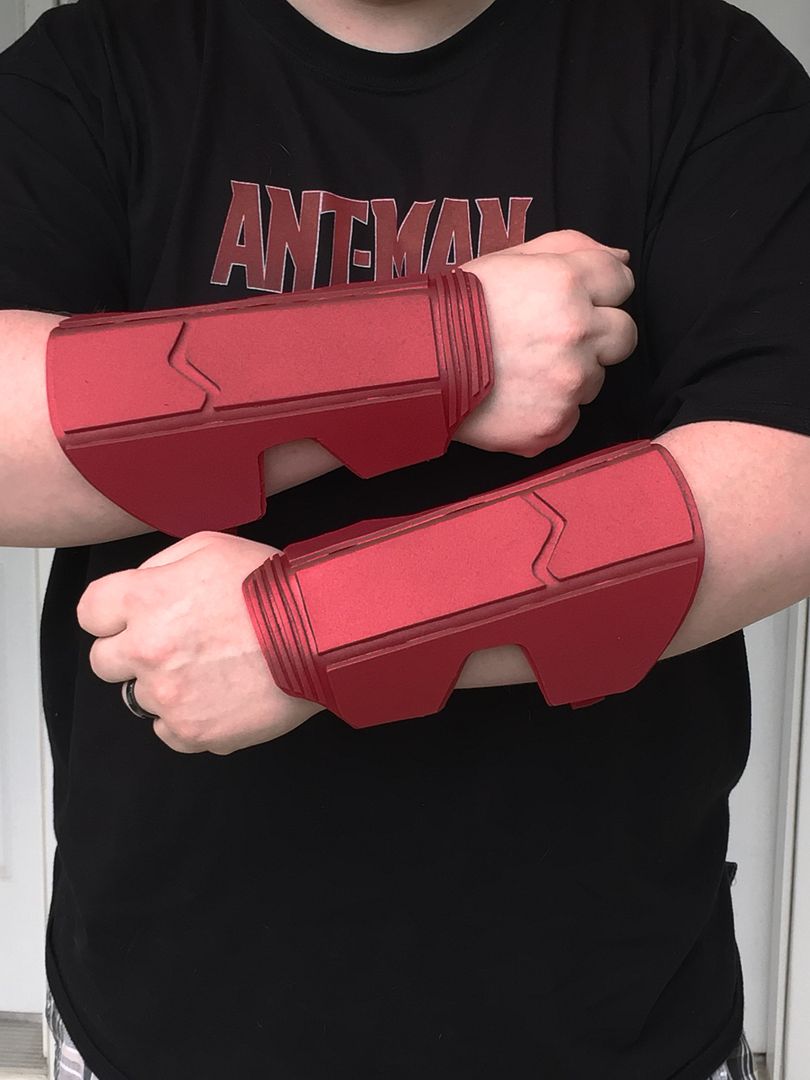
This is more what they look like, but not quite so washed out by the bright light.
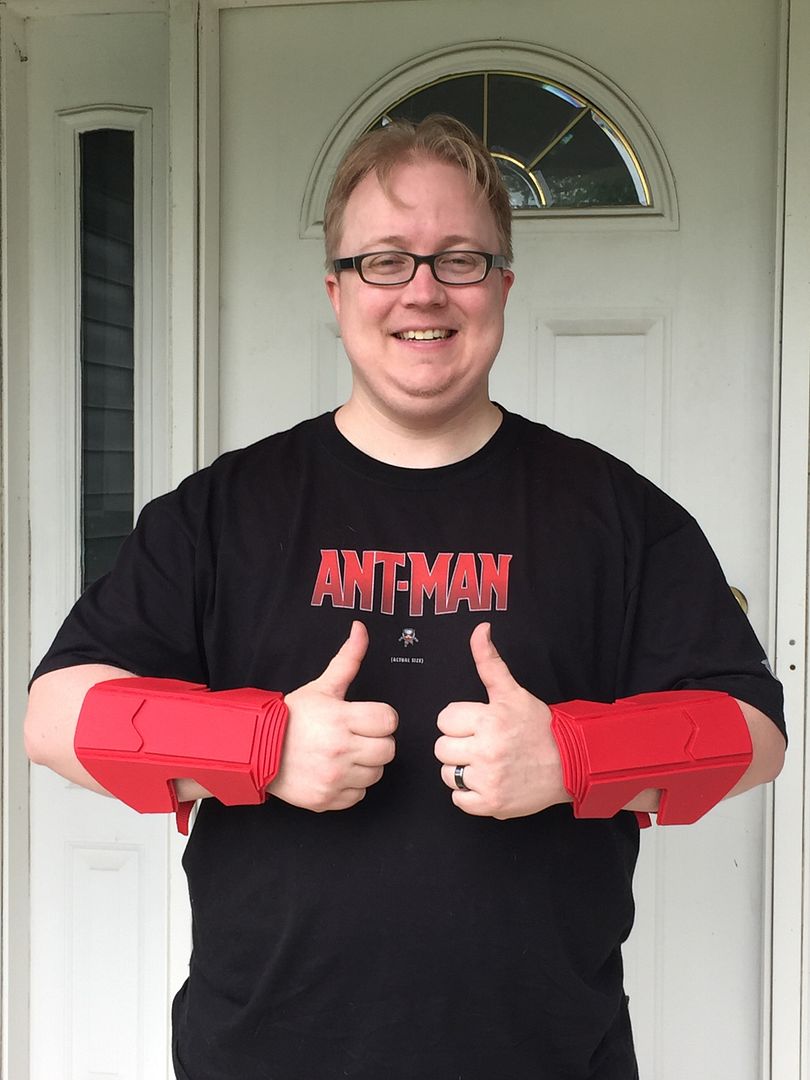
I think they look pretty good.
After getting them together, I set about looking for some gloves. I almost instantly decided against going with anything red, because I felt it would be too difficult to match the red of the gauntlets really well, and it would probably look a bit "off" with the two different colors right on top of each other.
I ride motorcycles as another hobby, and I have used a site called Leatherup for good quality, yet inexpensive, stuff in the past. I trolled their site a few times finding nothing. I looked in other places...one of the main things I was wanting was a glove that didn't have any logos or writing on it...and dang, that is a tall order to ask!!! The types of gloves I wanted...aggressive looking, protective looking...all have logos emblazoned all over them. I had almost resigned myself to getting some UnderArmour gloves with the actual Captain America shield logo on the palms of them...they were receiver gloves (or batting gloves) and I would then try to find some way to remove the UA logo from the back of the hand...however...I checked Leatherup one more time, and low and behold...a pair of brown, real leather, no logo, black trimmed gloves. I ordered them immediately.
Why brown?? Well, I figured that I would go with details on the costume in brown "leather." This would be my nod to the outfit from "Winter Soldier," and it would also be a bit of a nod to the idea of the "Bucky Rescue" outfit from "The First Avenger." I figured I'd go brown leather gloves, brown leather boots, do the utility belt in brown, and the underhelmet in brown.
This is what I ended up with when that was all said and done.
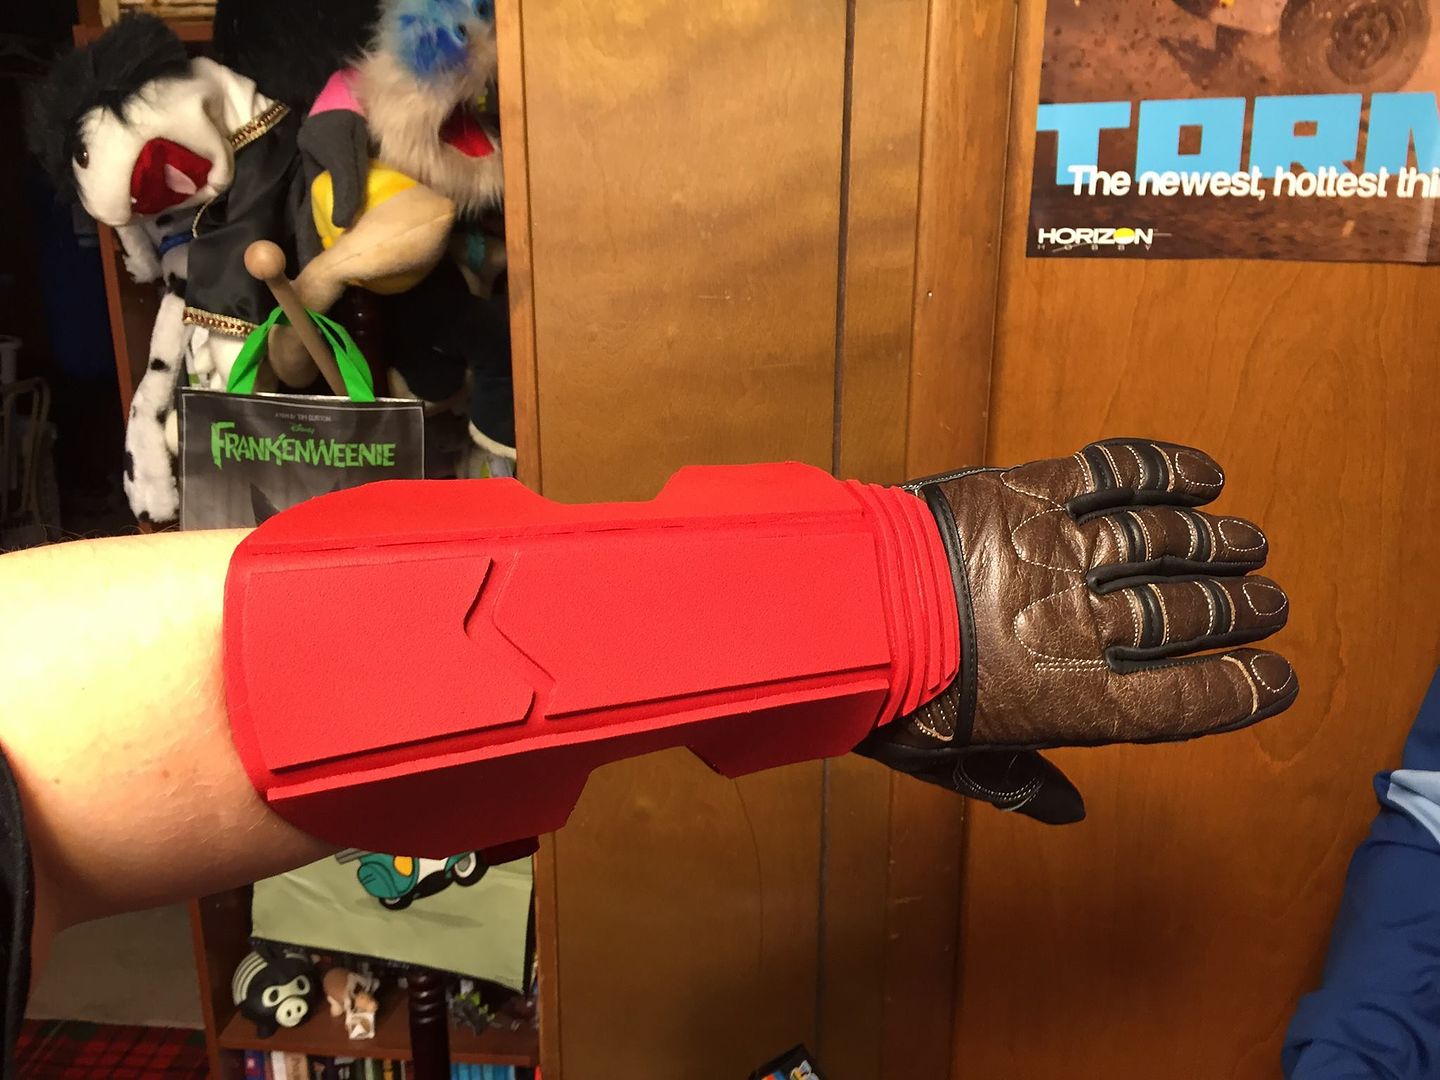
What you can't really see in that photo is that the back of the glove, near the wrist, actually has lines very similar to the front of the gauntlet, so it's like they were meant to be together!!!
While I was busy searching for the gloves and putting the finishing touches on the gauntlets, I had actually taken it upon myself to build FOUR helmets.
The first one was basically just to see if I could do it at all. The second one was painted and effectively finished, but was entirely meant to be a "rough draft" of sorts...a helmet that I completed, but basically just to learn what I was doing. The third one I tried scaling a bit differently to see if it would work out better slightly larger...it didn't. The fourth one was the helmet that I eventually finished.
I started out with standard EVA foam, of the 5mm variety. The trim was done with 5mm EVA and 2mm EVA. I put the helmet together with hot glue, then sealed it with my heat gun, laid four coats of thinned PVA glue (Elmer's), and finally put several coats of white PlastiDip on it to provide protection, a bit more firmness, and a texture that would resemble, very slightly, leather. I was going for the look of kind of a WWII style pilot's helmet, and when it was all done, I think I got what I was going for.
After the final coat of PlastiDip, I then put several coats of blue acrylic paint on with a roller. It worked very well. The paint ended up being slightly lighter in a few areas near the trim, which actually makes it look more like leather to me. After the paint, several coats of matte clear were put down to finish the look.
This is what I ended up with.

I didn't trust myself to make a stencil and paint on the graphics, so I contacted Callie at Callie-Graphics.com. I've used Callie for a LOT of RC vehicle graphics, and she does top notch work, so I trusted she'd be able to get me what I was looking for. I found the look that I wanted, go the images created, and sent them off to her. She cleaned up some of the pixilation on my PC Paint images, and sent me back perfect graphics...just what I was wanting!!!
The graphics on the helmet are pretty close to the helmet in "The First Avenger," and that is the overall look I was going for with the helmet.
Now that the helmet was pretty much done, it was time to start working on the under helmet.
I had initially planned on sewing one from real leather. I cut up an old tan leather jacket, tried my best to dye the leather darker, and ended up with leather that looked pretty good. However, when I started working with it, it was clear that the dye wasn't really doing a good job of sticking to the outside of the leather...as I moved it and messed with it, it was flaking off. Back to the drawing board.
I had some brown vinyl that I had gotten to work on something...it was part of the costume, but I don't really know what I got it for...and I ended up using that. It's a slightly different color brown than the gloves (and probably the rest of the accessories) but I figure that those things will all be far enough away from each other that slight differences won't be as noticeable as they would have been had I tried the red gloves.
After a bunch of different designs and tries, I ultimately ended up with this as the visible portion of the under helmet.
One thing that I've learned through building this helmet is that my ears are not only small (people have always made fun of me for that), but they are also placed in a strange spot on my head...low and pretty far back!!! I can now see what everyone was saying when they'd poke fun at me!!!! :lol So, the under helmet needed to be designed in a way to cover my ears entirely without looking too "big" or "awkward." I felt pretty good about the overall design, and I think it looks pretty good...I like it, at least.
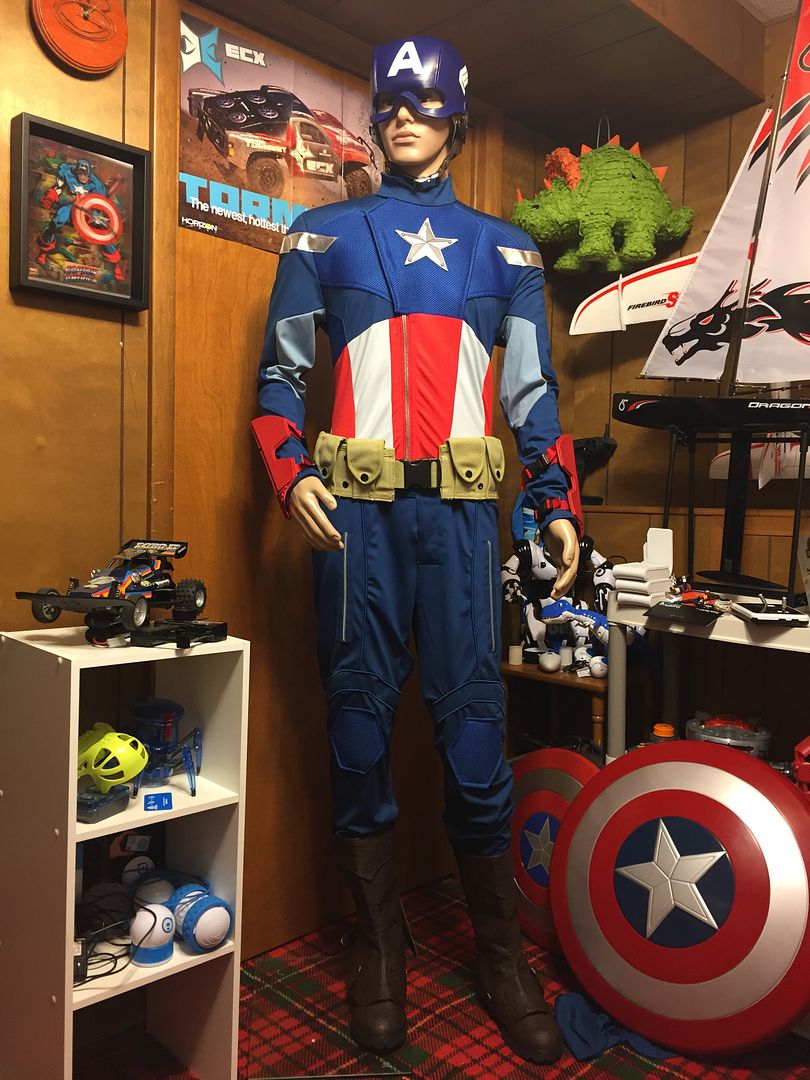
It was at about this time that I decided to fulfill a very strange lifelong dream of mine...the dream of owning a mannequin. I don't know why, but ever since I was a little kid I wanted a mannequin...and it was time to get one, to display the costume, to hold things in place, and to help me visualize things as they would look on an actual figure. I went with one from Amazon, and paid them the $8 to overnight it to me. When one does something odd like buy a mannequin, said mannequin NEEDS to be there as quickly as possible.
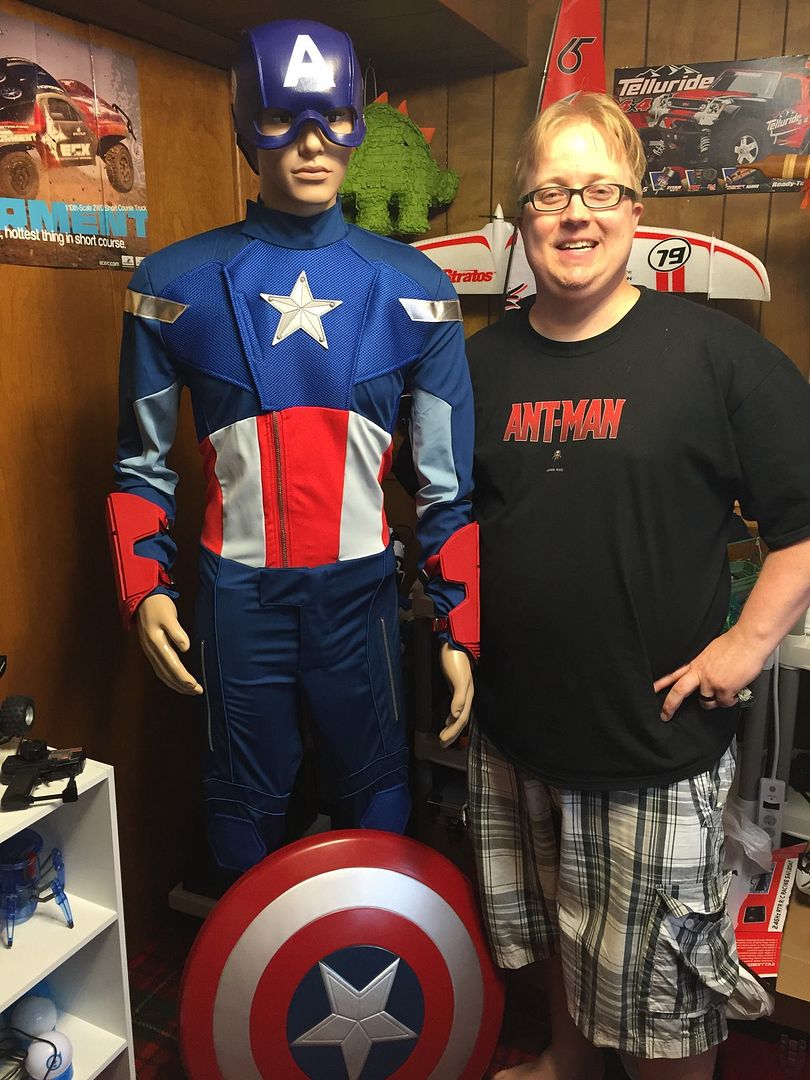
It is at this point that I feel that I should point something out. I wear a uniform to work, so often times when I get home, I just throw a T-shirt on, especially if I'm not going anywhere. The Ant-Man shirt in most of these photos is the one I toss on whenever I'm going to be working in the hobby room...so yes, I have more than one shirt...but yes, I happen to be wearing the same shirt in all these photos!!! :lol
Now that the mannequin was here, it was time to go back to working on the helmet...at this point I really went back and forth on how I wanted to detail the sides of it...I had originally planned on making some hexagons to put in the ear arches, but when I made them it created a new problem...one of the ear arches has an angle that's slightly different than the other one. With nothing in it, it's virtually impossible to tell. However, once you try to put some hexagons in there, it becomes much more apparent. I then toyed with the idea of putting some circles in there, but decided against that as well.
I was getting frustrated, which is when I realized I was trying too hard to make the helmet look like the ones from the movie...something that I don't really have the skill to do. I also got to the point where I had spent the money that I had budgeted on the helmet, so buying more materials or things was something I didn't want to do. I'll be honest, with this helmet, a few times I kind of felt like I could have just bought a fully finished one from one of the builders here on RPF and been done with it...but, I wanted to try to make as many things for the costume as I could, so I didn't really want to do that. I will probably still end up buying one eventually, but only to display in my media room when it's finished.
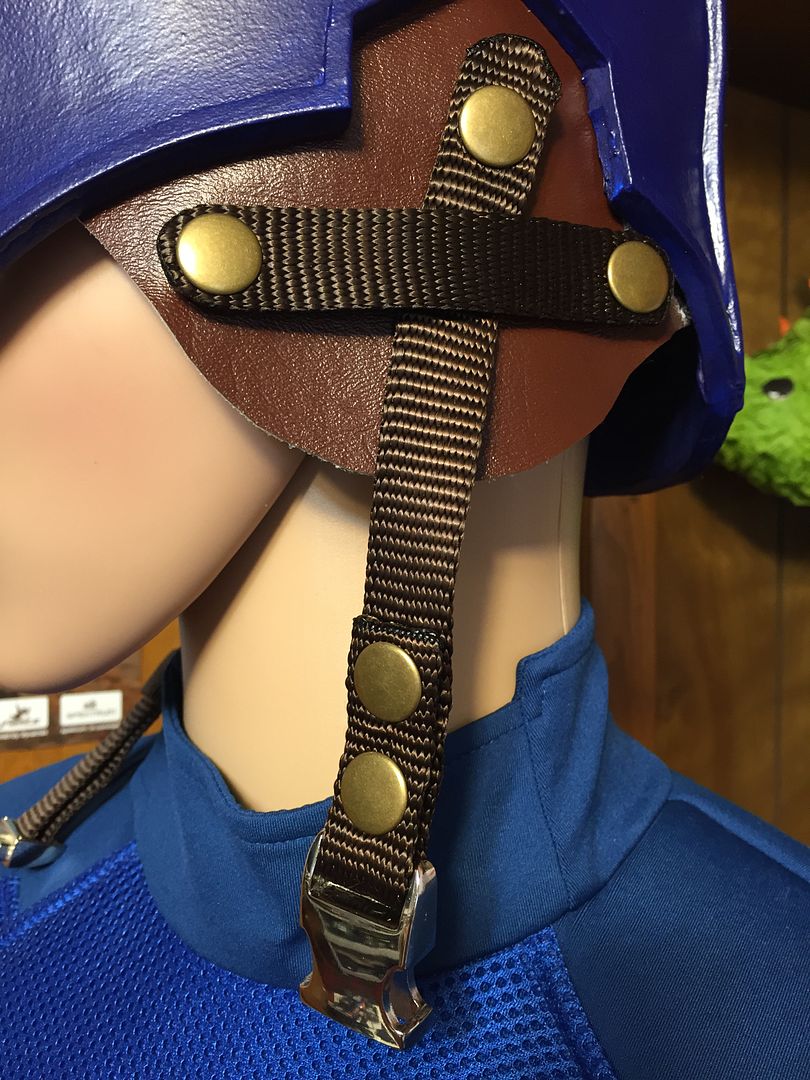
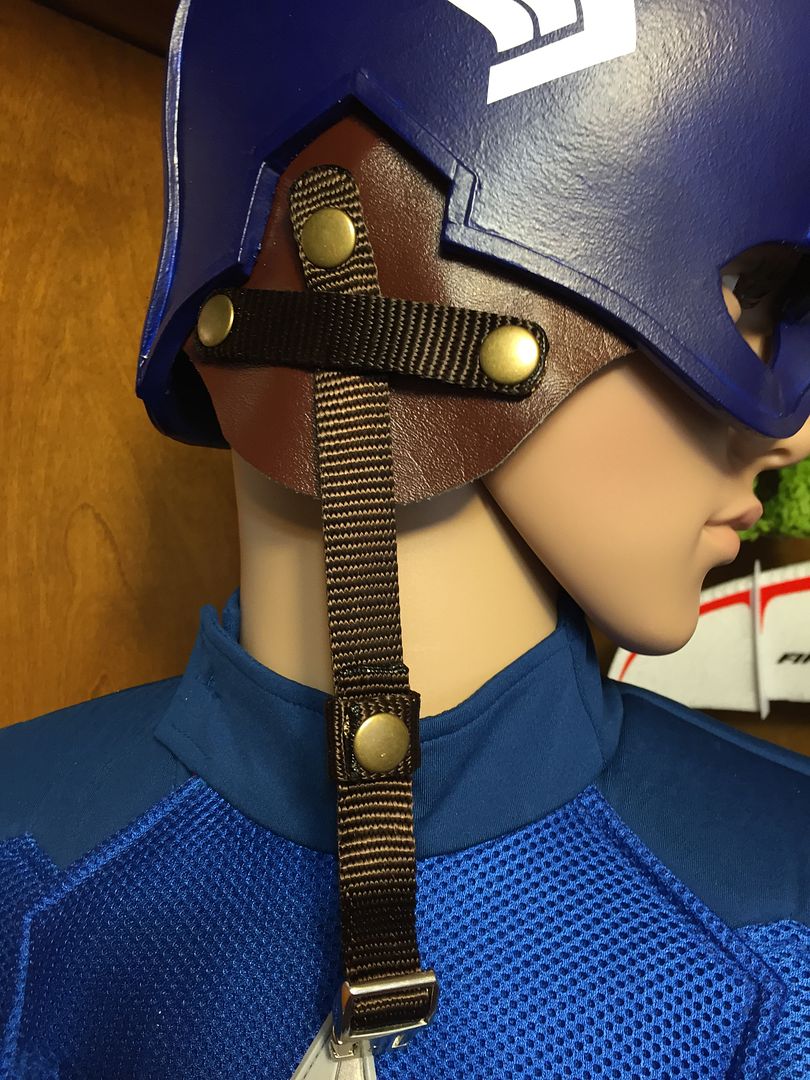
Anyway, I ended up deciding to just use some webbing and create a unique, but basic, design on the side of the helmet for the chin strap. After looking at it, I finally found something that I liked quite a bit, and went ahead with it.
It's not from any specific movie or anything, it was just something that I put together and liked...but I still think it looks like something that you might find on a Captain America helmet, so I'm really happy with my end result.
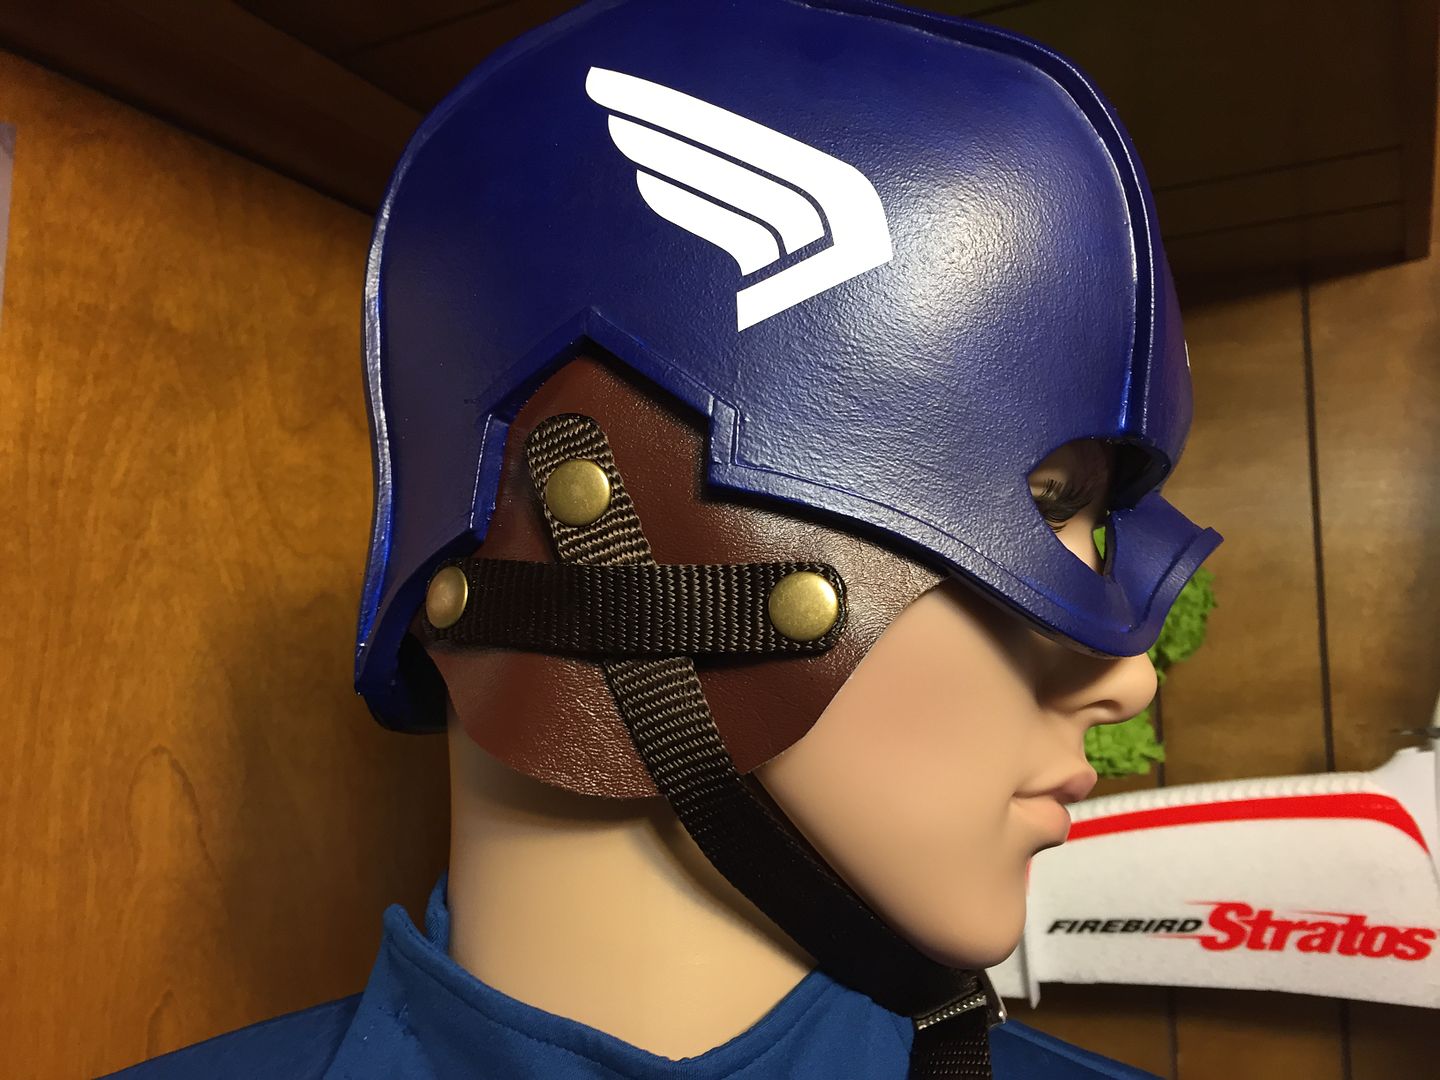
The only thing left to do is to find a keeper to keep the tail of the strap flush with the rest of it on the adjustable side of the chrome side release buckle.
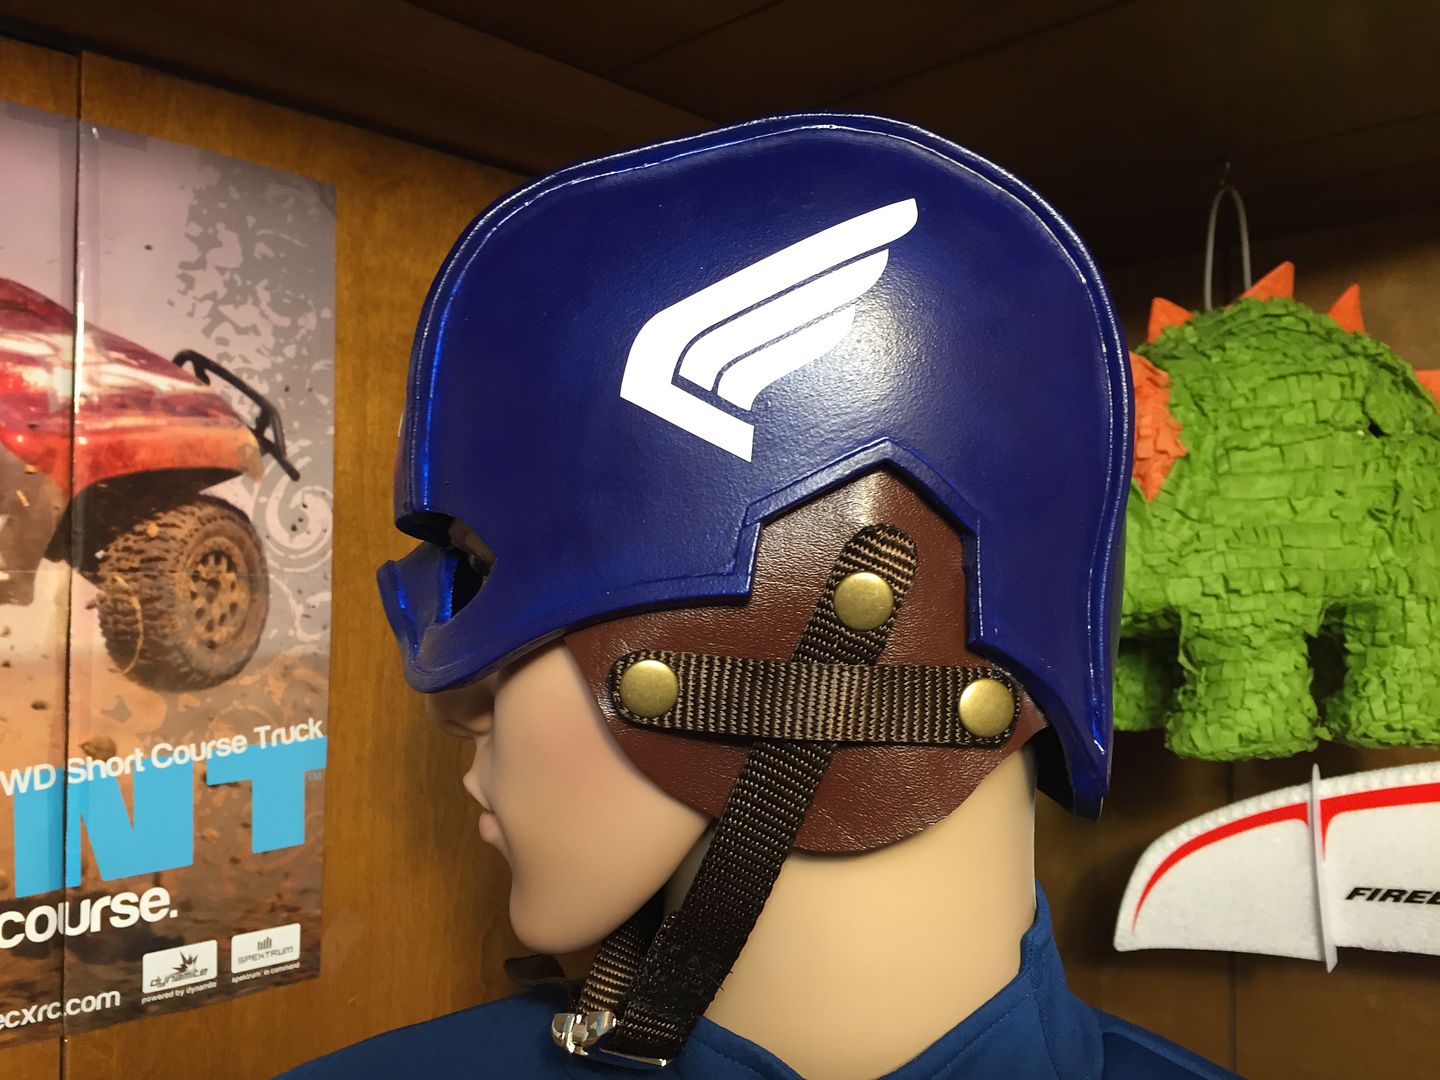
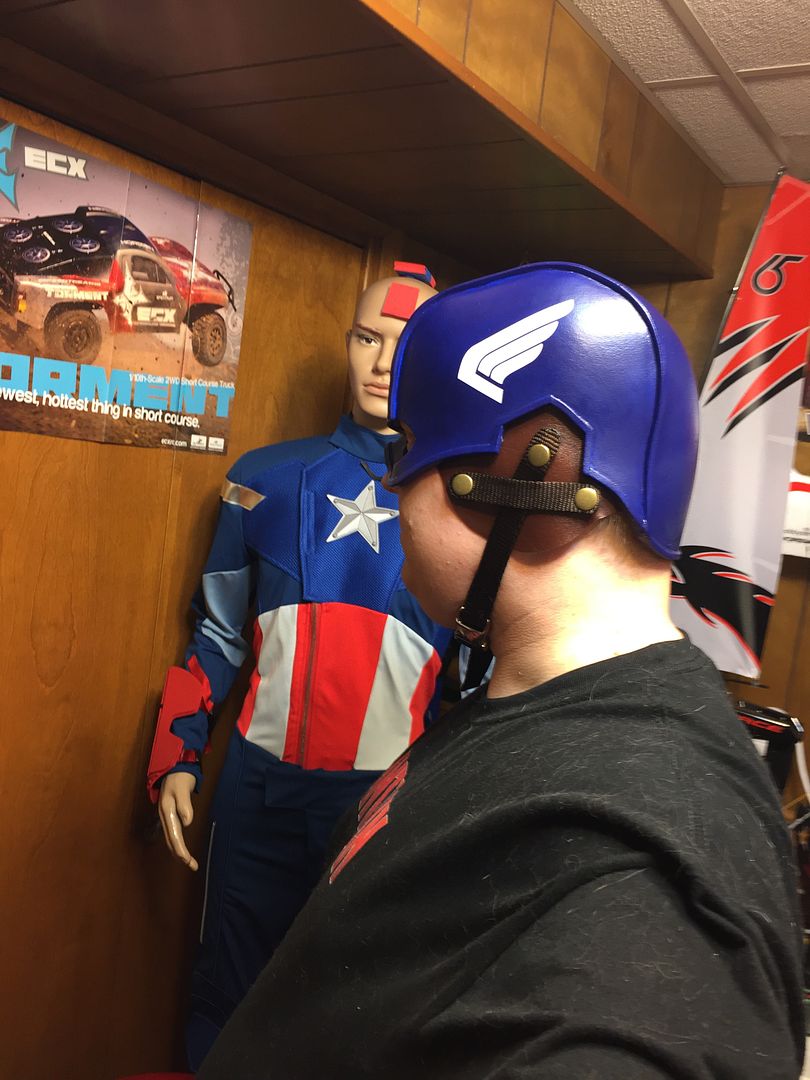
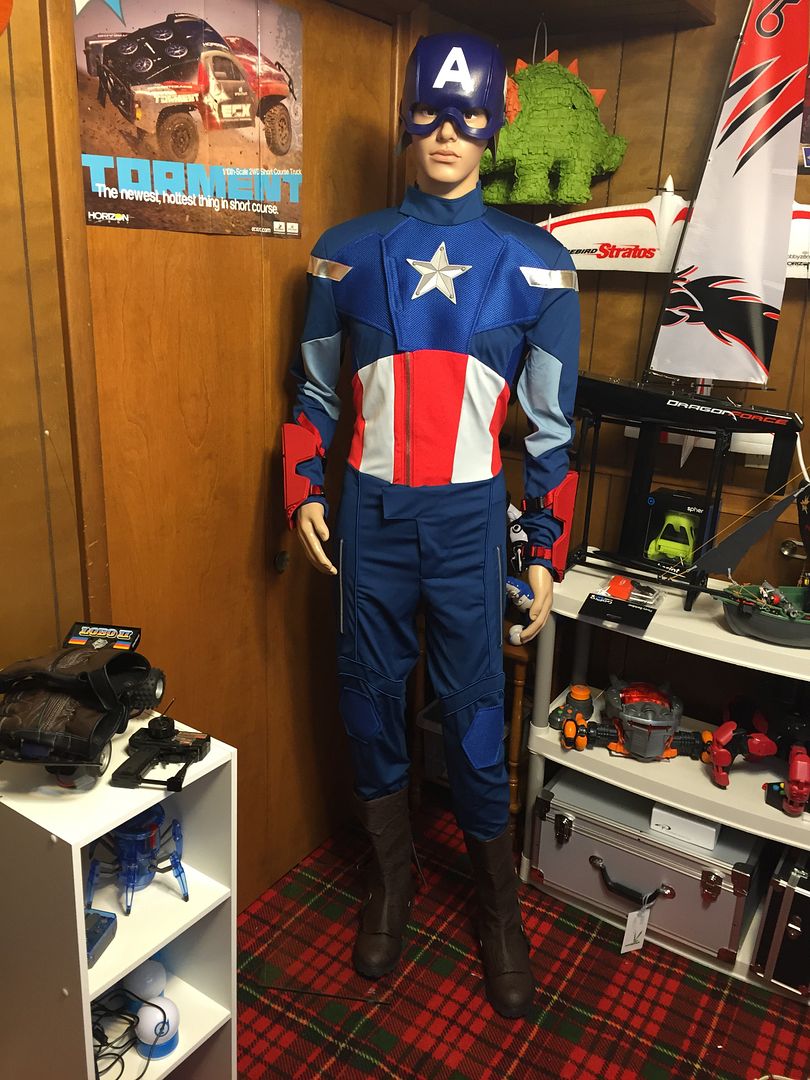
I really like how the helmet has turned out. It's unique, probably the only one like it, yet to me it's still very clearly a Cap helmet. I'm happy it's done, but kind of sad that now I don't get to work on it any longer.
At about the time that my helmet was nearing completion, I started working on ideas for boots. I had purchased the plans to make the boot covers from TheFoamCave, however, I realized that they were going to need some modifications to fit the way that I wanted them to. I also wanted some brown "leather" boots.
Here was the thing...I didn't want just normal combat boots, and I didn't want any modern boots. I wanted something that looked kind of old, but also unique. I thought about making some gaiters out of Neoprene, but stumbled upon some cosplay boots on Amazon that I thought would look pretty good. I may end up modding them a bit, however, I like the way they are as they sit pretty well...I think they fit well as something that kind of looks like some boots from WWII, but also unique and different.
They are a two piece boot. The boot itself is only about ankle high and fits me perfectly. The gaiter is then buckled on and held in place with those bronze buckles, which go really well with the bronze bits on the helmet. I am continuing to try to find a bronze side release buckle for the helmet, but as of now I've had no luck. Anyway, I think they go well with the costume. I may add some accessories to them, but as of now I'm thinking that they will just be exactly as they are.
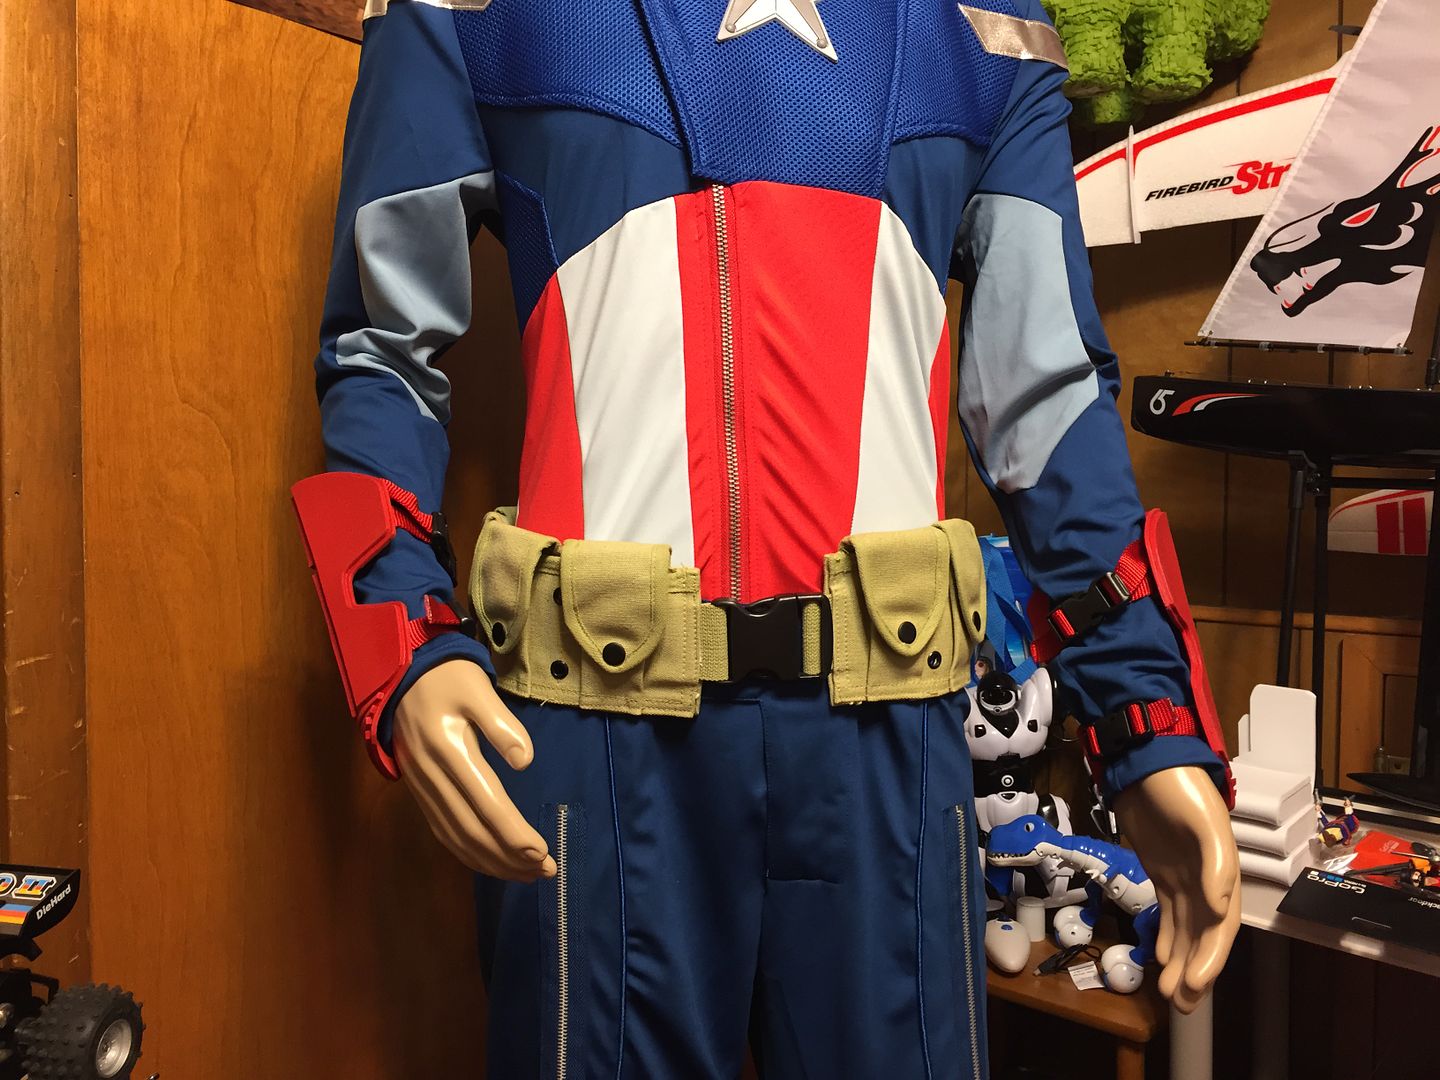
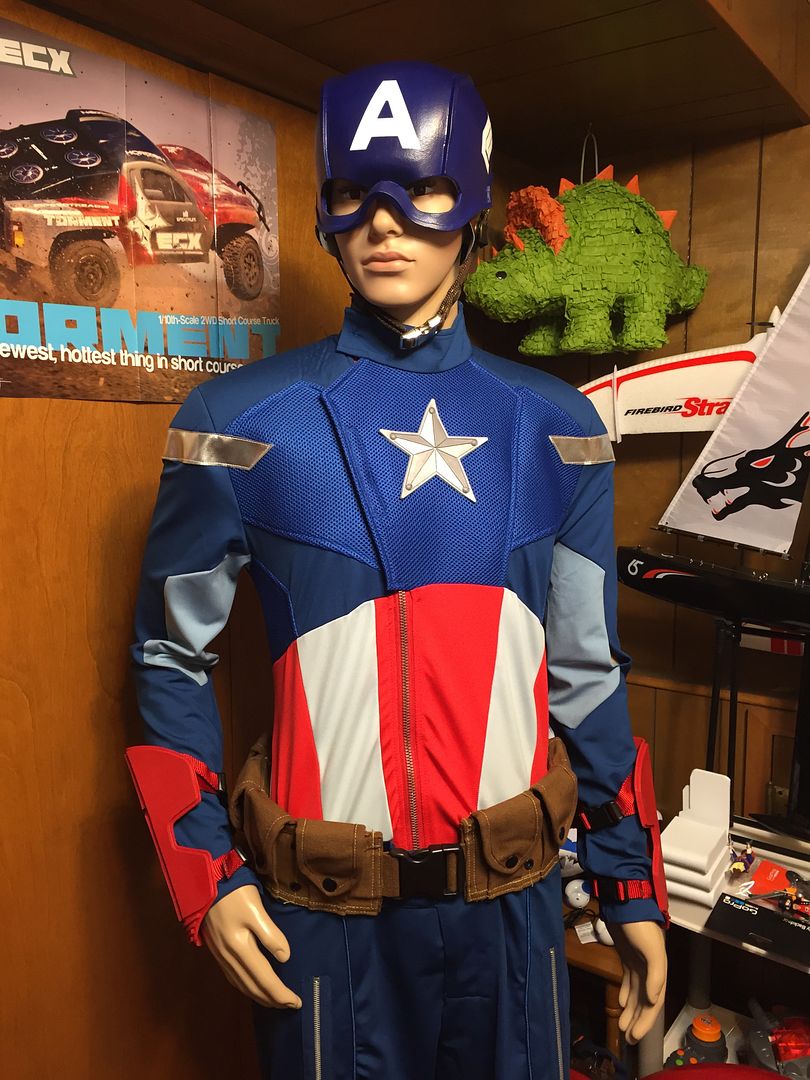
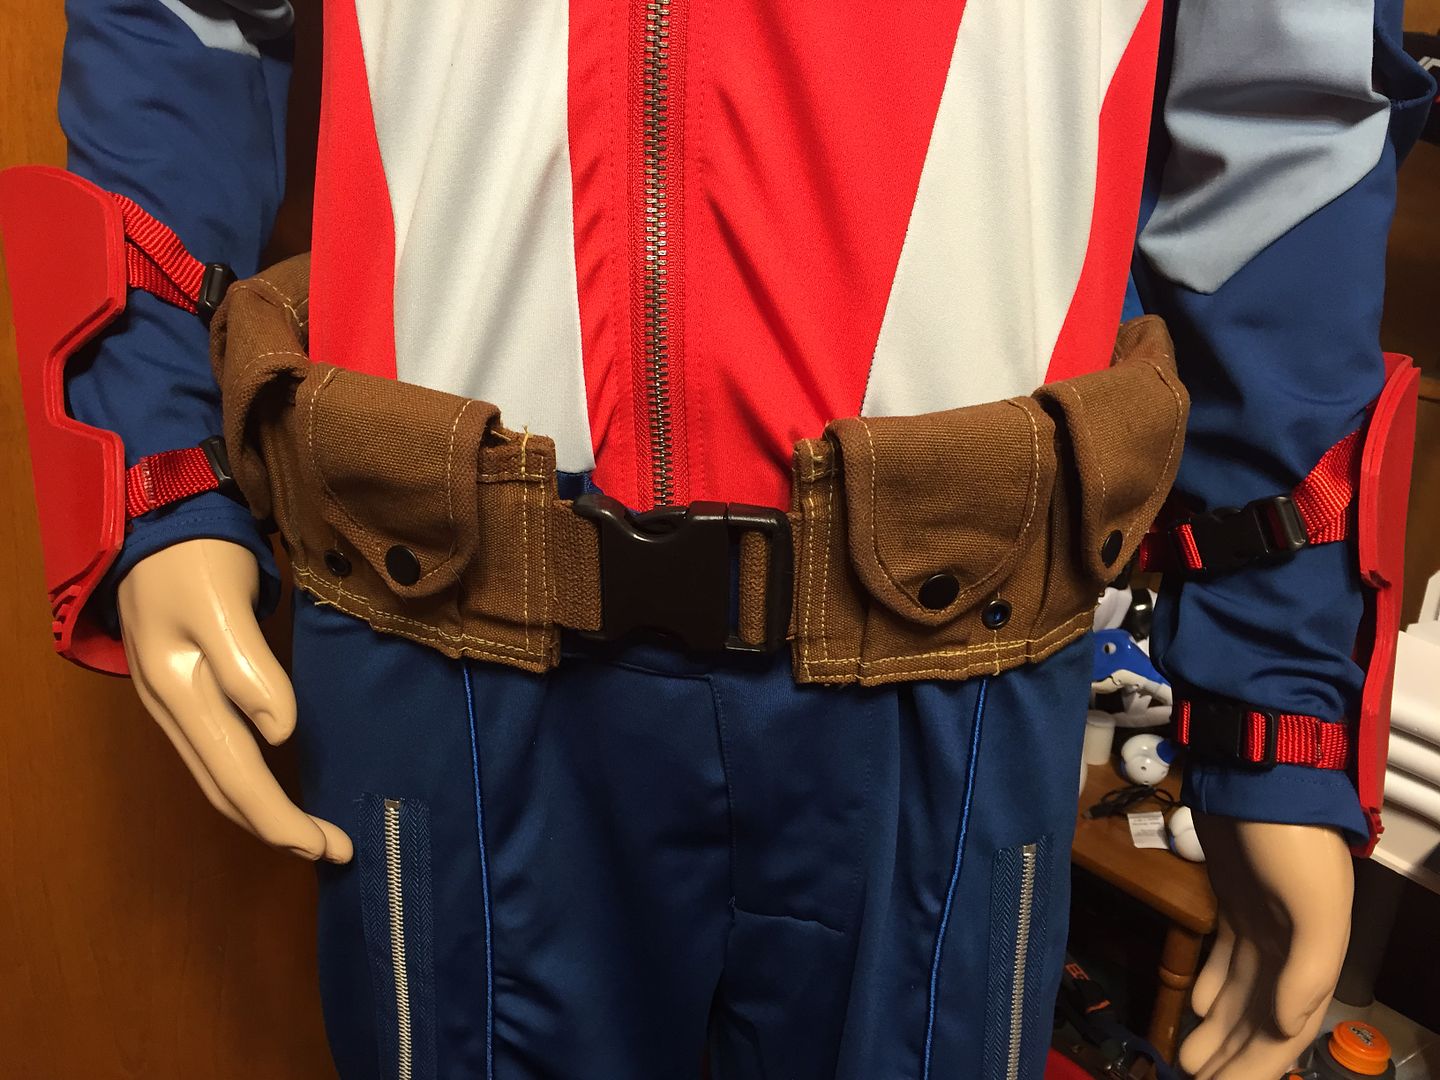
Next up is the utility belt. I'll be making it from TheFoamCave pattern, but doing some modifications to it to make it a bit easier to use, it will be brown, and I will be TRYING to find a bronze buckle to use with it.
I'd ultimately like all of the buckles and such to be bronze, as little details like that I think will really tie the whole thing together. I could try a brass one from Strapworks, but I'm not sure how close it will actually be to the color of the other bits. I'll keep my eyes open, though, and if I find something I'll snag it.
I also have one of the cheap plastic shields...but I'm currently trying to decide if I want to upgrade that by making it stronger, painting it, and adding nicer handle/straps, or if I want to build a heater shield like from the very first comic. Right now I'm kind of leaning towards heater shield, but who knows...I've got a lot of time to plan that. Also, I've got a pattern to make a set of coveralls that I'm working on modifying so that the zipper is on the back, which I think will be a good start to putting together that "Stealth Suit" type of look. That's a VERY long way off, though.
Well, that's it for now. As I work on things, change things, or upgrade things I'll add more pictures.
Thanks for looking.
Jeff
In an effort to cut back on the new threads that I've been making, I will be making one "consolidated" build thread for my costume. I'll update it as I go, and add pictures and stuff as I can.
Some back story. A friend of mine suggested that we go to the Comic Con in Detroit (Novi) together. I told her I would, but that I would want to go in a costume. She's pretty into that kind of stuff, so she asked what I would want to do. I told her I would probably want to go as Captain America. She told me that if I put that together, she'll put together a Black Widow costume, red hair dye and all, and we can go to the show next spring. So, I have a while before the show, so I will be constantly doing things to the costume...changing, upgrading, adding, things like that.
I started doing some research, and ended up deciding that I didn't really want to go with one particular version of the Cap from any one particular source. I decided that I kind of wanted to do my own take on the character...something that would take bits and pieces from different sources and put them all together...but something that to me was still very obviously Cap.
So, the first thing that I did was buy a bodysuit. I can sew...but I can't do really intricate designs and patterns, so I figured I should start out with a premade suit with the intention of possibly trying to put a "Stealth Suit" type suit together myself once I had gotten the majority of the basic costume finished...basically, I'd have something that was premade just in case what I try to put together turns out terribly. I started looking around trying to find a suit that had good reviews without being too ridiculously expensive. I settled on a suit from "Avengers," knowing that I would have to replace most of the accessories that came with it due to the low quality of those pieces. This is the suit, here:
As soon as I got it, I thought it was pretty nice. It has one seam that needs to be sewn again, but that's no big deal. As I suspected, however, the rest of the stuff with it would definitely need replacing. The mask, belt, boot covers, gloves, and gauntlets are all pretty poor quality.
I started looking for things to replace them with, and found TheFoamCave. I downloaded the plans for the gauntlets, boot covers, and utility belt and set about my first attempts at using EVA foam to do anything. At this point in time, I got the stuff all from the "Avengers" version of the suit, but my plan was still to modify some of the stuff to be my own. These were just what I was going to use as the building blocks of the costume.
After the first attempt, I had this...
I didn't like the way that the pattern had the gauntlets mount to the arms...it was just using thicker foam and Velcro. I wanted something that looked a bit "nicer," for lack of a better word. The rest of the pattern, I thought, was great. With the help of Strapworks.com I was able to get some webbing straps and some side release clips, and I ended up with some pretty workable gauntlets.
I was happy with how they turned out, and went with some red PlastiDip to finish them and add some protection.
I'm not sure why they appear so dark in this picture...it was something to do with my iPhone's auto selection of settings...
This is more what they look like, but not quite so washed out by the bright light.
I think they look pretty good.
After getting them together, I set about looking for some gloves. I almost instantly decided against going with anything red, because I felt it would be too difficult to match the red of the gauntlets really well, and it would probably look a bit "off" with the two different colors right on top of each other.
I ride motorcycles as another hobby, and I have used a site called Leatherup for good quality, yet inexpensive, stuff in the past. I trolled their site a few times finding nothing. I looked in other places...one of the main things I was wanting was a glove that didn't have any logos or writing on it...and dang, that is a tall order to ask!!! The types of gloves I wanted...aggressive looking, protective looking...all have logos emblazoned all over them. I had almost resigned myself to getting some UnderArmour gloves with the actual Captain America shield logo on the palms of them...they were receiver gloves (or batting gloves) and I would then try to find some way to remove the UA logo from the back of the hand...however...I checked Leatherup one more time, and low and behold...a pair of brown, real leather, no logo, black trimmed gloves. I ordered them immediately.
Why brown?? Well, I figured that I would go with details on the costume in brown "leather." This would be my nod to the outfit from "Winter Soldier," and it would also be a bit of a nod to the idea of the "Bucky Rescue" outfit from "The First Avenger." I figured I'd go brown leather gloves, brown leather boots, do the utility belt in brown, and the underhelmet in brown.
This is what I ended up with when that was all said and done.
What you can't really see in that photo is that the back of the glove, near the wrist, actually has lines very similar to the front of the gauntlet, so it's like they were meant to be together!!!
While I was busy searching for the gloves and putting the finishing touches on the gauntlets, I had actually taken it upon myself to build FOUR helmets.
The first one was basically just to see if I could do it at all. The second one was painted and effectively finished, but was entirely meant to be a "rough draft" of sorts...a helmet that I completed, but basically just to learn what I was doing. The third one I tried scaling a bit differently to see if it would work out better slightly larger...it didn't. The fourth one was the helmet that I eventually finished.
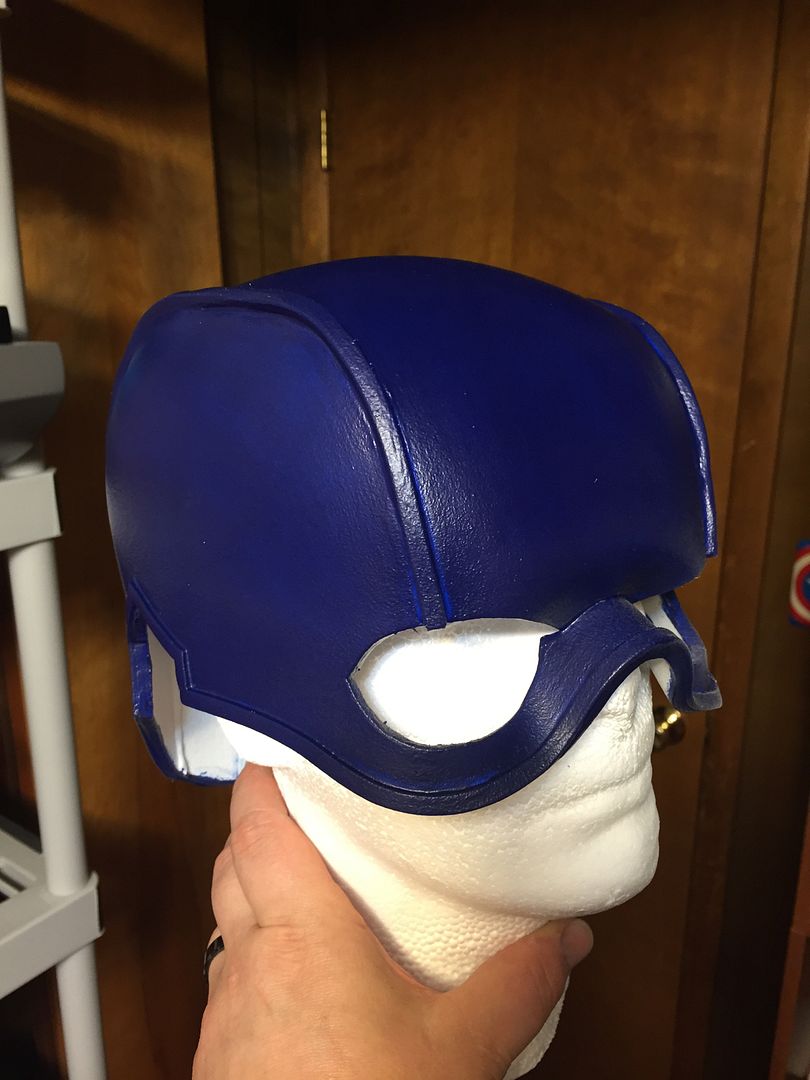
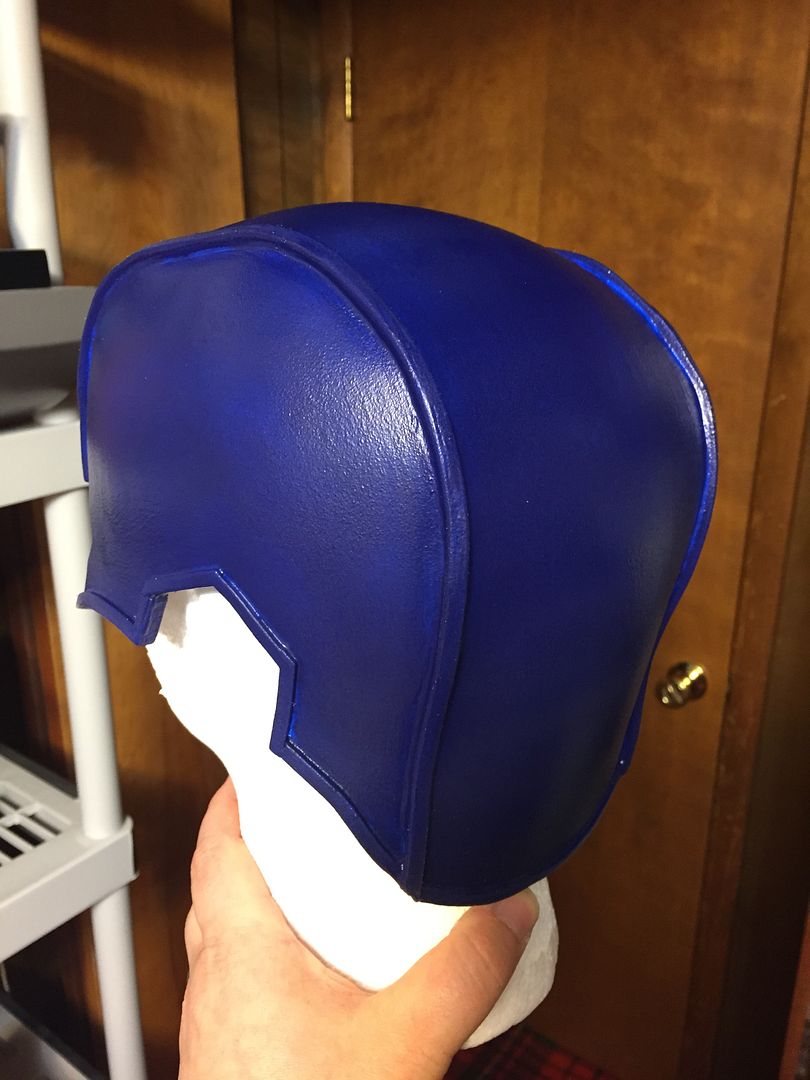
I started out with standard EVA foam, of the 5mm variety. The trim was done with 5mm EVA and 2mm EVA. I put the helmet together with hot glue, then sealed it with my heat gun, laid four coats of thinned PVA glue (Elmer's), and finally put several coats of white PlastiDip on it to provide protection, a bit more firmness, and a texture that would resemble, very slightly, leather. I was going for the look of kind of a WWII style pilot's helmet, and when it was all done, I think I got what I was going for.
After the final coat of PlastiDip, I then put several coats of blue acrylic paint on with a roller. It worked very well. The paint ended up being slightly lighter in a few areas near the trim, which actually makes it look more like leather to me. After the paint, several coats of matte clear were put down to finish the look.
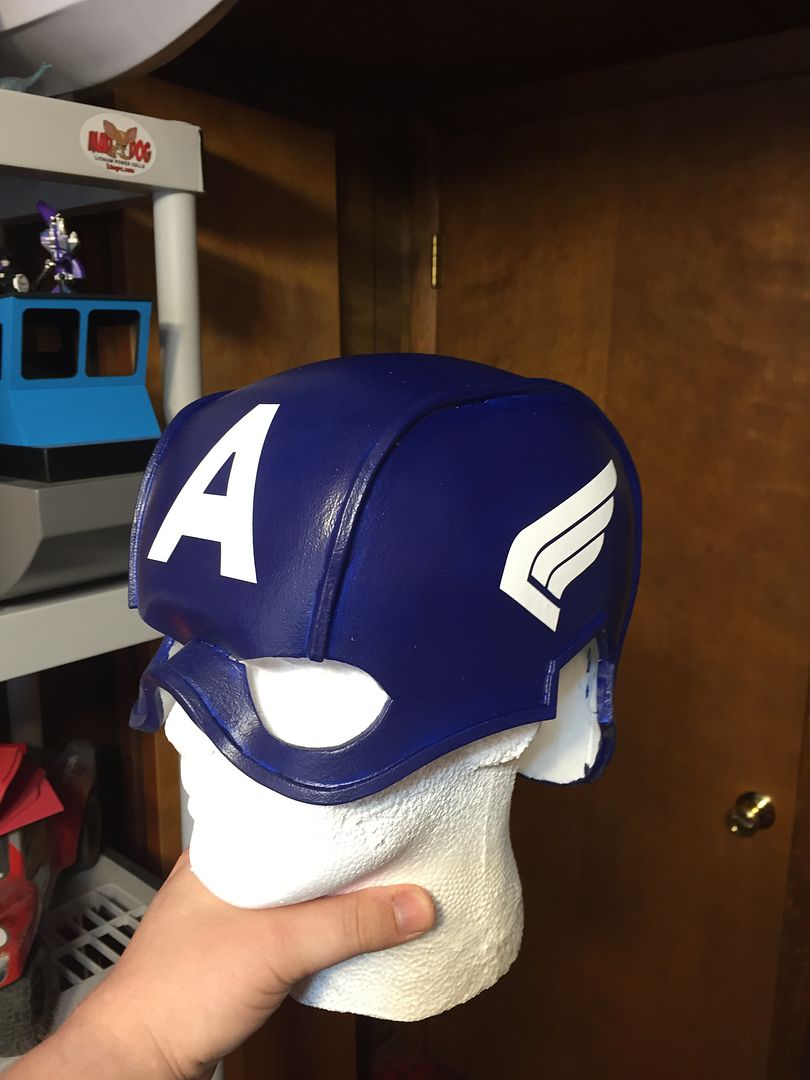
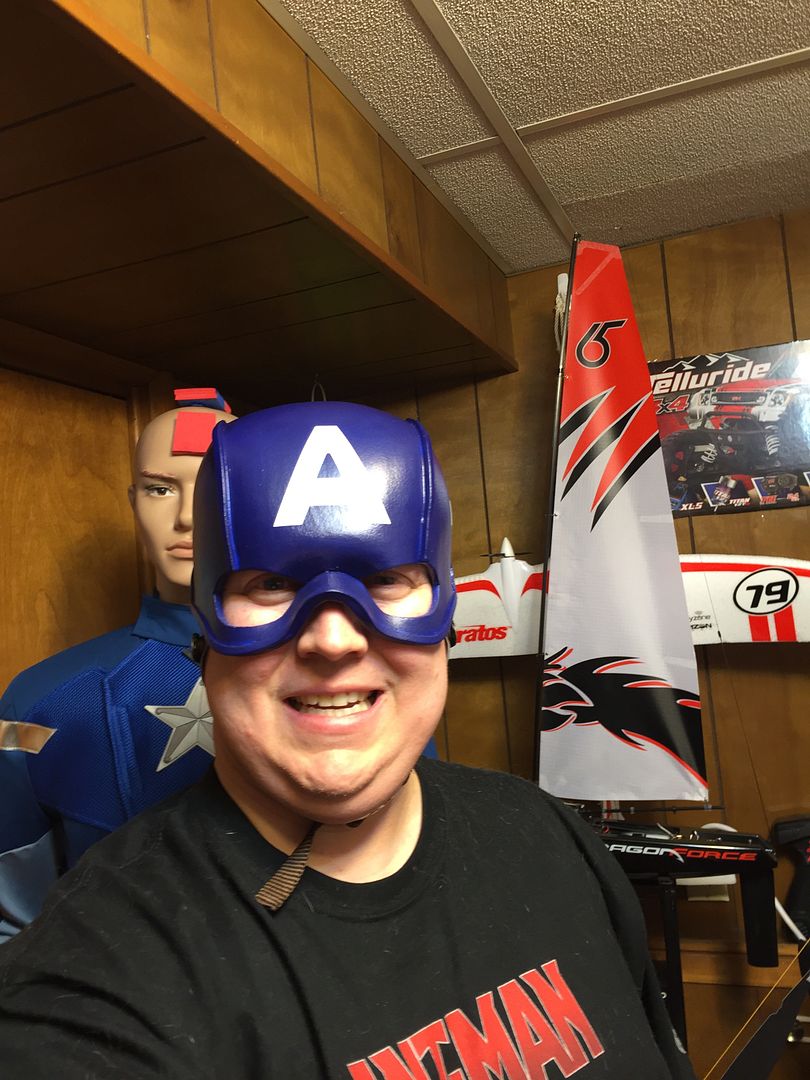
This is what I ended up with.
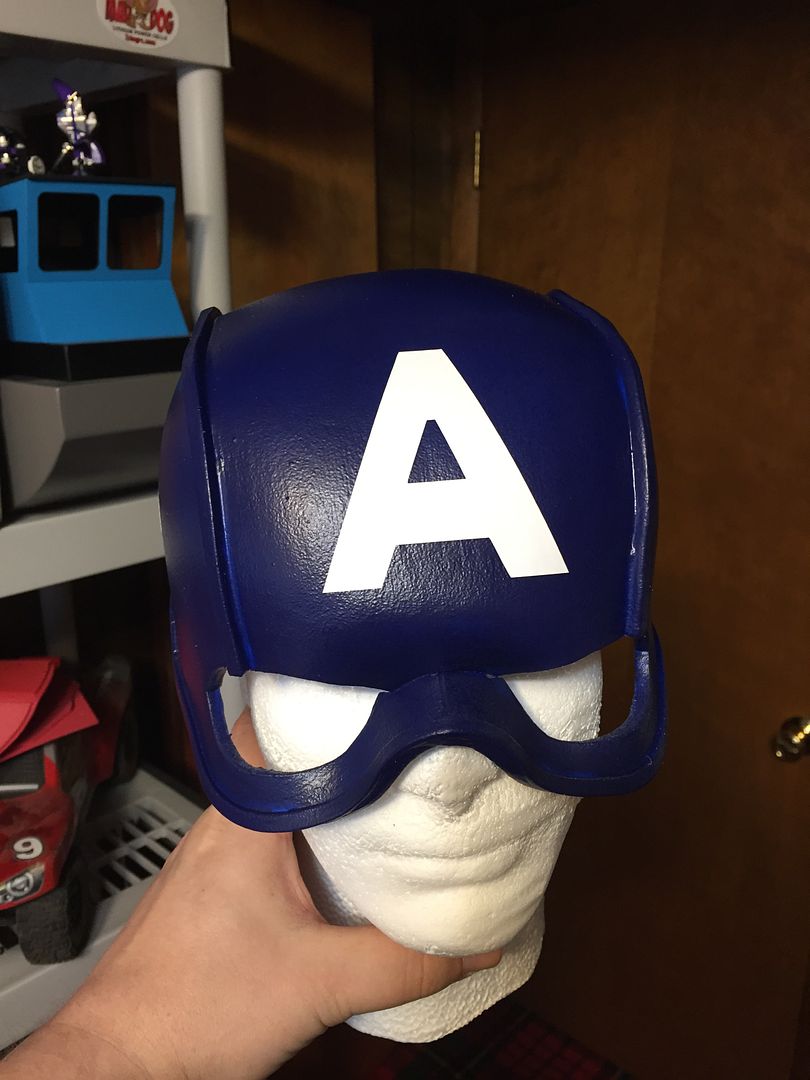
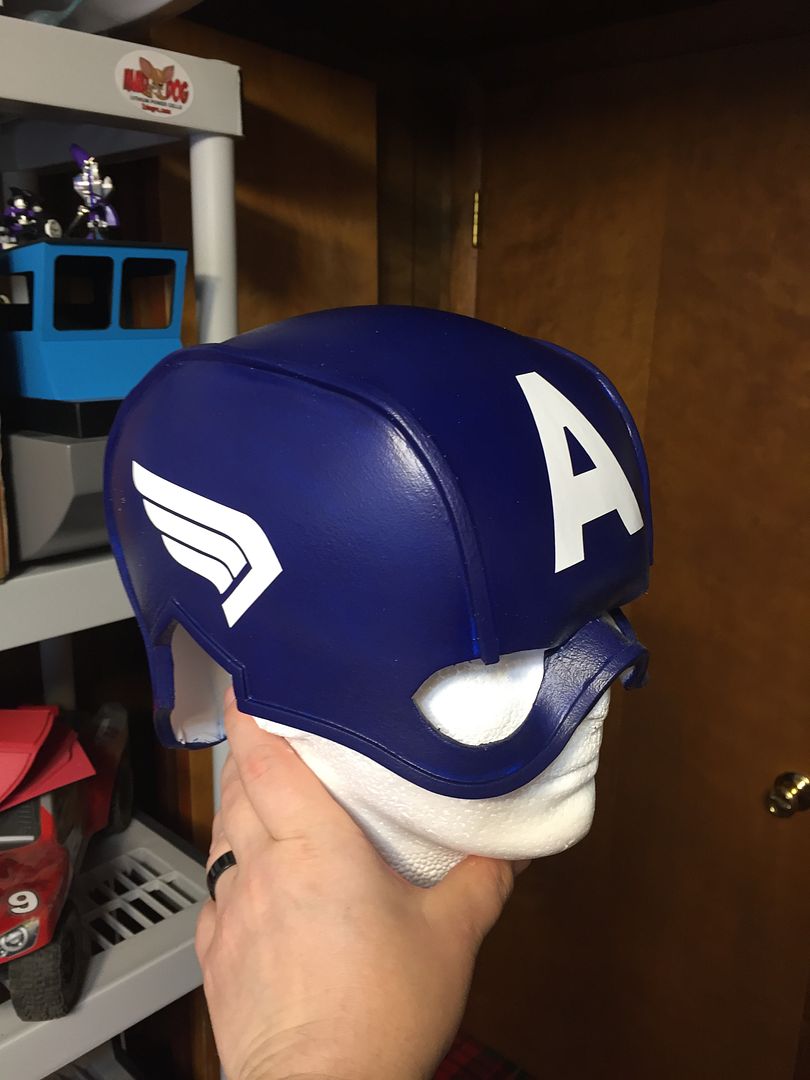
I didn't trust myself to make a stencil and paint on the graphics, so I contacted Callie at Callie-Graphics.com. I've used Callie for a LOT of RC vehicle graphics, and she does top notch work, so I trusted she'd be able to get me what I was looking for. I found the look that I wanted, go the images created, and sent them off to her. She cleaned up some of the pixilation on my PC Paint images, and sent me back perfect graphics...just what I was wanting!!!
The graphics on the helmet are pretty close to the helmet in "The First Avenger," and that is the overall look I was going for with the helmet.
Now that the helmet was pretty much done, it was time to start working on the under helmet.
I had initially planned on sewing one from real leather. I cut up an old tan leather jacket, tried my best to dye the leather darker, and ended up with leather that looked pretty good. However, when I started working with it, it was clear that the dye wasn't really doing a good job of sticking to the outside of the leather...as I moved it and messed with it, it was flaking off. Back to the drawing board.
I had some brown vinyl that I had gotten to work on something...it was part of the costume, but I don't really know what I got it for...and I ended up using that. It's a slightly different color brown than the gloves (and probably the rest of the accessories) but I figure that those things will all be far enough away from each other that slight differences won't be as noticeable as they would have been had I tried the red gloves.
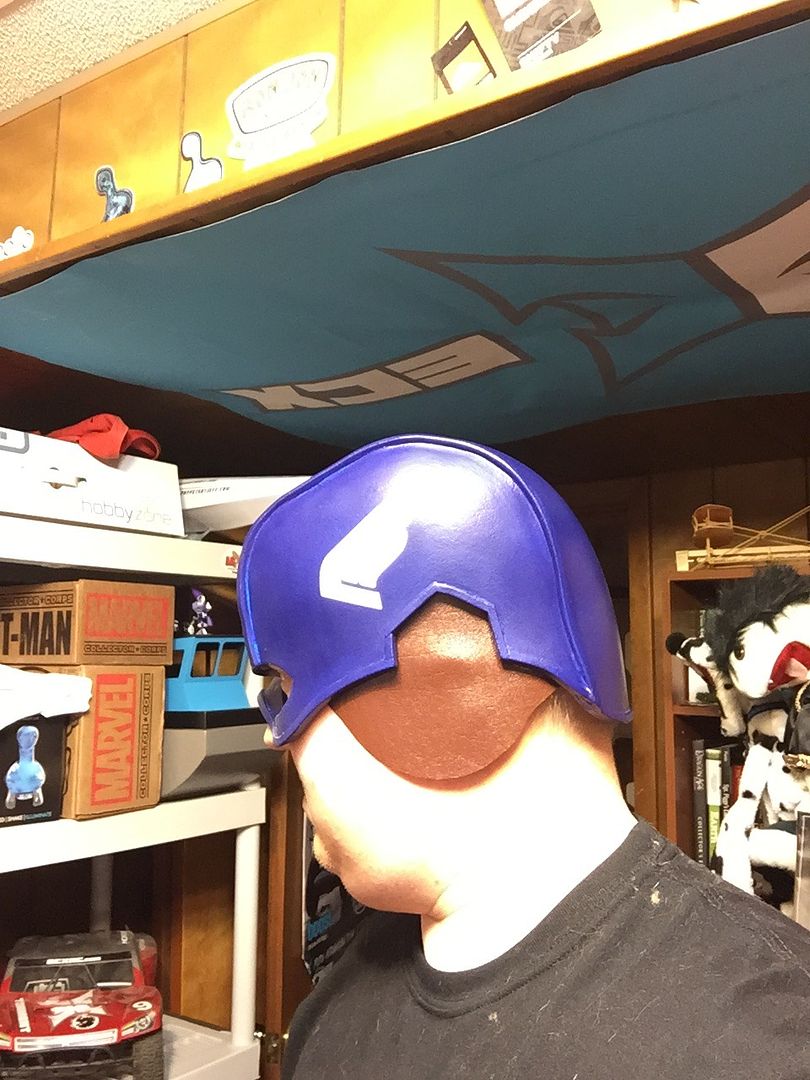
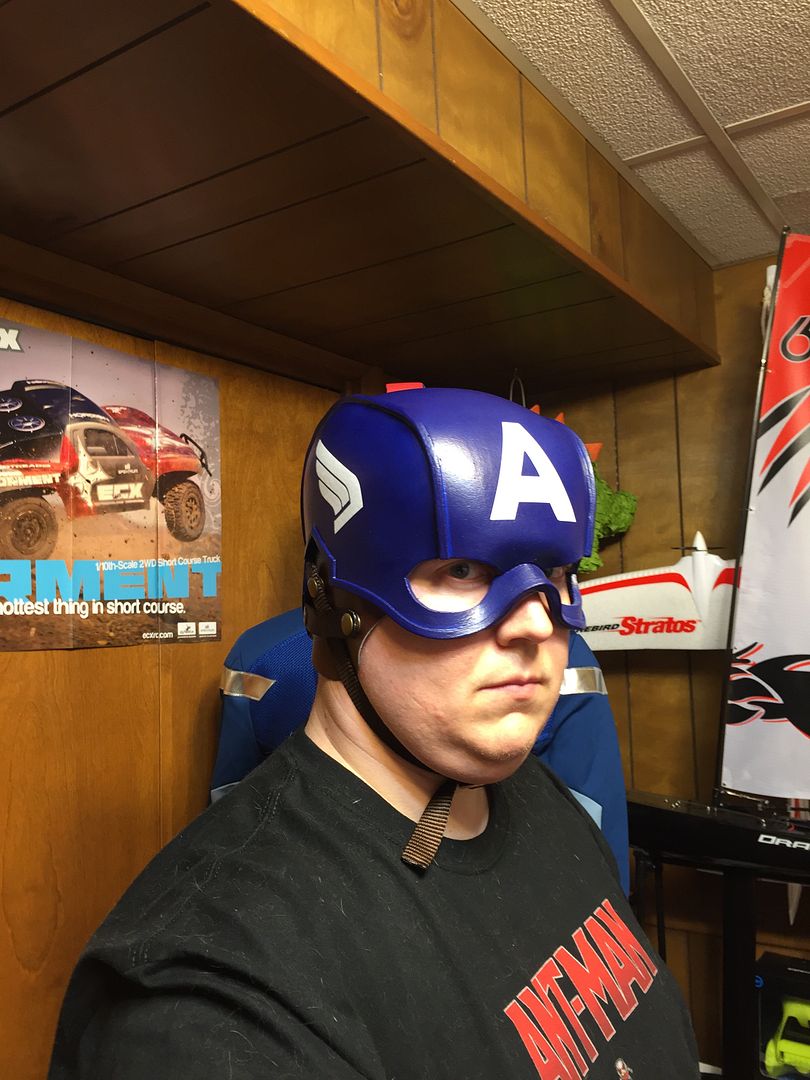
After a bunch of different designs and tries, I ultimately ended up with this as the visible portion of the under helmet.
One thing that I've learned through building this helmet is that my ears are not only small (people have always made fun of me for that), but they are also placed in a strange spot on my head...low and pretty far back!!! I can now see what everyone was saying when they'd poke fun at me!!!! :lol So, the under helmet needed to be designed in a way to cover my ears entirely without looking too "big" or "awkward." I felt pretty good about the overall design, and I think it looks pretty good...I like it, at least.
It was at about this time that I decided to fulfill a very strange lifelong dream of mine...the dream of owning a mannequin. I don't know why, but ever since I was a little kid I wanted a mannequin...and it was time to get one, to display the costume, to hold things in place, and to help me visualize things as they would look on an actual figure. I went with one from Amazon, and paid them the $8 to overnight it to me. When one does something odd like buy a mannequin, said mannequin NEEDS to be there as quickly as possible.
It is at this point that I feel that I should point something out. I wear a uniform to work, so often times when I get home, I just throw a T-shirt on, especially if I'm not going anywhere. The Ant-Man shirt in most of these photos is the one I toss on whenever I'm going to be working in the hobby room...so yes, I have more than one shirt...but yes, I happen to be wearing the same shirt in all these photos!!! :lol
Now that the mannequin was here, it was time to go back to working on the helmet...at this point I really went back and forth on how I wanted to detail the sides of it...I had originally planned on making some hexagons to put in the ear arches, but when I made them it created a new problem...one of the ear arches has an angle that's slightly different than the other one. With nothing in it, it's virtually impossible to tell. However, once you try to put some hexagons in there, it becomes much more apparent. I then toyed with the idea of putting some circles in there, but decided against that as well.
I was getting frustrated, which is when I realized I was trying too hard to make the helmet look like the ones from the movie...something that I don't really have the skill to do. I also got to the point where I had spent the money that I had budgeted on the helmet, so buying more materials or things was something I didn't want to do. I'll be honest, with this helmet, a few times I kind of felt like I could have just bought a fully finished one from one of the builders here on RPF and been done with it...but, I wanted to try to make as many things for the costume as I could, so I didn't really want to do that. I will probably still end up buying one eventually, but only to display in my media room when it's finished.
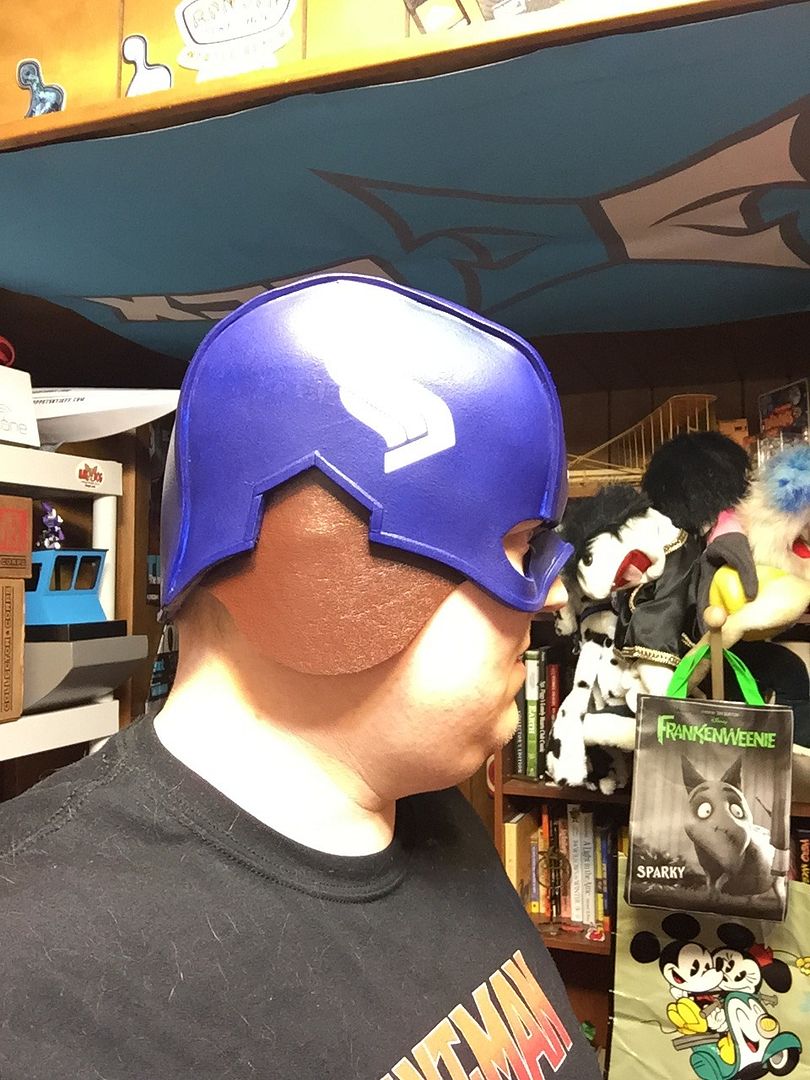
Anyway, I ended up deciding to just use some webbing and create a unique, but basic, design on the side of the helmet for the chin strap. After looking at it, I finally found something that I liked quite a bit, and went ahead with it.
It's not from any specific movie or anything, it was just something that I put together and liked...but I still think it looks like something that you might find on a Captain America helmet, so I'm really happy with my end result.
The only thing left to do is to find a keeper to keep the tail of the strap flush with the rest of it on the adjustable side of the chrome side release buckle.
I really like how the helmet has turned out. It's unique, probably the only one like it, yet to me it's still very clearly a Cap helmet. I'm happy it's done, but kind of sad that now I don't get to work on it any longer.
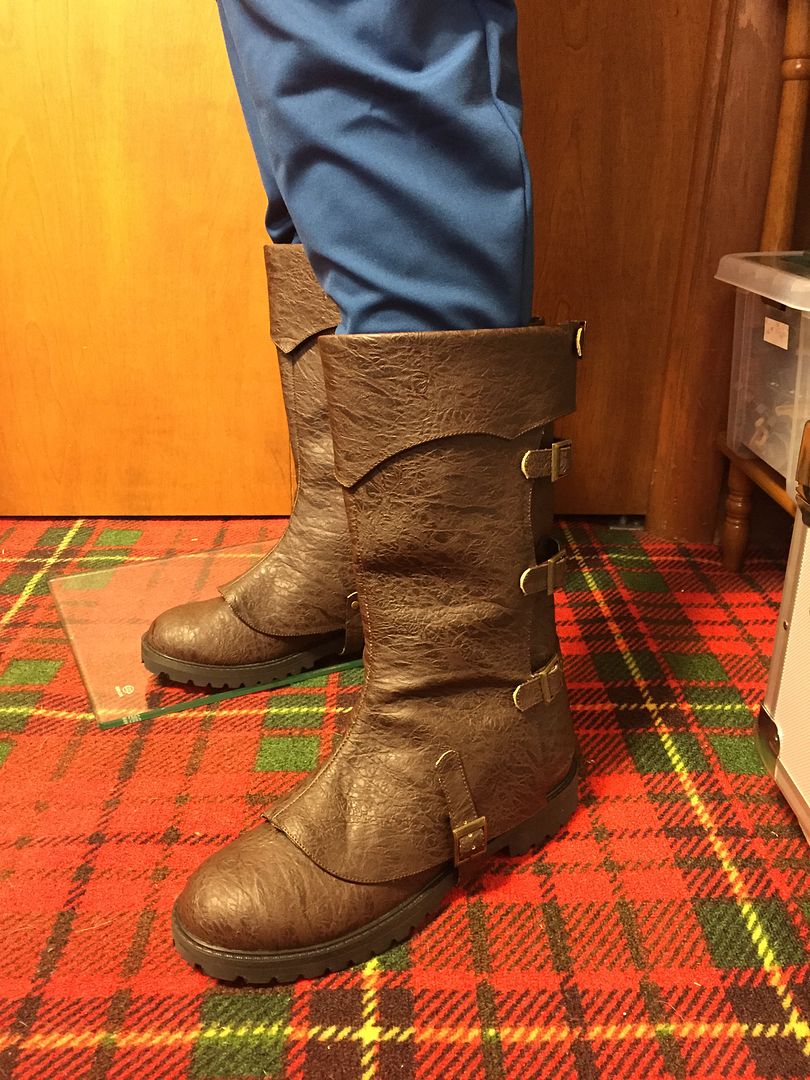
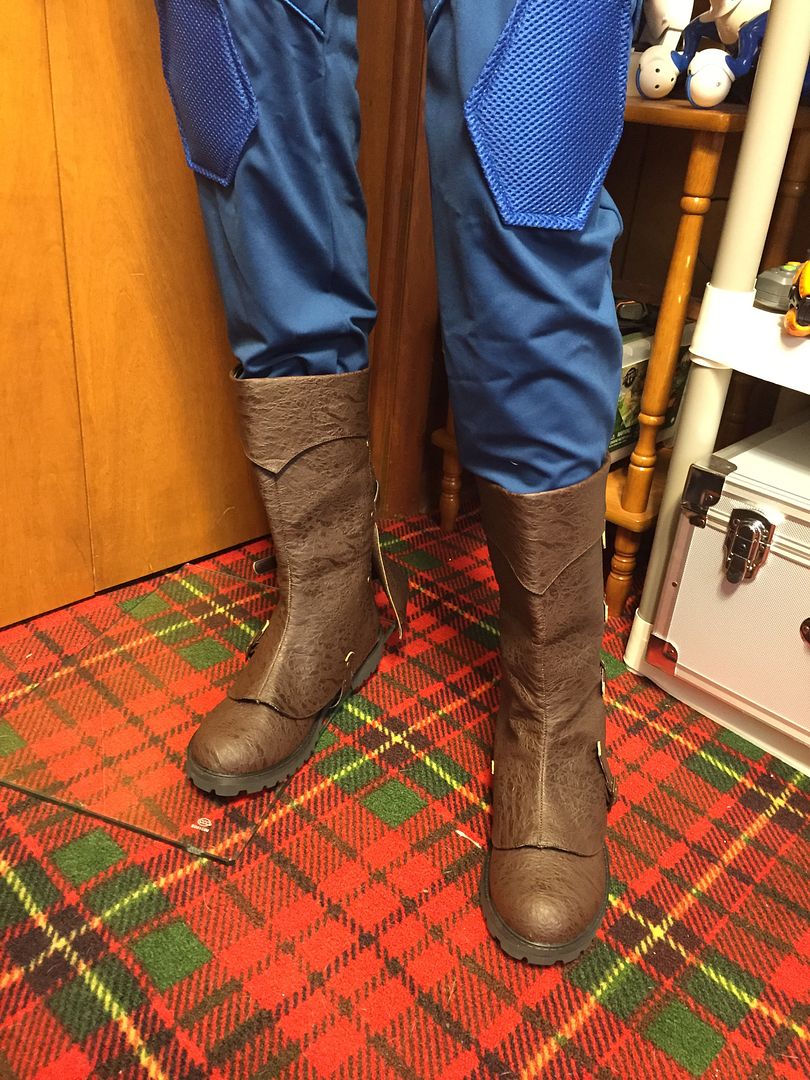
At about the time that my helmet was nearing completion, I started working on ideas for boots. I had purchased the plans to make the boot covers from TheFoamCave, however, I realized that they were going to need some modifications to fit the way that I wanted them to. I also wanted some brown "leather" boots.
Here was the thing...I didn't want just normal combat boots, and I didn't want any modern boots. I wanted something that looked kind of old, but also unique. I thought about making some gaiters out of Neoprene, but stumbled upon some cosplay boots on Amazon that I thought would look pretty good. I may end up modding them a bit, however, I like the way they are as they sit pretty well...I think they fit well as something that kind of looks like some boots from WWII, but also unique and different.
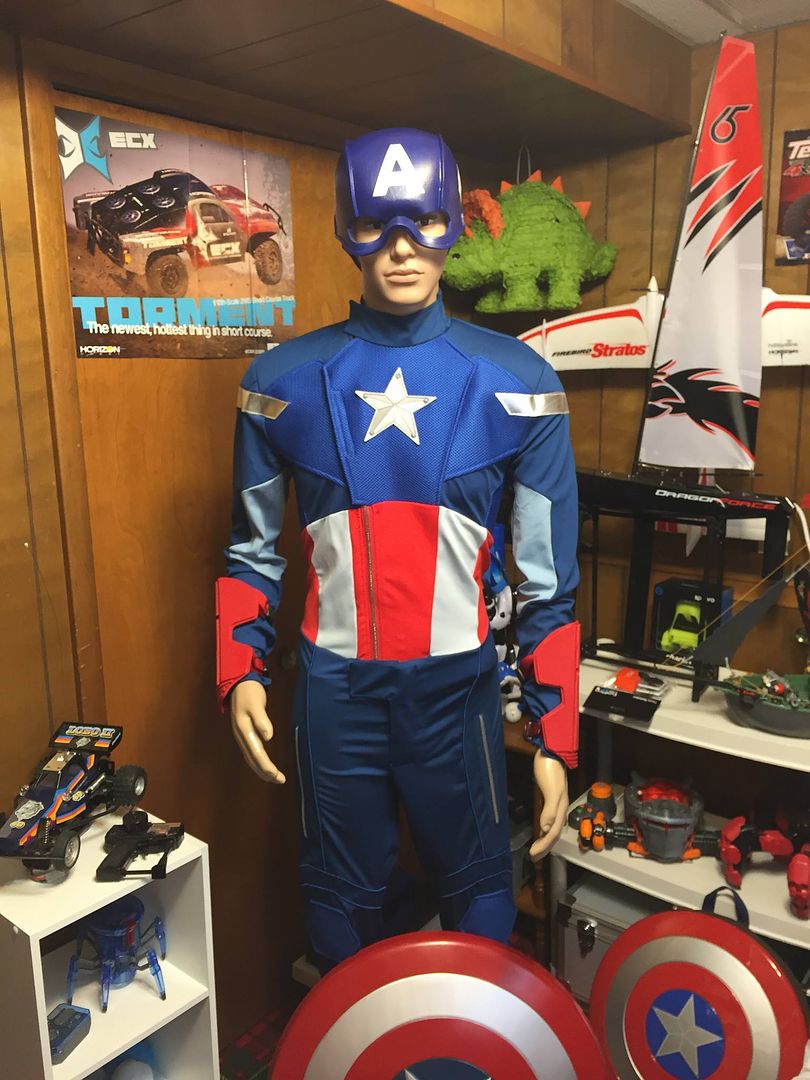
They are a two piece boot. The boot itself is only about ankle high and fits me perfectly. The gaiter is then buckled on and held in place with those bronze buckles, which go really well with the bronze bits on the helmet. I am continuing to try to find a bronze side release buckle for the helmet, but as of now I've had no luck. Anyway, I think they go well with the costume. I may add some accessories to them, but as of now I'm thinking that they will just be exactly as they are.
Next up is the utility belt. I'll be making it from TheFoamCave pattern, but doing some modifications to it to make it a bit easier to use, it will be brown, and I will be TRYING to find a bronze buckle to use with it.
I'd ultimately like all of the buckles and such to be bronze, as little details like that I think will really tie the whole thing together. I could try a brass one from Strapworks, but I'm not sure how close it will actually be to the color of the other bits. I'll keep my eyes open, though, and if I find something I'll snag it.
I also have one of the cheap plastic shields...but I'm currently trying to decide if I want to upgrade that by making it stronger, painting it, and adding nicer handle/straps, or if I want to build a heater shield like from the very first comic. Right now I'm kind of leaning towards heater shield, but who knows...I've got a lot of time to plan that. Also, I've got a pattern to make a set of coveralls that I'm working on modifying so that the zipper is on the back, which I think will be a good start to putting together that "Stealth Suit" type of look. That's a VERY long way off, though.
Well, that's it for now. As I work on things, change things, or upgrade things I'll add more pictures.
Thanks for looking.
Jeff
")