My 3rd (and likely final) Life-size 1:1 Han Solo in Carbonite

Really love all the hardware store greeblies and details, that’s some of my favorite and most fun stuff to make/see!
Thanks!

A little more progress today, getting closer to paint. I made some quick panels for the back to enclose the inner mechanics boards I made. The top one isn't screwed in yet, will do that after painting the inside.

IMG_5798.JPG


I managed to get the bottom one painted and did a test fit of the panel. I also tested how the lights look once fully enclosed (these lights will be wired to switches on one of the panels).

IMG_5811.JPG


IMG_5799.JPG


I also tested another color I was thinking about using for the cabinet. For my first two HICs I built I used a Dark Gloss Grey, but I am testing this Rustoleum color called Metallic Soft Iron.

IMG_5803.JPG


IMG_5802.JPG


I'm kinda liking this color, but might test one more. I didn't like the Metallic Steel, it was a little too light and I didn't think there was enough contrast from the Satin Nickel Metallic I'll be using for the carbonite.

Here's a couple pics of the inner mechanics board installed.

IMG_5805.JPG


IMG_5810.JPG


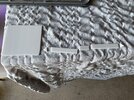
I did notice this area is darker now that it's painted and the back panel is on, so I decided to add one white LED to the side and test it. This LED will be on a separate switch from the red and yellow LEDs. It's hard to tell in the picture with so much daylight, but this will light it up enough to really see the inside mechanics.


IMG_5814.JPG


IMG_5815.JPG


Here you can see the light hitting the opposite end.

IMG_5812.JPG


Still need to touch-up a few spots with bondo on the outside, then I can start with the primer base. Here's a quick little video.


This looks much better in person.
 
Last edited:
More progress today.........bondo, sand, prime, repeat. I've done more sanding on this project than any other, but I'm real pleased with the transitions between the cabinet and bottom and top boxes. Other than some tiny imperfections, it looks great.

IMG_5822.JPG


IMG_5823.JPG


IMG_5824.JPG


IMG_5825.JPG


Once I was happy with that, two more coats of primer and then final sanding, ending on 800 grit.

IMG_5826.JPG


IMG_5827.JPG


Then on to my favorite part..........paint. I am trying something a little different with this one. I am using the Metallic Silver as a base, then hitting it with Rustoleum Hammered Silver, tones it down a little. Once this dries I'll go in with the watered down black acyclic paint to give the texture some depth. The lighting wasn't the greatest today when I was finishing up, but more photos to come.

IMG_5836.JPG


IMG_5829.JPG


IMG_5830.JPG


IMG_5832.JPG


IMG_5833.JPG


IMG_5838.JPG
 
Last edited:
Looking forward to pulling off this tape, I went with a slightly darker color with the Flat Soft Iron but I'm diggin' it. I always struggle with the cabinet color. It's not as dark as the photo suggests as this is in my garage. If you zoom in on the bottom, that gives you a better idea of color since the top looks dark in the photo. I think it will contrast nicely with the carbonite.

IMG_5844.JPG
 
Last edited:
So I couldn’t leave well enough alone, after letting the cabinet sit overnight I just wasn’t 100% on the color. It was close, but I wanted to try something else. So I went with the Rustoleum Gloss Dark Gray. I’ve used something similar on previous builds, and it does the job.

F0EAF3AA-ACD9-46C8-B5E1-B75C93F48974.jpeg
 
After a several month hiatus due to an extensive home remodel, work, and life in general, I'm glad to be working on this again. Started work on the side panels with a coat of aluminum.......

IMG_6563.JPG


Then I used some thin sintra / styrene sheets, cut out squares, sprayed them metallic silver, and used those as inlay pieces. It gives it a nice contrast.

IMG_6564.JPG


IMG_6686.JPG


I'm printing some of the greeblies myself, but for some I'm sourcing them from existing materials. For the ring greeblies I'm using some 3/4" CPVC pipe. I used my mini saw and cut out several pieces, then hit them with the same metallic silver.

IMG_6685.JPG


Here's how the panels look with the inlay pieces in and the first wave of greeblies. I'm not going for screen accuracy, so these won't be exact. I also opted not to inlay the larger square on the left side of each panel.

IMG_6794.JPG


IMG_6795.JPG


At any rate, it's coming together.............
 
Heading into the home stretch, worked on the panels yesterday and today. I had some left over white acrylic and cut several pieces for the translucent inlay details.

IMG_6854.JPG


It's not pretty on the inside, but it works. I'm going with some budget electronics on this, so not at all screen accurate. I'm also adding some other LEDs, a bit of my own personal preferences. For the main panel I went with a breathing green LED.

IMG_6863.JPG


IMG_6866.JPG


I also found some audio online and mixed a sound file for this module I have. I re-wired this to a push button on the panel and mounted it underneath, adds a little extra to the project.

IMG_6874.JPG


Got all the panels mounted and ran all the wiring for the LEDs, pretty happy with how it's coming along. I still have some greeblies to add, some alien symbols to put on, still need to add some detail with black acrylic paint to the front panel, and a few other minor touches.

I added a quick video below............

IMG_6870.JPG


IMG_6877.JPG


IMG_6879.JPG


IMG_6880.JPG


IMG_6878.JPG


Attachments

  • IMG_6854.JPG
    IMG_6854.JPG
    5.3 MB · Views: 50
Last edited:
I think I'm going to call this done for now, added some more greeblies and symbols to the side panels. I really love how this came out. I've never seen anyone do anything to simulate something like this with the internal mechanisms, but I think it looks great. Now just have to move him inside and mount to the wall!

IMG_6905.JPG


IMG_6904.JPG


IMG_6899.JPG


IMG_6900.JPG


IMG_6903.JPG


IMG_6901.JPG
 

Your message may be considered spam for the following reasons:

If you wish to reply despite these issues, check the box below before replying.
Be aware that malicious compliance may result in more severe penalties.
Back
Top