MPC Shuttle Tydirium

BobaFett6215

New Member
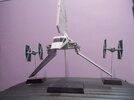
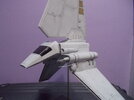
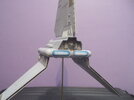
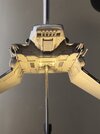
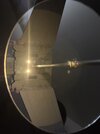
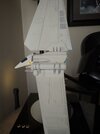
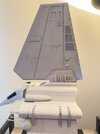
I’m working the MPC Shuttle Tydirium and need some help with what paint color to use. The
Reference photos I’ve looked at the color tends to very from and off white to a cream color to a light gray. I want to use Achive-X paints.
 
Its been a whole 6 years since I built mine. Didn't use achive-X paints, never have, although I'd like to try them someday.
I believe I used a type of off white and light grays. I didn't bother fixing the cockpit despite is being so wrong, as they based it more on the set piece than the model.
It was a mix of rattle can and hand brushing.
P1012225.JPG
 
I used Tamiya Insignia White in rattle can over their fine primer. Probably not exact, but it was a fun quick build of a not very accurate model, so what the hell, I was happy.
 

Attachments

  • DSCN7895.JPG
    DSCN7895.JPG
    2.3 MB · Views: 195
  • DSCN7897.JPG
    DSCN7897.JPG
    2.2 MB · Views: 203
  • DSCN7898.JPG
    DSCN7898.JPG
    2.1 MB · Views: 196
I used Tamiya Insignia White in rattle can over their fine primer. Probably not exact, but it was a fun quick build of a not very accurate model, so what the hell, I was happy.
Do you remember what you used to black out the cockpit window? I’ve tried transparent black paint by createx and automotive tint film neither of which I’d liked.
 
Do you remember what you used to black out the cockpit window? I’ve tried transparent black paint by createx and automotive tint film neither of which I’d liked.
I just painted it, with a brush, with some basic Testor's black from the inside, nothing elaborate.

This was a really fast build, the only flourishes I made were adding some detail to the wing/tail trenches replacing the cannons with brass rod, and scratchbuilding a bit of detail between the forward- facing wing cannons. My motto was "pretty good is good enough". I need to do that more, I always get carried away chasing perfection.
So you can’t see into the cockpit then?
 
No, just pure black.
Okay, thanks for the help. I’ll probably do the same just paint it black. It’ll save time not having to paint the interior. I’ll be lighting up the engines and adding the landing lights along with the lights in each of the 3 wings. I’ll post pictures of it when she’s all done.
 
I'm looking forward to your pics. I think the lights will set it off more than a detailed cockpit. The filming miniature's cockpit couldn't be seen anyway, so you're technically more accurate this way!
 
Yeah, my cockpit was also painted gloss black, so no seeing inside.
Because of that, I didn't add any details and the figures in it either and saved all that for any future builds that it might work for.
 
Okay, thanks for the help. I’ll probably do the same just paint it black. It’ll save time not having to paint the interior. I’ll be lighting up the engines and adding the landing lights along with the lights in each of the 3 wings. I’ll post pictures of it when she’s all done.
Another option is to make the black paint translucent by adding a lot of water or thinner (e.g., 50-60%) and then light the interior.
 
I'm looking forward to your pics. I think the lights will set it off more than a detailed cockpit. The filming miniature's cockpit couldn't be seen anyway, so you're technically more accurate this way!
Well she’s finally finished. She was a tough cookie to put together with all the lights and wires. Had some big gaps in the hull which I used AC glue and baking soda to fill in. Lots of sanding and body work on this one. Felt like I was working on car.
 

Attachments

  • IMG_5368.jpeg
    IMG_5368.jpeg
    2.1 MB · Views: 131
  • IMG_5360.jpeg
    IMG_5360.jpeg
    4.5 MB · Views: 116
  • IMG_5361.jpeg
    IMG_5361.jpeg
    4.5 MB · Views: 93
  • IMG_5364.jpeg
    IMG_5364.jpeg
    839.4 KB · Views: 98
  • IMG_5365.jpeg
    IMG_5365.jpeg
    823.1 KB · Views: 90
  • IMG_5366.jpeg
    IMG_5366.jpeg
    1.4 MB · Views: 87
  • IMG_5367.jpeg
    IMG_5367.jpeg
    1.2 MB · Views: 80
  • IMG_5362.jpeg
    IMG_5362.jpeg
    1.5 MB · Views: 82
  • IMG_5359.jpeg
    IMG_5359.jpeg
    1.3 MB · Views: 112
Turned out good for all its wrong issues the kit has. Nice to see it lighted up like that.
Filling all the gaps and sanding is a lot of work with this kit, but looks good.
 

Your message may be considered spam for the following reasons:

If you wish to reply despite these issues, check the box below before replying.
Be aware that malicious compliance may result in more severe penalties.
Back
Top