Let me start off by first saying that this is my first post here on these forums so hello to all ")
Also, as of right now these are the only props/replicas I've ever made. My knowledge in prop making is limited to what I've learned in working with these materials. I also have about 6 years of self taught ability in making 3d models in 3ds Max which was originally because I was a video game modder. I applied those skills to make 3d blueprints for what you're about to see and will for anything else I decide to make.
Down to the pictures since I'm sure that's what you all want to see.
Here's my first prop which I gave to my friend as a Christmas present. It's a Glass Throwing Knife from Morrowind. It was also my FIRST prop attempt.

Here are the construction phases
http://fc03.deviantart.net/fs71/f/2...ng_knife_construction_by_chief_01-d4jlbz0.jpg

It's made from 1/4in thick polycarbonate for the green glass pieces brushed with green solvent dye, magic sculpt for the rest of it, painted with a acrylic based powdered silver paint, and darkened with a universal non-acid based patina.
Here's my photobucket with the rest of the pictures
Throwing Knife Photobucket
Next is my second attempt at prop making, the 6th House Goblet from Morrowind's main quest.


It's made from 6 solid pounds of magic sculpt with steel "re-bar" for supporting the top half's walls, the spikes, and the handles.
Sorry I don't have ANY pictures of it while I was actually molding the magic sculpt, nor have I worked on it enough since these were taken to justify new pictures. Almost all of my time spent making anything in the past few months has gone to Keening, my third prop. I've started lining and carving the details with my dremel tool.
Here are the rest of the pictures during it's construction process
6th House Goblet Photobucket
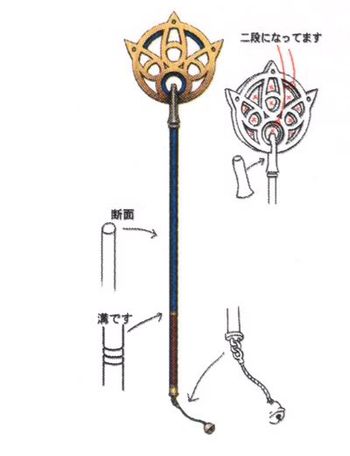
And last but not least, Keening.


This is the first one I really got into making real "blueprints" for it. I finalized the 3d blueprints over the weekend sometime last November. They were changed slightly when I actually started building for one reason or another, but mainly minor changes(ex: instead of rod through the blade's bottommost area I used a piece of 1/16in thick tool steel cut into a rectangle.)
Here's how all the parts would be arranged on a 12in x 12in x 0.5in sheet of polycarbonate along with some other 3d blueprint renderings.


Here's an assembly/disassembly video
http://s1151.photobucket.com/albums... Blueprints/?action=view¤t=1a73cb0a.mp4
Here are the rest of the blueprints and references.
Keening's references and blueprints on Photobucket
I don't have any pictures of the earliest steps but here's what I've got.
SORRY ABOUT THE CRAPPY CELL PHONE PHOTOS. I really need to get a camera >_>
Keening's "Progress" on Photobucket
You'll need to follow along through the pictures on the photobucket link above. Right at the end of carving the handle the crescent at the end broke in half from a multitude of reasons.

I ended up shearing off the disconnected central area on the two pieces, carving out a new center, and acrylic solvent welding the crescent back together. I even came up with a newer, stronger design for it in the process to make sure it won't break again.
After the carving was finished I tried my hand at working with leather to make a sheath. My sewing skills carried over for the leather-working.
The sheath was mostly finished and just needed the button snaps to come in the mail so I could attach them and finish sewing. In the mean time I made a stamp with my symbol on it to imprint it on the sheath.
The stamp itself is made from magic sculpt with 3 steel rings around it to strengthen it while it gets pounded with a hammer on an anvil. I've used the stamp on quite a few other leather items and it's held up extremely well for essentially being epoxy.
I was finishing up putting a coat of paint on it when all of a sudden the yardstick I was hanging it from fell and most of the pieces fell down the wooden stairs of the deck, down a floor, and onto the grass. Thinking of it still gets me pissed off. I had to sand all the paint off with sand paper which felt like it took forever. I finally got around to painting it a second time and did not like the results I came up with. I decided to strip it and try again. Didn't want to sand it off so I tried solvent paint remover. It ended up doing the job but, like I expected, put crazing all over Keening since it's made from polycarbonate.
Third times the charm right?
The gold is only this shiny in the sun and the darkened areas are much darker. I achieved a pitted texture like I was aiming for by making a nice even and full coat of gold over everything and then jittering the spray nozzle up and down to have it "spit" spots of paint about 2mm wide. waited till that had dried and repeated a few times. The pits were perfect for the patina to nestle into.
Finished Pictures


http://i1151.photobucket.com/albums/o630/MosesofEgypt/Keening/Keening Finished/8e9966bd.jpg
So here's the photobucket link to the finished pictures of Keening
Keening's "Finished" Photobucket pictures
Also, as of right now these are the only props/replicas I've ever made. My knowledge in prop making is limited to what I've learned in working with these materials. I also have about 6 years of self taught ability in making 3d models in 3ds Max which was originally because I was a video game modder. I applied those skills to make 3d blueprints for what you're about to see and will for anything else I decide to make.
Down to the pictures since I'm sure that's what you all want to see.
Here's my first prop which I gave to my friend as a Christmas present. It's a Glass Throwing Knife from Morrowind. It was also my FIRST prop attempt.
Here are the construction phases
http://fc03.deviantart.net/fs71/f/2...ng_knife_construction_by_chief_01-d4jlbz0.jpg
It's made from 1/4in thick polycarbonate for the green glass pieces brushed with green solvent dye, magic sculpt for the rest of it, painted with a acrylic based powdered silver paint, and darkened with a universal non-acid based patina.
Here's my photobucket with the rest of the pictures
Throwing Knife Photobucket
Next is my second attempt at prop making, the 6th House Goblet from Morrowind's main quest.
It's made from 6 solid pounds of magic sculpt with steel "re-bar" for supporting the top half's walls, the spikes, and the handles.
Sorry I don't have ANY pictures of it while I was actually molding the magic sculpt, nor have I worked on it enough since these were taken to justify new pictures. Almost all of my time spent making anything in the past few months has gone to Keening, my third prop. I've started lining and carving the details with my dremel tool.
Here are the rest of the pictures during it's construction process
6th House Goblet Photobucket
And last but not least, Keening.
This is the first one I really got into making real "blueprints" for it. I finalized the 3d blueprints over the weekend sometime last November. They were changed slightly when I actually started building for one reason or another, but mainly minor changes(ex: instead of rod through the blade's bottommost area I used a piece of 1/16in thick tool steel cut into a rectangle.)
Here's how all the parts would be arranged on a 12in x 12in x 0.5in sheet of polycarbonate along with some other 3d blueprint renderings.
Here's an assembly/disassembly video
http://s1151.photobucket.com/albums... Blueprints/?action=view¤t=1a73cb0a.mp4
Here are the rest of the blueprints and references.
Keening's references and blueprints on Photobucket
I don't have any pictures of the earliest steps but here's what I've got.
SORRY ABOUT THE CRAPPY CELL PHONE PHOTOS. I really need to get a camera >_>
Keening's "Progress" on Photobucket
You'll need to follow along through the pictures on the photobucket link above. Right at the end of carving the handle the crescent at the end broke in half from a multitude of reasons.
I ended up shearing off the disconnected central area on the two pieces, carving out a new center, and acrylic solvent welding the crescent back together. I even came up with a newer, stronger design for it in the process to make sure it won't break again.
After the carving was finished I tried my hand at working with leather to make a sheath. My sewing skills carried over for the leather-working.
The sheath was mostly finished and just needed the button snaps to come in the mail so I could attach them and finish sewing. In the mean time I made a stamp with my symbol on it to imprint it on the sheath.
The stamp itself is made from magic sculpt with 3 steel rings around it to strengthen it while it gets pounded with a hammer on an anvil. I've used the stamp on quite a few other leather items and it's held up extremely well for essentially being epoxy.
I was finishing up putting a coat of paint on it when all of a sudden the yardstick I was hanging it from fell and most of the pieces fell down the wooden stairs of the deck, down a floor, and onto the grass. Thinking of it still gets me pissed off. I had to sand all the paint off with sand paper which felt like it took forever. I finally got around to painting it a second time and did not like the results I came up with. I decided to strip it and try again. Didn't want to sand it off so I tried solvent paint remover. It ended up doing the job but, like I expected, put crazing all over Keening since it's made from polycarbonate.
Third times the charm right?
The gold is only this shiny in the sun and the darkened areas are much darker. I achieved a pitted texture like I was aiming for by making a nice even and full coat of gold over everything and then jittering the spray nozzle up and down to have it "spit" spots of paint about 2mm wide. waited till that had dried and repeated a few times. The pits were perfect for the patina to nestle into.
Finished Pictures
http://i1151.photobucket.com/albums/o630/MosesofEgypt/Keening/Keening Finished/8e9966bd.jpg
So here's the photobucket link to the finished pictures of Keening
Keening's "Finished" Photobucket pictures
Last edited: