Mera build - original design (L3P-O Cosplay)

Litesabr13

New Member
My fiance and I are building Aquaman and Mera for Denver Comic Con 2015 - attempting to take the various versions of the costumes and make them our own. In my case with Mera, I'm designing original armor as I don't want to wear just a spandex bodysuit! lol

I decided to start by making a corset to support "the ladies" and keep everything contained - I've made only one corset before and it was quite the project (I had the brilliant idea to have stripes which all had to line up because I'm anal. **facepalm**). This one turned out to be a bit easier, but still a huge undertaking as I drafted the pattern from scratch (Thanks to this site: http://www.foundationsrevealed.com/free-articles/74-draft-your-own-corset) and ended up altering it further (aka, making it up as I go) as I went. Overall I'm happy with it, but the boobs are pretty hard to size correctly until you have the boning in and evidently one of my many mockups did not have them as accurately as I thought - I had to add darts to the final corset to make it fit better. Not super happy with it, but at that point, I didn't want to start over. Also, as it's meant to be worn UNDER things and not be seen, I'm trying to let it go...(let it gooo, let it goooo ;) haha) I ordered all my corset supplies from: http://corsetmaking.com/ - great stuff!

20150301_154126.jpg
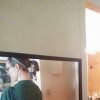
Drafting - holy pain in the butt
20150302_212731.jpg20150302_214438.jpgMock ups 1 and 2 (adding a more defined cup)
20150309_205402.jpgMock up 3? 4? (decided against actual cup and underwire so altered to solid pieces)
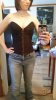
20150331_230809.jpg20150403_133749.jpgDone and on! Whew!

Next up, breastplate!
 

Attachments

  • 20150403_133749.jpg
    20150403_133749.jpg
    677.6 KB · Views: 134
THE BREASTPLATE!

First time working with worbla on this build - I'm really enjoying it! I'mamazed with how easy it is to work with which makes designing and building awhole lot easier as well... Whew! (Worbla from CosplaySupplies.com). On to thebreastplate:

I am using the sandwich method for most of my base patterns and building upfrom there. I think it's great to have the foam patterned out from my originalpaper patterns to really get a sense if something will work before cutting theworbla. And foam is way cheaper to have to waste than worbla - though I do tryto keep my bigger foam scraps "just in case"! The base of thebreastplate is sandwiched:
20150330_205918.jpg
Boob cups are doublelayers of worbla for a bit more sturdiness - was super nervous about this partand attaching them. Was way easier than I anticipated!
20150330_205956.jpg
I used masking tapeto help draw out patterns and then cut them out out. Super useful, but a painwhen it starts sticking to itself
20150403_212142.jpg
Because we are doingscalemail, I added scales to the breastplate - a long day of cutting for that.Assembly was fairly quick, but I think tracing a rough outline (seen on leftboob in pic) of the scales helped move it along. If I have time, I want to doscales on my greaves as well...
20150404_224943.jpg
Wanted to add somedimension so rolled up some scraps to shape the worbla over.
20150405_143159.jpg20150405_143224.jpg20150405_155728.jpg
Added a layer tosides and back to make it "pretty" lol Fiancé tells me he gets anElven armor vibe from it, but I'm okay with it.
20150405_173853.jpg
Needed something inthe middle to hide some of the rough connections so opted to make my ownshells. Again, rolled up some scraps and shaped the worbla over - worked sowell!
PicsArt_1429560294296.jpg

Overall liking how this turned out so far - besides the base breastplate,all the layers were patterned, cut, and assembled over a weekend! I am waitingto add googly eye rivets until I know if I have time to glue and paint eachone. Still so much to do, some things may have to slide!
20150405_211942.jpg

Feel free to let me know your thoughts or ideas/tips as we go! Thanks :)


20150330_205918.jpg


20150330_205956.jpg


20150403_212142.jpg


20150404_224943.jpg


20150405_143159.jpg


20150405_143224.jpg


20150405_155728.jpg


20150405_173853.jpg


PicsArt_1429560294296.jpg


20150405_211942.jpg
 
Last edited by a moderator:
Shoes! (omg, let's get 'em!)
View attachment 47007620150308_145312.jpg - Foam base, layered for shell effect on toes
20150329_204224.jpg20150420_181621.jpg
I added some designsto them based on the patterns I used on my breastplate to tie it together. Idon't have time to cast some resin jewels and play around with it so opted tojust use worbla - it's hollow underneath and turned out surprisingly well! Theleft shell/toe is super shiny from trying SmoothOn's new self-leveling primer(originally for 3D printed stuff) - I think it will move along the finishingprocess by not having to prime and sand several times (here's hoping!)

20150308_145246.jpg


20150308_145312.jpg


20150329_204224.jpg


20150420_181621.jpg
 
Last edited by a moderator:
CROWN!
20150417_190938.jpg - Close up of the shell. I did this the same as the ones on my breastplate - rolled up some scraps and heated the big shape over them. The swirls were left over from the braces (post to come - still have some work to do on those)
20150417_190949.jpg - Added the fins to the sides of the "M". I originally planned to make the M one piece, but for the sake of saving worbla space, I went for 4 - I think it will turn out okay!
20150417_191003.jpg - Fully completed front. I am planning on using magnets sewn in to the wig to attach it and magnets on the back of the crown - wish me luck!
 
GREAVES!
20150420_215812.jpg - Playing worbla tetris with the pieces. Not doing sandwiched for the base to, again, save some worbla . However, with the layers of scales and extra foam/worbla pieces on top, it still ended up pretty sturdy.

Forgot to get progress pictures these past few pieces, but here are a few angles of the completed greaves. Thinking of adding some knee "flair" but not sure - THOUGHTS??
20150425_121752.jpg 20150425_121828.jpg20150425_140707.jpg
 
A LOT has been completed since the last post. Here are some pictures with brief updates:

SHOULDERS - I started with a basic shoulder and added some "flair" to make it a bit more interesting (and way more pain in the but to have to paint...ugh...but worth it). I also wanted to have some neck protection and the Ami-comi version of Mera has fins along her neck so I toned them down and went with it! My fiance also has a fin type collar for his Aquaman armor so I think it will tie in nicely:
20150502_142546.jpg20150502_142600.jpg20150502_151836.jpg20150502_160719.jpg20150502_174705.jpg

For the other shoulder, I wanted something a bit bigger and shell-like. I really had no clue how it would turn out based on the foam, but once I added the worbla it was sooo much better! I used a dremel and some hand sanding to smooth out the foam which I had hot glued to a styrofoam ball half. Again, I added the fin for a neck guard, only slightly bigger:
20150508_204455.jpg20150505_204600.jpg20150504_223333.jpg20150504_223327.jpg20150504_202938.jpg20150511_222520.jpg

BRACERS - Not too many progress photos on these, but I wanted to tie in the ridged shape of the breastplate to the bracers as well and so gave it a layered look. Because I still want the armor to have some femininity, I added some scrollwork (pain in the butt!) and pearls. Pearls found in the scrapbooking section of your local craft store are AMAZING for this and I will probably use as rivets for future projects over googly eyes. Googly eyes have a slightly flat shape that just wouldn't work for this, plus adding the pearls after painting saved me the trouble of having to paint them all!! haha Mere's bracers also had what looked like an 'M' on them so I attempted to incorporate that too:
20150411_230924.jpg20150411_230911.jpg20150515_202959.jpg2015-05-17 (1).jpg

UPDATES on the GREAVES:
Got them strapped on and painted. Worried at first they came off a bit "Lady Loki", but I think they work with the other armor as a whole. Pictured is some aging done on the right and nothing on the left - what a difference a bit of black paint makes! I've also included what my original sketch for these were:
20150518_134719.jpg2015-04-02.jpgIMG_20150509_224732.jpg

UPDATES on the BREASTPLATE
It's been painted! And, because I didn't have to paint each pearl and could just super glue them on (super huge pain - I still have glue on my fingers :p), I went ahead and added my pearl rivets :) Had an issue with the metallic gold spray paint reacting to the green - cracked all over, but I'm calling it "battle damage" and letting it be. I also included my original sketch:
2015-03-31.jpg2015-05-16.jpg2015-05-17.jpg

My fiance was nice enough to make my scalemail for me since he was so accomplished at making his shirt for Aquaman! I just have half a shirt that is attached to a thick leather strap and I made a harness for so I didn't have all the bulk and weight of a full metal shirt under my breastplate. The harness also serves as how I will attach the shoulders and my cloak (more to follow). Here's the rough look of the armor before paint, still having some trouble getting the Nike glue off so will have to come up with something to hide it. Any recommendations? Sorry for the super long post!!
IMG_20150417_110950.jpgIMG_20150513_075607.jpg
 

Attachments

  • 20150510_115922.jpg
    20150510_115922.jpg
    9 KB · Views: 107
Camera Ninja 1.jpgCamera Ninja 2.jpg

Action shot from the Cosplay Shindig - We won 1st place, Novice Craftsmanship!!
DMGIce 1.jpg

We have a few more things we'd like to add to Aquaman and Mera for Salt Lake Comic Con in September so stay tuned!
 
This thread is more than 8 years old.

Your message may be considered spam for the following reasons:

  1. This thread hasn't been active in some time. A new post in this thread might not contribute constructively to this discussion after so long.
If you wish to reply despite these issues, check the box below before replying.
Be aware that malicious compliance may result in more severe penalties.
Back
Top