You are using an out of date browser. It may not display this or other websites correctly.
You should upgrade or use an alternative browser.
You should upgrade or use an alternative browser.
MEN IN BLACK TRI-BARREL - DONE WITH PICS!!!!!
- Thread starter Rusty85
- Start date
Nice drawer slides! Just like the original
Rusty85
Sr Member
At least I know I was close on matching the paint to the real thingRusty85
LED board
View attachment 1338999
aluminum vs 3D printed bullet end
View attachment 1339000
Aluminum bullet end with brass casing
View attachment 1339001
View attachment 1339002
Love the works! You guys rock!
Rusty85
Thanks for all the kind words!
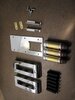
A small update. The metal bullet parts are done, i just have to dremel out the 3D tips a bit so the aluminum spacers i made can fit into them. Also made some barrel light tips. These will be in the middle of each barrel. When the side knob is in the 1dot position the top barrel will be lit. When its in the 2 dot position both bottom 2 barrels will be lit and when in 3 dot obviously all the barrel lights will be lit.


Thanks for all the kind words!
A small update. The metal bullet parts are done, i just have to dremel out the 3D tips a bit so the aluminum spacers i made can fit into them. Also made some barrel light tips. These will be in the middle of each barrel. When the side knob is in the 1dot position the top barrel will be lit. When its in the 2 dot position both bottom 2 barrels will be lit and when in 3 dot obviously all the barrel lights will be lit.
Yum! MIB Porn!
failure edit.....lol
Last edited:
A small update, ended up just sliming up the alien. Too risky to fill the side tank, it was very expensive and i worry about the curing heat from the resin. The barrel side greeblies are mostly done minus the washer at the ends. Compared to my original casting its decent. Magazine bullets are done , brass casings, aluminum backs and 3D tips and lastly have the barrel light holders done. Canisters go on the big barrels and ill re-utilize the unused side part for the top barrel.


I look forward to seeing this completed... I worked at Icons & held the Screen used Gun, I always wanted one too, Icons never did produce them so that unfortunately never happened, I really wish I had at least taken photos but didn't get the chance...
I'll ask around if anyone who worked there has any old photos...
I'll ask around if anyone who worked there has any old photos...
I look forward to seeing this completed... I worked at Icons & held the Screen used Gun, I always wanted one too, Icons never did produce them so that unfortunately never happened, I really wish I had at least taken photos but didn't get the chance...
I'll ask around if anyone who worked there has any old photos...
Wow pics would be fantastic. I have limited reference on these. Most pics are tough to see detail. Thanks for your effort !
Rusty85
Getting close now.........
Grip repainted gloss black and matt clear

This is how you fit a square peg in a round hole.....delrin battery end caps.

Cables done

Base plate opened up to fit the chrome expansion and parts polished, brass brackets to hold the halves together, corkscrews repainted.


Copper is glareing in this pic but you cant really see it in real life.

Top egg button got a magnet installed in the end and epoxied a nut inside the egg so the knob can be removed so there will be access to the mounting screw behind it. Also had to epoxy the side knob to the switch.

Unfortunatly the chrome prossess mucked the threads up at the base so i had to machine one end on all the hexs to clear it. Also polished the plate.


CR123 battery box parts and covered LED tubes with silver tape for maximum light transmission...lol


Battery box goes on the end of the grip. Just have to remove the grip screws and remove the whole grip then remove 2 screws on the battery box tube to change the battery. I know CR123s are a little expensive but ive yet to see one leak unlike modern AA's. And they have good power. Still have to make the top contact wire.

Mounted a green led in the tank bottom just for a little color since we are not filling the tank. Still need to decide what glue to use to glue the tank halves together without making a mess.

All polished up minus the barrel parts. Love that new red LED ! Also made the side hoses

Disassembled the barrels and polished up all the parts. Also gave the grip a few coats of matt clear. I love the finish im getting with the gloss black and matt clear. Barrel end cap is still to be epoxied once the led housings are glued in.


Tomorrow ill assemble and wire it up and glue the leds in the barrels. Tomorrow is going to be a fun day.
Getting close now.........
Grip repainted gloss black and matt clear
This is how you fit a square peg in a round hole.....delrin battery end caps.
Cables done
Base plate opened up to fit the chrome expansion and parts polished, brass brackets to hold the halves together, corkscrews repainted.
Copper is glareing in this pic but you cant really see it in real life.
Top egg button got a magnet installed in the end and epoxied a nut inside the egg so the knob can be removed so there will be access to the mounting screw behind it. Also had to epoxy the side knob to the switch.
Unfortunatly the chrome prossess mucked the threads up at the base so i had to machine one end on all the hexs to clear it. Also polished the plate.
CR123 battery box parts and covered LED tubes with silver tape for maximum light transmission...lol
Battery box goes on the end of the grip. Just have to remove the grip screws and remove the whole grip then remove 2 screws on the battery box tube to change the battery. I know CR123s are a little expensive but ive yet to see one leak unlike modern AA's. And they have good power. Still have to make the top contact wire.
Mounted a green led in the tank bottom just for a little color since we are not filling the tank. Still need to decide what glue to use to glue the tank halves together without making a mess.
All polished up minus the barrel parts. Love that new red LED ! Also made the side hoses
Disassembled the barrels and polished up all the parts. Also gave the grip a few coats of matt clear. I love the finish im getting with the gloss black and matt clear. Barrel end cap is still to be epoxied once the led housings are glued in.
Tomorrow ill assemble and wire it up and glue the leds in the barrels. Tomorrow is going to be a fun day.
Attachments
Last edited:

Well, shes finally done and she is SHINY!!!!! Alot of work but well worth it. Hope you like it Pat ! The side knob with the 3 dots controls how many barrels light up. 1, 2 or 3. So glad i put the green LED behind the alien tank. At certain angles it lights up the perimeter of the tank and the pattern on the side and just adds that extra color. The slide switches on the side turn on the barrel and green lights and the swiitch on the top near the red LED turns it on. So happy with how it came out.


Holy crap, that is so AWESOME!!! It's probably better quality than the real prop. Absolutely mind boggling work!!! Words fail me, sir!
Similar threads
- Replies
- 0
- Views
- 354
- Replies
- 3
- Views
- 1,054