McQuarrie Vader WIP Scratch Build & Research (Studio 49)

Thanks Panaflex

And also looks like one of the photos didn't embed properly.
Here's a quick mock up with the body + switch + the switch. (Both 3D printed parts still need some clean up by the way)


http://i1057.photobucket.com/albums/t391/Studio_49/Mcquarrie Vader/Lightsaber/7D_zpsyyttlenz.jpg

I find it interesting that the McQuarrie concept Vader saber had a grenade-ish component to it that apparently was adopted for the OB1.

Really like the whole build. The saber is icing on the cake.
 
Last edited by a moderator:
Update 25:


Ok, time for an update that I myself am extremely excited about... the helmet is now finished minus the lenses (which bookcase will send the my DU and armour) I now feel it's as good as I can get it with my current painting skills. The painting is complete on the face and the lid, the hard hat liner has been installed and I have also installed fans to keep me cool, the complete kit out.


​This little journey just for the helmet has been challenging at times since I've not had any prior experience with painting helmets, especially ones this complex. There was lots of trial and error wit a lot of sanding back and re-painting but in the end I can confidently say this is the best paint job I have ever done. The photos that I've taken don't do it enough justice (I'll have to get some nicer photos down the line when I get the chance). I'm actually surprised I was able to get the fish that I got with just spray paint cans!


​By the way I'm not game enough to put it on yet since I want to be 100% sure the paints not green so I don't wreck all the work I've put into it, so expect those in a couple weeks time.


So that's enough talk, here's the photos:


14A_zps2lsejmnz.jpg


14B_zpst4drcwlg.jpg


14C_zpsy6happms.jpg


14D_zpssyazko60.jpg


14E_zpsks2hqvn8.jpg


14A_zps2lsejmnz.jpg


14B_zpst4drcwlg.jpg


14C_zpsy6happms.jpg


14D_zpssyazko60.jpg


14E_zpsks2hqvn8.jpg
 
Last edited by a moderator:
Beautiful!

Update 25:


Ok, time for an update that I myself am extremely excited about... the helmet is now finished minus the lenses (which bookcase will send the my DU and armour) I now feel it's as good as I can get it with my current painting skills. The painting is complete on the face and the lid, the hard hat liner has been installed and I have also installed fans to keep me cool, the complete kit out.


​This little journey just for the helmet has been challenging at times since I've not had any prior experience with painting helmets, especially ones this complex. There was lots of trial and error wit a lot of sanding back and re-painting but in the end I can confidently say this is the best paint job I have ever done. The photos that I've taken don't do it enough justice (I'll have to get some nicer photos down the line when I get the chance). I'm actually surprised I was able to get the fish that I got with just spray paint cans!


​By the way I'm not game enough to put it on yet since I want to be 100% sure the paints not green so I don't wreck all the work I've put into it, so expect those in a couple weeks time.


So that's enough talk, here's the photos:


http://i1057.photobucket.com/albums/t391/Studio_49/Mcquarrie Vader/Helmet/14A_zps2lsejmnz.jpg


http://i1057.photobucket.com/albums/t391/Studio_49/Mcquarrie Vader/Helmet/14B_zpst4drcwlg.jpg


http://i1057.photobucket.com/albums/t391/Studio_49/Mcquarrie Vader/Helmet/14C_zpsy6happms.jpg


http://i1057.photobucket.com/albums/t391/Studio_49/Mcquarrie Vader/Helmet/14D_zpssyazko60.jpg


http://i1057.photobucket.com/albums/t391/Studio_49/Mcquarrie Vader/Helmet/14E_zpsks2hqvn8.jpg
 
Last edited by a moderator:
Re: McQuarrie Vader WIP Scratch Build & Research (Studio 49)

It looks amazing, but I feel like the dome is a little far off of the face plate. That gap looks too large.

Ahh yes, I thought that someone might mention that.
Not to worry though. The only reason it sticks out as far as it does is because it's sitting on a mannequin head and there's only so much I can adjust it and also the fact I'm not game to touch it to hard until the paints not green.
When I actually put on my head, I'm able to shift and adjust it easily to look right thanks to the Velcro that hold the lid and face together.
So it's ok if that's what some people were concerned about, the mannequin just not very forgiving with putting a Vader Concept Helmet on it then adjusting it! ;)

- - - Updated - - -

So the easiest way to imagine it is when I put the helmet on, the face moves towards and up more to drastically reduce the gap between the gap of face mask and dome
 
Great paintjob ... I just wonder if there should be a 2 tone schematic applied on the facemask ... what do you think Studio 49?

Chaim
 
Great paintjob ... I just wonder if there should be a 2 tone schematic applied on the facemask ... what do you think Studio 49?

Chaim


Well this is an interesting topic that I been talked to the guys over at the SLD forum about for a while before painting. I forgot to post those things here so I shall do a summary of my thinking :) :thumbsup


So there were 2 possible options that could be considered if I were to do a 2 tone scheme, first is the grey and black like seen in the movies and second is pearl like blue and black like seen in some of the art and drawings.

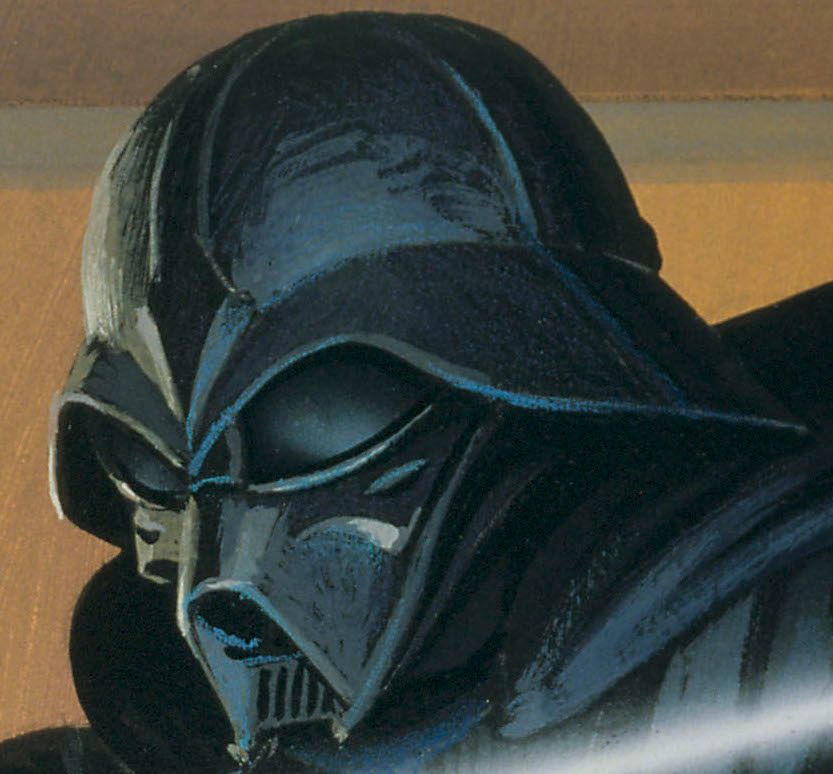
To begin with I disregarded the grey option as there is nothing to suggest that in the art or on any of the offical statues that have been released to date. Looking at the picture it may seem that the helmet does have a 2 tone grey and black scheme, but if you look closer, none of those lighter tones are uniform which suggests to me that it's just lighting that's been rendering my RMQ.
R1_zpsutsarmqv.jpg


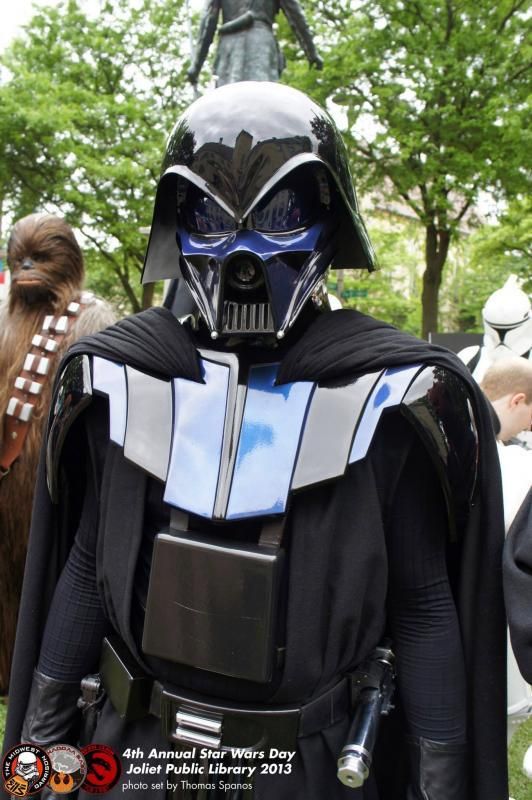
Then the second option was the 2 tone scheme with the pearl like blue with black. This one is a little less clear to determine but I believe the blue was never invented to represent a colour that was physically applied to the helmet. Now for this one I needed to look at the state that have been produced over the years.

Now this is what some people may be thinking of in terms of colour but I just feel that the blue is not an accurate representation of the art. (although I'm not being negative about the costume, because it is absolutely awesome)
1_zpslr7qf2dp.jpg


So in terms of offical sources there are a few sources to look at.
First is the Gentle Giant which goes with the straight gloss black
G1_zpsycqsrthv.png


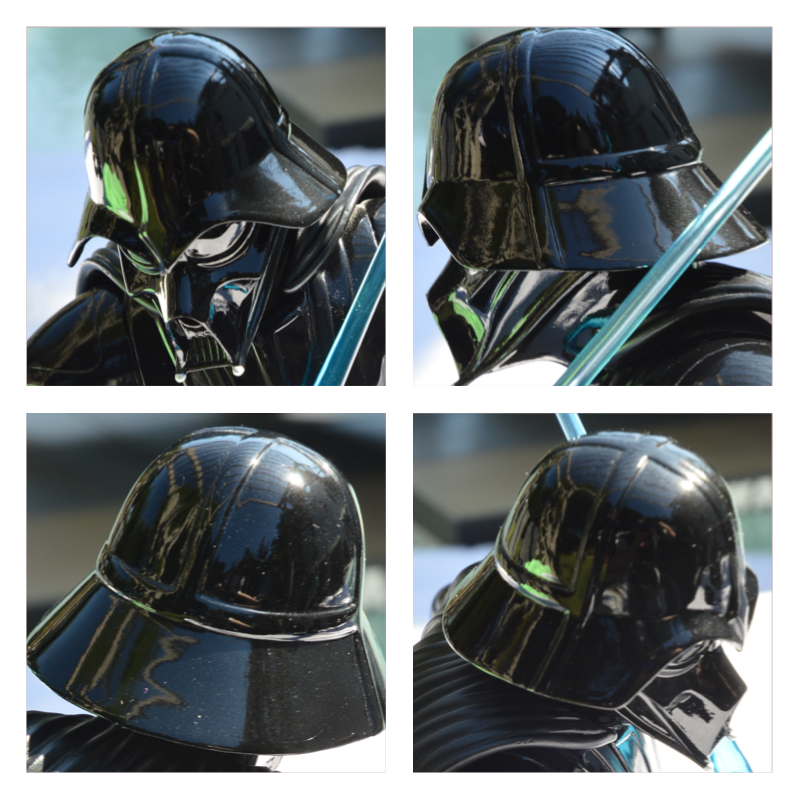
Then second is the Kotobukiya. Now this one is the most stylised one thats been released.
And these blue highlights are reflected all over the figure, the helmet, leathers, boots shins, etc
I believe that all these blue highlights are not a physical feature but instead an aesthetic choice by the Koto design team to show what they intemperate the reflect of the saber blade to be.
2_zpse1x4yvex.jpg


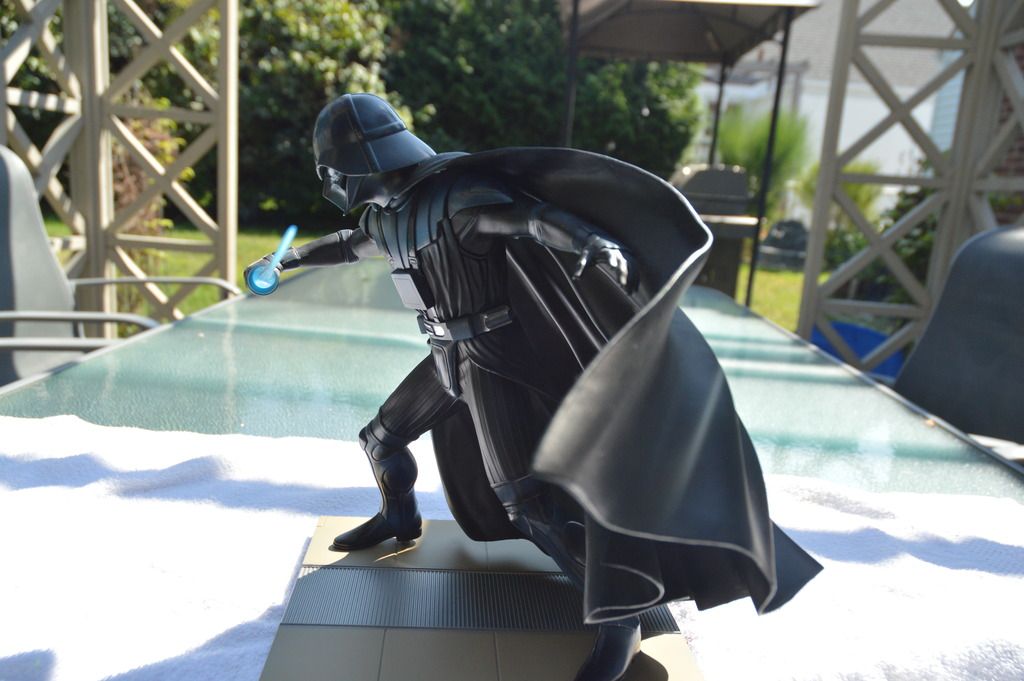
Then finally there is the RMQ Vader Figure that Sideshow is making, and you can clearly see that they are going for the plain black for the entire figure.
SDCC-2015-Sideshow-Star-Wars-Slide04.jpg


So long story short, by comparing all my sources and process of elimination I believe that the helmet should be a one tone gloss black paint scheme an that is the most accurate reflect of the art RMQ drew all those years ago and and that any of the blue type paints used in figures are simply to represent the reflection of the Lightsaber blade.
Hope that helps answer the question mate :)
 
"Another part bites the dust"
wink.gif


So today I was able to finish the Chest box by glueing in the centre piece so now it completely done! (Minus strapping)
4_zpsyb8aslb9.jpg


I was also able to fix up the paint job on the main mid section of the saber hilt and it looks so much better and sharper now.
All I needed was a really low tech solution, just carefully shove blutack into the ridges and give it a coat of gloss black.
Much happier with it now!


8B_zpsf9nv9ueo.jpg


wink.gif


4_zpsyb8aslb9.jpg


8B_zpsf9nv9ueo.jpg
 
Last edited by a moderator:
There are some automotive paints that are black in base colour with blue pearl incorporated....meaning under certain lighting conditions the surface with look black and in others, blue.

example:

 
That would imo be the correct choicr, although I am of the opinion that the idea of a blue basic colour just stems from the reflections of the blue lightsaber seen in the artwork.
 
Update 27:

Not exactly a build update but more of a mini celebration of mine the I had sine today I was able to throw on the dome proper for the first time.

I put on the balaclava, turned on the fans and temporarily blu-tacked the lens in (since they will be replaced).


I'm so stoked with the pictures I was able to get and I really wanted to share them!
The photos really show of how glossy I was able to get it with just spray paint cans (which I'm pretty proud of) so even though the dome looks a little grey in shots that just etc reflection of the walls. Although I did the best I could with the paint, on the dome only there are some tiny little cracks in the paint on the front so I'm thinking of finding someone local who can do the up with automotive paints for me.


Anyway I'm just over the moon since I did a proper test fit wit this guy :)
I know it's not 100% but yes it the first ever test fit ;)


15C_zpszzweslqh.jpg


15E_zpszq9ifner.jpg


15D_zps6v7swwm0.jpg


15F_zpshdifkt0z.jpg


15G_zps8qx216g0.jpg


15I_zps4tkuiirv.jpg


15C_zpszzweslqh.jpg


15E_zpszq9ifner.jpg


15D_zps6v7swwm0.jpg


15F_zpshdifkt0z.jpg


15G_zps8qx216g0.jpg


15I_zps4tkuiirv.jpg
 
Last edited by a moderator:
That dome looks way too high up, in the original drawing it looks attached almost directly to the rest of the helmet. Just my opinion, though.
 
That dome looks way too high up, in the original drawing it looks attached almost directly to the rest of the helmet. Just my opinion, though.

Yeah I know it may be a bit of a gap but this doesn't concern me too much as this lid is just to get me off the ground with the costume (especially thanks to the awesome price I got it for). I am planning to upgrade it to a far superior down the line that would certainly address this concern but for now I'm just happy to have this guy in my collection. More than anything and its been a fun project as well that's helped me learn a lot as well. :) :thumbsup
 
Update 28:


Well I forgot to post this but when I went into print a prototype Bossk Part for THXBOY I also printed the last parts for the belt buckle. So once I finish the Lightsaber I'll move onto making this guy. For now it'll stay in its kit form.


2A_zps0rp1em1e.jpg


2B_zpsaf7aa0ul.jpg


2C_zpswoe9v4yp.jpg


2A_zps0rp1em1e.jpg


2B_zpsaf7aa0ul.jpg


2C_zpswoe9v4yp.jpg
 
Last edited by a moderator:
The Mask is 1 of 2 the action figure contains both. I like this one best lol :D

I Like Rens Mask but the concept vader even with out the breathing would have been cool to see on the screen.
 
Another part to add to the inventory!
JSmails was kind enough to ship out a Fleetfarm Leather Belt for the RMQ Vader. Thank you sir you are a legend!

Now once I get the buckle sorted, holster, belt pouch, belt box and saber clip made/purchased I'll be able to mount them all


1A_zpsa9a9glqf.jpg


1B_zpss0iopwt5.jpg


1A_zpsa9a9glqf.jpg


1B_zpss0iopwt5.jpg


1B_zpss0iopwt5.jpg


1B_zpss0iopwt5.jpg


1B_zpss0iopwt5.jpg
 
Last edited by a moderator:
Update 30:
Tonight I was able to begin the assembly/construction of the belt buckle.
While getting setup I replied that he small area connecting the 2 pieces of etc body of etc buckle would be prone to breaking when being worn so I decided to re-enforce the buckle with 1 - 2mm Plastic sheet and glue everything with liquid nails.
The whole thing is set up in G-Clamps at the moment so it should be good to go soon enough.
3A_zpsphlopk8y.jpg


3B_zps6pvzgnvb.jpg


3A_zpsphlopk8y.jpg


3B_zps6pvzgnvb.jpg


3A_zpsphlopk8y.jpg


3A_zpsphlopk8y.jpg


3A_zpsphlopk8y.jpg
 
Last edited by a moderator:
Very nice work so far.

The helmets lid does look a little more Spaceballs than it does RM art however. I'd consider grinding down that little Mohawk piece until the lid is flush.
 

Your message may be considered spam for the following reasons:

If you wish to reply despite these issues, check the box below before replying.
Be aware that malicious compliance may result in more severe penalties.
Back
Top