Sha Sha Chu
New Member
Hi all,
I am planning on building an M6 Carnifex pistol from scratch (yes, I'm late to the party) to be molded and cast. I am going to mostly follow chinbeard aka Punished Prop's awesome instructions here but I don't want to cast it as one solid piece for two reasons:
1) I'd like to install LEDs where the lights are in this reference pic:

2) I'd like a moveable trigger.
Ultimately I'd like the LED area to be accessible after assembly in case I need to repair the LEDs/switch or change out the battery. The area where the trigger is installed does not have to be accessible after assembly, but I don't want to do something like route out a hole in the cast part after the fact.
This is the first time I'm attempting anything like this, so I'd like to run my plans by the fine folks here and see if they sound reasonable.

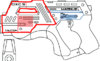
The plan is basically to mold it in 3 main parts (+ the trigger). The bulk of the gun will be a solid piece (everything in black lines). The red panel will be built and molded separately and be used to access the LED area. The shaded red area will be routed out of the main MDF piece to create a hollow to install the LEDs and battery. I'd like to place a switch in the switch that is intersecting the red shaded area. I was thinking of either sinking magnets into the main body and attaching the panel with magnets, or adding little walls to the panel to fit in the routed-out area and just holding it in with friction.
The blue panel will also be built and molded separately, again with the blue shaded area routed out of the main MDF to create room for the spring + upper part of the trigger. Since it won't need to be removed later, I was planning on just gluing it in place.
This approach feels right to me because the panels are made out of separate pieces of sintra/styrene anyway, so I would just be molding them separately rather than gluing them in place before molding. I'm hoping that I'll be able to just make the panels as one-sided molds; I'm not sure if this will make it difficult to make them sit flush against the main body of the gun, though. I do think it will be very difficult to make the beveled areas line up.
Anyway, does this sound reasonable? Does anyone have any better ideas? I've been thinking about this for a few days and this was the best I could come up with.
(Also: first post! Hi! I built a portal gun on a whim a couple years ago and while it was far from perfect, it turned out pretty well for not having any idea what I was doing. Fast forward to now and I received a TechShop membership as a gift, so I'm going to give a more complicated build at try.)
I am planning on building an M6 Carnifex pistol from scratch (yes, I'm late to the party) to be molded and cast. I am going to mostly follow chinbeard aka Punished Prop's awesome instructions here but I don't want to cast it as one solid piece for two reasons:
1) I'd like to install LEDs where the lights are in this reference pic:
2) I'd like a moveable trigger.
Ultimately I'd like the LED area to be accessible after assembly in case I need to repair the LEDs/switch or change out the battery. The area where the trigger is installed does not have to be accessible after assembly, but I don't want to do something like route out a hole in the cast part after the fact.
This is the first time I'm attempting anything like this, so I'd like to run my plans by the fine folks here and see if they sound reasonable.
The plan is basically to mold it in 3 main parts (+ the trigger). The bulk of the gun will be a solid piece (everything in black lines). The red panel will be built and molded separately and be used to access the LED area. The shaded red area will be routed out of the main MDF piece to create a hollow to install the LEDs and battery. I'd like to place a switch in the switch that is intersecting the red shaded area. I was thinking of either sinking magnets into the main body and attaching the panel with magnets, or adding little walls to the panel to fit in the routed-out area and just holding it in with friction.
The blue panel will also be built and molded separately, again with the blue shaded area routed out of the main MDF to create room for the spring + upper part of the trigger. Since it won't need to be removed later, I was planning on just gluing it in place.
This approach feels right to me because the panels are made out of separate pieces of sintra/styrene anyway, so I would just be molding them separately rather than gluing them in place before molding. I'm hoping that I'll be able to just make the panels as one-sided molds; I'm not sure if this will make it difficult to make them sit flush against the main body of the gun, though. I do think it will be very difficult to make the beveled areas line up.
Anyway, does this sound reasonable? Does anyone have any better ideas? I've been thinking about this for a few days and this was the best I could come up with.
(Also: first post! Hi! I built a portal gun on a whim a couple years ago and while it was far from perfect, it turned out pretty well for not having any idea what I was doing. Fast forward to now and I received a TechShop membership as a gift, so I'm going to give a more complicated build at try.)
")