Yeah, the cleaning rod was snapped clean off at the bracket in some shots!
You are using an out of date browser. It may not display this or other websites correctly.
You should upgrade or use an alternative browser.
You should upgrade or use an alternative browser.
The Mando Project (S.A. Blaster, Metal Beskar Ingot and I guess maybe the whole darn suit...!)
- Thread starter JOATRASH FX
- Start date
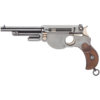
Ok, gang. I need a little sanity-check here, regarding the cleaning rod bracket. I've been staring at this so long I might not be seeing the forest....
Throughout this whole build, I've been going back and forth between it being rounded or angular. There are precious few shots of it during the entire season, and none of them are really clear. (The clearest one is from the promo still, and I'm not counting the closeup in the final episode since we don't know if that was CG or not.)
On the real Bergmann, it's rounded, but I figured that maybe they changed it since they altered so many other details.
Either way, I've been kinda seeing sharp corners where the green arrows are. Now, it could be that the recess in the frame is angled and the actual bracket is rounded (drop-shaped). It doesn't feel like a trick of light either. I have a shell half and bracket for either option, but I'm not settled on which to go with. Maybe the rounded is "safer" since everyone is doing it that way, but at the same time I want to get the thing right and not lean too much on what everyone else is doing, since I've barely glanced at any other models while doing this one so as not to "muddle my mind". I even tried editing out the nut, figuring that it might be leading me in one direction.

Maybe use a rounded bracket but leave the shell angled? If a clear shot appears somewhere, proving it to be round, filling in the corners of the shell is an easy fix, and the bracket is such a small and easy part to replace.
What say you?
Throughout this whole build, I've been going back and forth between it being rounded or angular. There are precious few shots of it during the entire season, and none of them are really clear. (The clearest one is from the promo still, and I'm not counting the closeup in the final episode since we don't know if that was CG or not.)
On the real Bergmann, it's rounded, but I figured that maybe they changed it since they altered so many other details.
Either way, I've been kinda seeing sharp corners where the green arrows are. Now, it could be that the recess in the frame is angled and the actual bracket is rounded (drop-shaped). It doesn't feel like a trick of light either. I have a shell half and bracket for either option, but I'm not settled on which to go with. Maybe the rounded is "safer" since everyone is doing it that way, but at the same time I want to get the thing right and not lean too much on what everyone else is doing, since I've barely glanced at any other models while doing this one so as not to "muddle my mind". I even tried editing out the nut, figuring that it might be leading me in one direction.
Maybe use a rounded bracket but leave the shell angled? If a clear shot appears somewhere, proving it to be round, filling in the corners of the shell is an easy fix, and the bracket is such a small and easy part to replace.
What say you?
Scarecrow Joe
Sr Member
I think it should be rounded.
In my eyes it was more rounded and enter seeing the pics zsherman posted I’d say that’d be my option
Here’s another pic. I could see where this one in dark lighting could cast questions to either or
I think what we are seeing here on this image is an oversized nut, which is larger than the tab itself. But nice pic!!
Thanks guys. Yeah, as I noted in the post, I was aware that it's rounded on the original Bergmann, but since they changed just about every detail in some way for Mando's gun, I didn't want to go by that as a definite.
Here's where I'm currently leaning, after thinking about it a bit more:

It feels like it would be very odd if the light hit the recess in such a way that it would appear angled. I thought maybe the nut was casting a shadow, but the light is coming from the lower left. On the other hand, that, along with pixel-blending, could explain why a rounded bracket might look angled in an angled recess.
Leaving the recess angled (and the bracket rounded) would be a good compromise in lieu of better reference , since a little putty or filler can be put in the corners to round them out if new info is discovered. (And either way, a bracket doesn't take long to print.)
Here's where I'm currently leaning, after thinking about it a bit more:
It feels like it would be very odd if the light hit the recess in such a way that it would appear angled. I thought maybe the nut was casting a shadow, but the light is coming from the lower left. On the other hand, that, along with pixel-blending, could explain why a rounded bracket might look angled in an angled recess.
Leaving the recess angled (and the bracket rounded) would be a good compromise in lieu of better reference , since a little putty or filler can be put in the corners to round them out if new info is discovered. (And either way, a bracket doesn't take long to print.)
danomite40
New Member
I could see some digital compression artifacts/anti-aliasing at play here seems from a real production sense for it to be angled but I don't know much about machining to really say. What's the easier order of operations to machine this on a real part? I'd say whatever seems like the simpler machining process would be the real thing.
Of course since the prop isn't based on an actual bergman, all bets are off") So what's easier to model then?
So what's easier to model then?
Of course since the prop isn't based on an actual bergman, all bets are off
So what's easier to model then?Ah, that's actually from me having run a few sharpening passes on the image. The original looks like this:I could see some digital compression artifacts/anti-aliasing at play here seems from a real production sense for it to be angled but I don't know much about machining to really say. What's the easier order of operations to machine this on a real part? I'd say whatever seems like the simpler machining process would be the real thing.
Of course since the prop isn't based on an actual bergman, all bets are off
As for what's easier to model... doesn't matter, since I already have both variants. (It's a 5-minute mod.) I'm still leaning towards a rounded bracket and an angled recess, since it leaves the door open to change later, on a printed pistol, if needed.
Update time!
It's been a few days, working on various things. I've decided on going with a rounded bracket and angled recess.
Here's something I added at the last minute. There's no real natural place to have a speaker in this thing and still keep it looking screen accurate, so I came up with the idea of a slight mod to the side disc. By raising it slightly out from the receiver, letting a 0.5-1mm thin "crack" all around stay open that is not visible from the side, I figured it would be enough to let a good amount of sound to escape. I haven't tested it, but from my time as a musician I know that sound is notorious for leaking through ANY crack, no matter how small! If no electronics are going to be installed, the disc can be inserted flush to the body.


Some wood grain in the grips!

It's been a few days, working on various things. I've decided on going with a rounded bracket and angled recess.
Here's something I added at the last minute. There's no real natural place to have a speaker in this thing and still keep it looking screen accurate, so I came up with the idea of a slight mod to the side disc. By raising it slightly out from the receiver, letting a 0.5-1mm thin "crack" all around stay open that is not visible from the side, I figured it would be enough to let a good amount of sound to escape. I haven't tested it, but from my time as a musician I know that sound is notorious for leaking through ANY crack, no matter how small! If no electronics are going to be installed, the disc can be inserted flush to the body.
Some wood grain in the grips!
Update time!
It's been a few days, working on various things. I've decided on going with a rounded bracket and angled recess.
Here's something I added at the last minute. There's no real natural place to have a speaker in this thing and still keep it looking screen accurate, so I came up with the idea of a slight mod to the side disc. By raising it slightly out from the receiver, letting a 0.5-1mm thin "crack" all around stay open that is not visible from the side, I figured it would be enough to let a good amount of sound to escape. I haven't tested it, but from my time as a musician I know that sound is notorious for leaking through ANY crack, no matter how small! If no electronics are going to be installed, the disc can be inserted flush to the body.
View attachment 1244548
View attachment 1244549
Some wood grain in the grips!
View attachment 1244550
Awesome!!!!!!
OK, time for another update... and the reveal of the final model and all parts!
Here we go. the final blaster with all the parts (except the four side rivets and the front underbarrel "nub") just kinda stuck together. (Some double-sided tape is holding the sight and hammer in place, but beyond that it's all friction and press-fit. Not that you could lift it like this, but I have been lucky enough to get the fit so tight that the parts "want" to stay together.)

And a breakdown of almost all the parts:

Paintwork has started too. I'm going to try a variation on the blued finish I did on my Blade Runner Leon's Concept COP a while back. This time, I'm going to see if I can add some brown-tones to certain areas and make it color-shift a little.
First was a good one once-over with 800 grit to make the primer grip better and smooth out any minimal print lines that may be visible. You barely see them on resin prints, but I like to go over them anyway. Sometimes I might use 400 grit, always wetsanding, on the little "nubs" left over from the supports. (The engineering resin I use is crazy expensive, but it's a dream to work with and sand soooo easily to a butter-smooth feel. You have to be a little careful when drilling in it though, because it doesn't like the sheering forces of a drill bit. For that reason, I try to make sure I don't need to do drilling in models like this. Tapping, on the other hand, works surprisingly well.)
Next I hit it with Games Workshop "Chaos Black" primer. (Some of their paint products are really good if you use them right. The primers dry in just a few minutes and are very easy to lay down, dust-free.)

I opted to glue the side-rail to the frame before priming. (The two key-squares are sanded almost flat and I've since removed them from the digital model because they aren't needed, and in face make assembly harder.)

The next stage will be to coat it with a special blend of clear blue with just a tiiiiiiiny bit of gunmetal metallic mixed in.
Here we go. the final blaster with all the parts (except the four side rivets and the front underbarrel "nub") just kinda stuck together. (Some double-sided tape is holding the sight and hammer in place, but beyond that it's all friction and press-fit. Not that you could lift it like this, but I have been lucky enough to get the fit so tight that the parts "want" to stay together.)
And a breakdown of almost all the parts:
Paintwork has started too. I'm going to try a variation on the blued finish I did on my Blade Runner Leon's Concept COP a while back. This time, I'm going to see if I can add some brown-tones to certain areas and make it color-shift a little.
First was a good one once-over with 800 grit to make the primer grip better and smooth out any minimal print lines that may be visible. You barely see them on resin prints, but I like to go over them anyway. Sometimes I might use 400 grit, always wetsanding, on the little "nubs" left over from the supports. (The engineering resin I use is crazy expensive, but it's a dream to work with and sand soooo easily to a butter-smooth feel. You have to be a little careful when drilling in it though, because it doesn't like the sheering forces of a drill bit. For that reason, I try to make sure I don't need to do drilling in models like this. Tapping, on the other hand, works surprisingly well.)
Next I hit it with Games Workshop "Chaos Black" primer. (Some of their paint products are really good if you use them right. The primers dry in just a few minutes and are very easy to lay down, dust-free.)
I opted to glue the side-rail to the frame before priming. (The two key-squares are sanded almost flat and I've since removed them from the digital model because they aren't needed, and in face make assembly harder.)
The next stage will be to coat it with a special blend of clear blue with just a tiiiiiiiny bit of gunmetal metallic mixed in.
I honestly don't know yet. I've seen one or two posts about it in the various Mando Facebook groups, but I haven't looked into how far along they are.Where would be a good place to look for a holster for this, to match the one from the show?
I honestly don't know yet. I've seen one or two posts about it in the various Mando Facebook groups, but I haven't looked into how far along they are.
I’ve seen one guy on FB start, but Corellian Dry Goods on insta, who, as we all know, does the most amazing Solo holster rig, is working on it right now. Hit him up and let him know you’re interested and, if we all do it, I know he’ll make it a priority if he has interested parties.
JediJohn182
Well-Known Member
Are you offering them painted and weathered? Or just doing your own one, looks awesome so farOK, time for another update... and the reveal of the final model and all parts!
Here we go. the final blaster with all the parts (except the four side rivets and the front underbarrel "nub") just kinda stuck together. (Some double-sided tape is holding the sight and hammer in place, but beyond that it's all friction and press-fit. Not that you could lift it like this, but I have been lucky enough to get the fit so tight that the parts "want" to stay together.)
View attachment 1245968
And a breakdown of almost all the parts:
View attachment 1245973
Paintwork has started too. I'm going to try a variation on the blued finish I did on my Blade Runner Leon's Concept COP a while back. This time, I'm going to see if I can add some brown-tones to certain areas and make it color-shift a little.
First was a good one once-over with 800 grit to make the primer grip better and smooth out any minimal print lines that may be visible. You barely see them on resin prints, but I like to go over them anyway. Sometimes I might use 400 grit, always wetsanding, on the little "nubs" left over from the supports. (The engineering resin I use is crazy expensive, but it's a dream to work with and sand soooo easily to a butter-smooth feel. You have to be a little careful when drilling in it though, because it doesn't like the sheering forces of a drill bit. For that reason, I try to make sure I don't need to do drilling in models like this. Tapping, on the other hand, works surprisingly well.)
Next I hit it with Games Workshop "Chaos Black" primer. (Some of their paint products are really good if you use them right. The primers dry in just a few minutes and are very easy to lay down, dust-free.)
View attachment 1245976
I opted to glue the side-rail to the frame before priming. (The two key-squares are sanded almost flat and I've since removed them from the digital model because they aren't needed, and in face make assembly harder.)
View attachment 1245977
The next stage will be to coat it with a special blend of clear blue with just a tiiiiiiiny bit of gunmetal metallic mixed in.
Similar threads
- Replies
- 1
- Views
- 178
- Replies
- 1
- Views
- 591
- Replies
- 7
- Views
- 390
- Replies
- 2
- Views
- 608