M 451 Firestorm

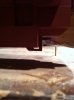
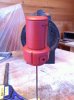
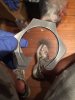
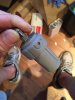
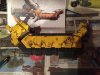
I liked your approach on cutting the dowel at a consistant angle. Nice techniques!

Cheers, probably one of the lesser difficult stages in the build but a task never the less. Have found that the parts I looked at prior to build that I thought would be difficult have actually been the easier parts to get done and vise versa but I feel the hardest task lies ahead.........moulding!
 
Well that's what makes it a great technique. Every time I'm doing something that feels really difficult in the back of my mind I know that an easier, more effective technique exists to create the same effect.

Wedging a round dowel between two square pieces of pre marked wood is a great solution to a simple problem.

What were the especially challenging parts of this build?
 
Glen, the Firestorm looks gorgeous! You did an incredible job with the build. If and when you mold it, I would love to paint one. Sign me up!
 
Motivation shot to spur me on the final stages of this build!
 

Attachments

  • image.jpg
    image.jpg
    652.6 KB · Views: 311
Did a little to firestorm today and redoing canister as not completely happy with first attempt, got some detailing done, and added the under barrel grip thingy
 

Attachments

  • image.jpg
    image.jpg
    1.1 MB · Views: 116
  • image.jpg
    image.jpg
    1.1 MB · Views: 126
  • image.jpg
    image.jpg
    793.4 KB · Views: 114
  • image.jpg
    image.jpg
    1 MB · Views: 130
Started detailing on the canister (redo over) and made a piece to cast so all 4 are identical for the master.
 

Attachments

  • image.jpg
    image.jpg
    750.9 KB · Views: 121
Redoing the canister section of the firestorm this weekend, but this time I wanted to use resin as would be less prep than wood due to wood grain knots etc.
i was able to find drainage pipe of nearly correct sizes to cast the pieces needed to then turn on my lathe, been on the lathe most of today and am really happy with results over previous wooden build! Just a little spot putty here and there and it's done.
looking at this I may even drill out center in order to hold the battery cell which will be powering LEDs, I've also been asked by the commissioner that the canister be removable!
 

Attachments

  • image.jpg
    image.jpg
    1.3 MB · Views: 121
  • image.jpg
    image.jpg
    1.1 MB · Views: 119
Right 2nd attempt at canister almost finished, been casting copies of repeated detailing so is all uniform etc, am very pleased I redid this part as came out much better and would have always felt I should have done better had I used original built piece.
 

Attachments

  • image.jpg
    image.jpg
    867.4 KB · Views: 139
Right guys this has gone on far too long! Have re visited this project with aim to finish, started moulding all the pieces and am planning on getting this thing fully moulded in the forth coming week. So much prep has taken place to get to moulding stage but the end is indeed in sight!
 

Attachments

  • image.jpg
    image.jpg
    594.9 KB · Views: 102
  • image.jpg
    image.jpg
    537.4 KB · Views: 106
  • image.jpg
    image.jpg
    648.2 KB · Views: 104
  • image.jpg
    image.jpg
    625.6 KB · Views: 109
  • image.jpg
    image.jpg
    596.6 KB · Views: 103
Poured another mould over the weekend using a new method I got from a member on here, the results were great and will be using this method from now on as it produces clean crisp moulds with a near perfect part line. Previously I had been using clean clay to divide the piece in a Lego mould box, but now with the new process I pour a silicone layer up to my point where I want the part line to be, once cured I hot glue registration marks to this layer and mould release spray then pour my 1st half of the mould. Once set I then flip it over and remove part line silicone and registration glue leaving a perfect flat first half of mould ready to release spray and pour final half of two part mould! Simple but effective, granted a little silicone waste but worth it as no clean up of clay from mould after!
 

Attachments

  • image.jpg
    image.jpg
    541.3 KB · Views: 99
  • image.jpg
    image.jpg
    590.8 KB · Views: 98
Cold cast some pieces with Aluminium powder last night, first time I've actually mixed it into the resin as previous methods I've only dusted the mould so prep has sometimes cut thru the layer and revealed resin. I also dyed the resin black to bring out the metal finish.
Will be doing a lot this way as firestorm has a lot of metallic parts, and this will req no paint just flat and polish.
 

Attachments

  • image.jpg
    image.jpg
    995.1 KB · Views: 115
  • image.jpg
    image.jpg
    827.7 KB · Views: 85
  • image.jpg
    image.jpg
    983.8 KB · Views: 115
  • image.jpg
    image.jpg
    923.7 KB · Views: 112
  • image.jpg
    image.jpg
    1.1 MB · Views: 99
Lots of casting with the aluminum powder, this is gonna save painting on some parts!
 

Attachments

  • image.jpg
    image.jpg
    902.5 KB · Views: 102
  • image.jpg
    image.jpg
    1,013.6 KB · Views: 94
  • image.jpg
    image.jpg
    918.6 KB · Views: 98
Been matrix moulding for the first time this past week, never done it before and it's supposed to be better and cheaper on silicone.
I agree only it takes a lot longer what with all the different processes involved.
image.jpegimage.jpegimage.jpeg
Here I made a template to go around the piece and raised it up to roughly halfway round, this would be the part line of the mould when finished.
image.jpegimage.jpegimage.jpeg
The part was bagged, then clayed up and registration marks added then mould released and fibre glassed, added a pour spout for silicone later.
image.jpeg
This process was repeated for opposite side.
image.jpegimage.jpegimage.jpegimage.jpeg
The fibre glass was then trimmed and drilled and then separated. Then the part was removed and bag taken away and all clay removed from one half of mould.
image.jpegimage.jpeg
The part was then put back in the mould with the clay left in, registration marked and silicone covered with a brush for detail covering.
image.jpeg
Jacket added and silicone poured to replace clay.
image.jpegimage.jpeg
This was repeated for both sides, until I popped this out the jacket
image.jpeg
Then the silicone was pulled apart and part removed to reveal this clean matrix mould.
 
Did some rusting to the main painted part, I used ferrous powder and a mix of peroxide and vinager to start reaction. I first base coated where I wanted the rust with a brown paint and dry brushing then I painted some of the peroxide solution on top once was dry then quickly dusted the ferrous over the peroxide mix. The reaction foams up but dries like a nice rust crust which after 24 hours can be brushed over to remove excess and unwanted rust.
 

Attachments

  • image.jpeg
    image.jpeg
    1.6 MB · Views: 95
  • image.jpeg
    image.jpeg
    1.4 MB · Views: 107
  • image.jpeg
    image.jpeg
    1.3 MB · Views: 90
Here fully assembled and close to finished, just some weathering and sealing to go.
 

Attachments

  • image.jpeg
    image.jpeg
    1.6 MB · Views: 115
  • image.jpeg
    image.jpeg
    1.5 MB · Views: 96
  • image.jpeg
    image.jpeg
    1.6 MB · Views: 102
This thread is more than 6 years old.

Your message may be considered spam for the following reasons:

  1. This thread hasn't been active in some time. A new post in this thread might not contribute constructively to this discussion after so long.
If you wish to reply despite these issues, check the box below before replying.
Be aware that malicious compliance may result in more severe penalties.
Back
Top