I want to start this post off by stating that I understand other build threads have been done on this particular prop in the past.
With that said, I want this to serve as an in-depth guide for anyone and everyone of ANY experience level. I was once one of “the kids” who lurked the RPF over a decade ago and had minimal funds to make things to the magnitude I wanted/knew I was capable of. Below you will find a complete build “tutorial” with links and plenty of photos.
—— Now for the build ——
First and foremost, research and reference material.
From the point in the movie where Luke goes off in his landspeeder to chase after R2, all the way until dressing as a stormtrooper, his belt remains unchanged and no longer has the incredibly rare and expensive Warner & Swasey scope pouch (the long rectangular pouch on his back side). This makes things a little easier and cheaper for us. Below are several photos I used as reference for the build:


Next step, measurements.
Particularly using the photo above with the screen-used belt laid on red carpet, and the fact that the belt is approximately 2 inches wide, I was able to gather the following measurements using a photo editing app, scaling a google image of a ruler to that 2 inch dimension:


My fiancé also printed out this image on paper to-scale to gather overall length and hole locations for belt holes, brass rivets, silver snaps, etc.
Next, parts and materials.
Pouches needed:
- Swiss Army WW2 double pouch (these aren’t overly expensive or hard to find on ebay)
- WW2 Dutch Hembrug M95 “triangle” ammo pouch (this is the hardest to find and most expensive part of the build if you choose not to go the replica route). Patience is your friend here
Brass Rivets (INCLUDES LEATHERWORKING TOOLS IN KIT!):
WUTA 83Pcs, Solid Brass Rust-Proof Studs 4 Sizes (Brass)
Buckle snaps (INCLUDES LEATHERWORKING TOOLS IN KIT!):
60 Sets 15mm 5/8" Mixed Heavy Duty Snap Fasteners Kit
Buckle:
Tandy Leather Large Rectangular Buckle Blank 11688-00
Belt:
Tandy Leather Heavyweight Natural Cowhide Leather Strip 2" (51 mm) x 50" (1.3 m) 4535-00
Brass rod for loops:
I just got these from Ace Hardware, it’s 3/16” brass rod. I know some others believe they are D-rings, but after trying loops and seeing how it bunches up the leather loops like the photo, I am incredibly confident they are simple round loops. To each their own.
Saber hooks:
These I ordered from the WannaWanga (fellow RPF member) website. These are simply the best and easiest option as they also include the rivets.
Next, the build.
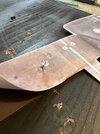
Upon receiving the leather, I immediately went to getting the color down with some wood dyes, as my minimal experience with leather dyes have been unsatisfactory. Here you can play around with getting colors to your liking, I just used a few applications of some Howard’s Restore A Finish in Dark Walnut that I had lying around. Just test on a scrap piece first!

Below is everything I had laid out in place:

I then transferred my holes onto the leather using a thumb tack, basically tracing the printed belt for every hole or rivet. Taping the paper to the belt helps keep things lined up.

From this point, it’s a simple matter of tracing out the two leather loops, and punching holes in their proper places using the tools in your new kits, and experimenting with paints and steel wool on the buckle to your liking. I used Rustoleum matte black spray paint and tried to replicate the wear patterns from the reference photo of Luke on his back.
I didn’t take many photos here as the instructions are included in the kits themselves, but here is how mine looked after those steps:

The brass loops:
This step was fairly simple, I found an object in the house that had the diameter of of the loops in the printed belt (I used the handle of a breaker bar in my toolbox for car repairs) and simply bent a loop around it as tightly as possible, and cut the excess rod with a dremel. To go a step further, I soldered it with a soldering iron to make it more solid, though this isn’t absolutely necessary for display:


After a little bit of a wait, I finally tracked down that elusive M95 pouch. Many believe the dark brown variation is correct and that the tan is not, but I believe the tan ones are simply unused surplus that weren’t exposed to care products, the elements, etc OR the one in the movie was actually painted by the prop department as dyes on leather usually penetrate the “fleshy” part of the leather, which doesn’t explain the light areas from wear on Lukes. This is just speculation, I wanted to make my tan one dark to match Luke’s as close as possible.

I used Angelus Leather Paints with a couple different versions of their brown paints mixed to my liking to get this end product:

And that’s pretty much it! This is my first build thread, so I hope it isn’t too hard to follow. I hope this can inspire both experienced and new builders to give it a try or even take some of my thought process for their own builds!
With that said, I want this to serve as an in-depth guide for anyone and everyone of ANY experience level. I was once one of “the kids” who lurked the RPF over a decade ago and had minimal funds to make things to the magnitude I wanted/knew I was capable of. Below you will find a complete build “tutorial” with links and plenty of photos.
—— Now for the build ——
First and foremost, research and reference material.
From the point in the movie where Luke goes off in his landspeeder to chase after R2, all the way until dressing as a stormtrooper, his belt remains unchanged and no longer has the incredibly rare and expensive Warner & Swasey scope pouch (the long rectangular pouch on his back side). This makes things a little easier and cheaper for us. Below are several photos I used as reference for the build:
Next step, measurements.
Particularly using the photo above with the screen-used belt laid on red carpet, and the fact that the belt is approximately 2 inches wide, I was able to gather the following measurements using a photo editing app, scaling a google image of a ruler to that 2 inch dimension:
My fiancé also printed out this image on paper to-scale to gather overall length and hole locations for belt holes, brass rivets, silver snaps, etc.
Next, parts and materials.
Pouches needed:
- Swiss Army WW2 double pouch (these aren’t overly expensive or hard to find on ebay)
- WW2 Dutch Hembrug M95 “triangle” ammo pouch (this is the hardest to find and most expensive part of the build if you choose not to go the replica route). Patience is your friend here
Brass Rivets (INCLUDES LEATHERWORKING TOOLS IN KIT!):
WUTA 83Pcs, Solid Brass Rust-Proof Studs 4 Sizes (Brass)
Buckle snaps (INCLUDES LEATHERWORKING TOOLS IN KIT!):
60 Sets 15mm 5/8" Mixed Heavy Duty Snap Fasteners Kit
Buckle:
Tandy Leather Large Rectangular Buckle Blank 11688-00
Belt:
Tandy Leather Heavyweight Natural Cowhide Leather Strip 2" (51 mm) x 50" (1.3 m) 4535-00
Brass rod for loops:
I just got these from Ace Hardware, it’s 3/16” brass rod. I know some others believe they are D-rings, but after trying loops and seeing how it bunches up the leather loops like the photo, I am incredibly confident they are simple round loops. To each their own.
Saber hooks:
These I ordered from the WannaWanga (fellow RPF member) website. These are simply the best and easiest option as they also include the rivets.
Next, the build.
Upon receiving the leather, I immediately went to getting the color down with some wood dyes, as my minimal experience with leather dyes have been unsatisfactory. Here you can play around with getting colors to your liking, I just used a few applications of some Howard’s Restore A Finish in Dark Walnut that I had lying around. Just test on a scrap piece first!
Below is everything I had laid out in place:
I then transferred my holes onto the leather using a thumb tack, basically tracing the printed belt for every hole or rivet. Taping the paper to the belt helps keep things lined up.
From this point, it’s a simple matter of tracing out the two leather loops, and punching holes in their proper places using the tools in your new kits, and experimenting with paints and steel wool on the buckle to your liking. I used Rustoleum matte black spray paint and tried to replicate the wear patterns from the reference photo of Luke on his back.
I didn’t take many photos here as the instructions are included in the kits themselves, but here is how mine looked after those steps:
The brass loops:
This step was fairly simple, I found an object in the house that had the diameter of of the loops in the printed belt (I used the handle of a breaker bar in my toolbox for car repairs) and simply bent a loop around it as tightly as possible, and cut the excess rod with a dremel. To go a step further, I soldered it with a soldering iron to make it more solid, though this isn’t absolutely necessary for display:
After a little bit of a wait, I finally tracked down that elusive M95 pouch. Many believe the dark brown variation is correct and that the tan is not, but I believe the tan ones are simply unused surplus that weren’t exposed to care products, the elements, etc OR the one in the movie was actually painted by the prop department as dyes on leather usually penetrate the “fleshy” part of the leather, which doesn’t explain the light areas from wear on Lukes. This is just speculation, I wanted to make my tan one dark to match Luke’s as close as possible.
I used Angelus Leather Paints with a couple different versions of their brown paints mixed to my liking to get this end product:
And that’s pretty much it! This is my first build thread, so I hope it isn’t too hard to follow. I hope this can inspire both experienced and new builders to give it a try or even take some of my thought process for their own builds!
 Well done