Leviathanworksh's 2014 Model Contest Entry

Okay - So I thought I would give this one a go. I love a good contest because it brings out some crazy ideas in people.

So a bit about me first - I'm Jake, I am a prop and model maker based in London. I do a lot of carpentry and bits as well, I was even once a circus performer. I have been making models since I was a little kid, I have always been a bit model nuts - and have a stack of assembled and unpainted kits on the go at any given time.
I work full time as a prop maker so I don't usually get to make anything for myself, hence why this was too good to pass up. The stuff I build day to day ranges from small touring to Opera and Theme parks. I do normal TV and film stuff as well.

So what am I making?

Short answer - apart from a doodle - Not a bloody clue [please read in a comical British accent]

I am doing a total scratch build spacecraft, I'm even going to try and avoid using kits for parts if I can. If it looks like I will be using them I will list what kits I used and what from them. I want to put some electrics into this as well - Who doesn't love a model with lights right? The body work will be a custom sculpt - not sure if I will Vac form or mould the pieces yet. I'm keen to use as many found objects as possible, so my first day of making (below) has involved anything I could find in the house!


First - Here is the obligatory Starting post - original thread in the background and assorted household materials - some rods and tubes as well.

20140406_093842.jpg

Second some more bits and bobs- The silver thing is a fancy anti-perspirant cap - so I ripped it apart and used some of the bits, Filled some bottle caps with Bondo - they will be used a bit later.

20140406_101021.jpg

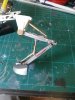
With a couple of other random items - Here is my turret rough assembly. Lots still to do on it - but nice fun to start with.

20140406_230122.jpg


Stay tuned for more- I like to try and update regularly so subscribe if you like :D


Jake

Leviathan Workshop
 
Okay

So update number 1 on the 5/5/14

so far its not too shabby. I had to change my mind a little about Greeblies - I couldnt find as many bits as i wanted from random items, so here are the 2 kits I have been using

20140505_125847.jpg

The Huey kit I went and brought for £5 and the Bismark kit I already had - The castings on the Bismark kit are terrible - so it got religated to my random components box a while back.

Port and starboard thrusters -
20140428_174819.jpg

So these are made out of a whole load of junk, The bottom of the burner is 3 shot glasses stacked up - Cheap plastic ones from the local pound store.
The white ring is a Jumbo Curtain ring - I brought these from the same place for an animatronic job a while back
Then its a Dr Pepper cap
Finally - possibly the most disgusting childs sweets (candy) that I have ever tasted - it was essentially a green syrup that was so sickly sweet that it almost made me chuck. But the lid was exactly what I needed so I brought 2. Im not sure my tastebuds will ever return - but thats the cost of art right?

The Greeblies are mostly bashed from the Huey Kit - except the large Actuators that run from the cuirtain rin up - they I think were supposed to be guns for the bismark. As i said- Terrible cast kit.

The Rear Engine

20140505_160659.jpg

So this is the rear engine which is made out of a few elements, The main body is a Plasticote spray paint lid - A small hole taken out of the bottom for LEd's but thats another update.
Attached to the side are GIANT Rawl plugs - again from the pound store - split down the centre and then layered up on the side.
On top of the spray cap is the lense from a plastic torch. Has a nice set of defined rings so that was mine straight away!! - inside that to give some shape and detail as kind of a burner filter thing
A plastic plughole strainer.

So in the next update I'll start to fill in all the information about the body work. Slightly different from my original method I planned- but will look nice from the outside

Other updates will include all the LED's - theres quite a bit going on with that.

Thanks for listening


Jake
 
Thanks guys thats very flattering. Had another busy day today so will post some more updates towards the end of the week.


This is my favourite kind of work to do. I have this massive box of junk and every time I have a look I see it differently.
Will keep detailing the process for those that are interested.

Jake
 
So here we go another update


This time it is all the landing gear.

20140506_120724.jpg

So this is the model that I used for casting, Its made from some 3mmx3mm square styrene rod that I used to build up the 'legs' of the unit - The foot is made from a Ladys shaving razor stand (thank you girlfriend for letting me steal it)

The greeblies are mashed from the Bismarck kit and the Huey, They are really only there for later use, wait and see in a few photos time.

Naturally I only had enough bits to make on - So its moulding time!!!


20140506_125848.jpg
I separated the model onto two base plates, The Clay is Chavant and just really to help with any undercuts, The small blob is to make a place for a vent hole later. Note that the joining sprues are really long, they wont be like this on the model, but I would rather have more to cut off in case of air bubbles.

Some quick acrylic boxes to hold the silicone into shape - I should mention that I am fully aware of how irritating a shape this is to mould, I accepted before I did it that I would most likely get imperfections to tidy up on the cast. I also wedged chunks of clay into it to save me some silicone - needless to say my mould was very far from a nice block when it was done.

20140506_140854.jpg

But the clay blobs saved me on lots of material so this was a bit cheaper than first thought.

20140506_142852.jpg

Ooooh silicone - I'm just using a standard RTV silicone that has a 30min pot life and a 6 hour demould time. These moulds will later become keys for other things when I chop them up later. I didn't even bother de-gassing it, I just poured from very high to eliminate most of the air. I then taped the mould to my band saw table to vibrate any bubbles out for about 10 mins.


After much waiting the mould was cured, I cast the pieces in an EasyFlo 120 from Mould life, its actually a far better resin for slush casting but it was fine for this, Easyflo 120 doesn't snap cure so its builds up in layers more like latex.
A little amount of cleanup was required, the flash for the seam was non existent (wooop) - but a few air bubbles appeared so they were sanded off - and one of the greeblies didn't come out well enough so I sanded it off completely.


20140516_123256.jpg

And ta daah the finished casting, this has had all the clean up done - and then a few actuators made from Brass rod added - and some hydraulic hose. Its been given a flat pewter paint on the resin parts, and some gross dusty texture applied as I hate models that look too clean, did that with some milliput sanding and some superglue to get it in the right places. Then a little top piece to help them attach to the under carriage of the model. This has a component from a german gun attached to make the little joint disk. else its all styrene.

So there we go. More updates coming - bodywork is slowly getting there - but a few design changes have slowed that down. Need to build a small armature for it - but currently my welder is out of gas so I need to get that fixed first. Led's being added, some paint has been done- So Slowly getting there.

Jake
 

Attachments

  • 20140506_120721[1].jpg
    20140506_120721[1].jpg
    541.8 KB · Views: 124
  • 20140516_123256.jpg
    20140516_123256.jpg
    1 MB · Views: 145
So a little bit more of an update

Firstly on the body work, This is it kind of taking its basic shape - I have changed my mind a few times about what this ship will be, which means I have hacked it about quite a lot.

The front end of it has been done as a poly carve then skinned in bondo. lots of filling and sanding later - I was shooting for something Gerry Anderson esque, but it didn't quite work the way I wanted. So I extended the base plate of the body back by 100mm. The gap in the middle is going to become a cargo platform. My idea was essentially that this was a small shipping vessel (read possible smuggling and the like) so I will be making a few small shipping containers to go onto the platform and adding more details and the like.

The conical engines will attach to the sides as well, But as you can see there is loads to do!!


20140520_131930[1].jpg


Sadly I have run out of Firely to watch (yes even the commentaries) so its time to find a new show to re-watch.

20140517_135450[1].jpg

I also chucked in a small LED set for the main engine, its 3 reds and an amber - which look lovely when its all turned on. Sadly I have to start running all these in now or I will never get back in again. I have a small set of GOW bulbs wired in series which I brought as a unit for something else a while back - they are going in as well, so some extra electrical bits just to give it some detail.

Still have the bridge to build as well, so loads to do.

Oh and a word from the wise, If you own a husky... don't do model making at home, husky fluff gets everywhere and doesn't scale well.... Here is the guilty culprit! ( I guess its my fault for calling him Loki)


1606297_510404900720_1758714792_o.jpg

More updates coming soon, an afternoon with car body filler awaits me


Jake
 
Okay so - This is phase one of the assembly!

20140527_003635.jpg
The space in the middle is a kind of Cargo area - more for you to see on that in the next few days.

I still need to fit the other thruster to the other side - more sanding and then prime it all out -

A couple more kit bashed bits on this side- in the back wall of the cargo bay - I will post photos of the two kits I stole those bits from in the next post.

The only part of this I am currently un- happy with is the cockpit windows, so we shall soon see what I come up with to improve that section, The thrusters have a white and an amber LED in there- they just need soldering into the circuit.

The nose end is almost entirely body filler - I have a picture of the poly carve somewhere- but I didn't like most of it and cut the back end off. I then took out all the poly and thickened it from the inside.


20140527_003654.jpg
This is the back end of the spaceship all primed out- lots of painting to do here - but otherwise mostly done - i'm sure I will find things to tweak in the final few days. A few kit bashed parts here - also a few 'IT' connectors that I found in a bin, I also used the cable as pipes. Engine is the same engine as in earlier posts - it had some black flexible PVC put on the inside to mask any light spill. Final coat of primer on the back end tomorrow (THANK GOD!!)


20140527_003727.jpg

A quick shot of the underside which has all sorts of stuff put on to detail it - Bits of the Huey hog - some windows out of a car kit - some bits of another car kit hacked around. Grey bits are from the Bismark - Green from the huey hog, Orange are from the 88 German gun kit.

Any my usual assortment of bottle caps and things - Dr pepper has been a great friend on this project so far, Milk lids - and a couple of random ones from my mould tray that I used to use.


The two bolts will be replaced with threaded bar tomorrow to make the full armature stand for it.

So there we go for now - last few days so everything proceeds at a manic pace as always. Couple of nice treats coming as surprises, all in the name of context :D
Bring on the late night painting sessions

Jake
 
So this will be the penultimate post!!

Like everyone its a bit of a mad scrabble to get it done... ugh. But the light can now be seen from the tunnel.

So here is a pic of the two other kits I used to bash out the underside - they were fairly good castings, and nice and cheap. They aren't the kind of kit that I would build for myself but if you like cars then there not bad.

20140527_194019[1].jpg

Here is the bottom all primed out and lovely ready for painting - I have chosen to use the Revell Acrylics as I quite like them. I have used all sorts of methods on this, Painting, dry brushing, puddling, Airbrushing, Salt technique and the hairspray technique. and millions of washes... sooo many washes.

I love weathering things I think its one of the bits I like best so its one I spend a lot of time on.

So this is a shot of the bottom - all painted and ready to roll. This may be the last shot of the underside I get fully as once its assembled there is no way to get the angle. As always with more time I would have done more- but im pretty happy. The salt method for rust has turned out okay on the underside - but not as well as it is on the top (you will see later today) The landing gear looks weird when photographed from beneath as its set for a kind of 'dynamic take off' pose.

Lots of grain of wheat bulbs under there to add some interest.

20140531_104857[1].jpg

I also HIGHLY recommend bench dogs - they are the orange non slip things you can see at the edge of the frame - utterly brilliant work holders and they were pretty cheap as well!


Final shot for this post - Base board - The bolts are secured from the underside using type D insert nuts - they have a plastic cover to go over the tube a bit later - but that's essentially it. The texture is done with plaster and sawdust- and its purple because - Why the hell not - There clearly are not enough purple planets!

20140531_104958[1].jpg

So that's it for the penultimate post - a couple of nice bits to come in the final post - but still lots to do today.

Hope you all have a lovely modelling filled weekend - and to my fellow competitors - Good luck today - its going to be a long one! I'm really excited to see what other awesome stuff is produced! - Next time can we have longer please!!!!
 
looking good man... yea, seems we're all in a mad scramble.

yeah crazy day ahead. to be honest IF I had an extra month I would have still built something that took all that time! I found a lot of time to work on this - yet it could be even more complicated!!!
 
So here we go!


This is the final product as it were - as always im not totally happy and there are things i would love to tweek. Alas time is not our friends here, but its been okay. some bits were fiddly but mostly it was ok.

So when I first started this I wanted to make somthing inspired by the Gerry Anderson and his world of vehicles. At times I strayed away from it - and then accidentally it has headed back in the direction towards the end. The concept is for a small Cargo ship - for kind of small planet to planet shipping, or maybe space depot to space depot. Shes quite and old ship as you can see by all the weathering, but the kind of big girl who can be nippy if she needs to. Well without any further ado. Here she is - My finished model contest entry.

So here we go - Obigitory front views

front 1.JPG

I deciden to name the boat Cronus - I had a few choices but liked that the best

Front 2.JPG
another front view

Rust detail.JPG
Here is some detail of the rust effect around the cockpit area and, well, all over the bloody thing - shes quite a battered old bird. I used the salt technique here again - worked pretty well and gave some great discolouration

side 2.JPG

side 1.JPG

Two side views - in its kind of dynamic take off pose, this is how it shall live up on the shelf.

thrusters.JPG

Detail of the thrusters, there is a little LED pair in there to give it a nice glow

landing gear.JPG
Here is a little shot of the landing gear and underside that I can show now its mounted - please refer to earlier images to see what alll the detail is.

top.JPG

What she looks like looking over the back from cockpit height.

back.JPG

And my favourite view - the main engine - a few LED's that pack a punch.

Cargo.JPG

And for those who havent spotted them already - I put a few Decals on the Cargo - I thought it was quite nice to have a Weyland logo as well as Blue Sun Corp. - Yes I know they are different universes, but i like that they kind of are mashed in there in a cargo bay. So to all the purist's - Naaa :p . I love Firefly and Aliens equally so i wasnt going to choose.

Its been a great journey - I would love to get another crack at it next time, so many more ideas, maybe more structure with my time.

But thanks for the oppertunity to get my hands dirty, and to all the others Best of Luck - hope it all goes awesome for you

Jake
 
Back
Top