March 3, 2024
When we last left our intrepid builder, he had just finished cutting down the the acrylic cockpit dome and needed to move on to scribing it. After doing some tests, scribing on the previous one I botched, I didn't feel that comfortable doing it on the acrylic. The surface was too hard and brittle. I've ordered some grey styrene semi-spheres from Plastruct and when they arrive I'll get back to it. Keeping with the plan of doing as much as possible as subassemblies I moved on to the bomb pod pylon.
This was made up of three pieces of two cut down parts from the five Morser Karl kits and then laminated together.
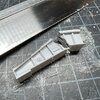
While that was drying I started working on the bomb pod itself. This too is made up of two identical parts from the aforementioned Morser Karls. These were to be cut down and joined in opposing directions joined by sections cut from a single pieces from the Leopold.
After determining an approximation I made my cuts with a razor saw and miter box. Some careful sanding yielded two perfectly symmetrical halves.
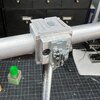
A highlight of the week was the armature arriving!! Thank you, Swgeek! Six points of mounting goodness.
The bottoms of pieces needed a rectangular opening cut in them so a guide was made using Tamiya tape. The bulk was hogged out with a Dremel and then a file was used touring it home.
What happened next was another lesson to remind me that I'm new to the world of scratch building and that I need to do my homework and really study and pay attention to my reference. That also means using reference from multiple sources and comparing notes. I got tunnel vision and got locked in, assumed more like it, that the halves of the pod were symmetrical. They're not.
One is slightly wider and I found out after I had joined the pieces together and went to glue the greeblies from the Hanomag on. It was too narrow.
Fortunately I was able to cut one one of the halves off without any damage. I've learned too the part of kit bashing is amassing kits from previous builds. I was fortunate/lucky to have a spare part from the remaining Morser Karl albeit a different color.
I managed to get it rebuilt and to an acceptable level of tolerance for my standards. The photo below encapsulates my adventures yesterday. Did I mention I tried eyeballing the angle to cut the pylon and ****** that up too? Oh yeah, it was an exciting week.
Again I found myself box diving and fishing out duplicate parts to correct my mistake. Cut, glue, clamp. #clampchamp
While that was gluing I decided to really study the angles that the pylon and the pod join. This was challenging because the surface that the pylon is glued to is inside the pod. In an effort to get it as close to perfect as possible I used a leftover piece to practice on. After carefully studying multiple angles in different photos, and literally counting rivets, I got a fit that worked for me. I did the same for the length.
Shortly after the tube for the fuselages arrived I made a jig to hold the sections securely when it came time to do the scribing. I taped a piece of sandpaper to a practice section, put it in the jig and it worked perfectly for sanding the pylon piece to match the curve of the body.
It worked on the finished exactly the same.
After adding some greeblies, the pylon was glued in place using 5-minute epoxy and it was finished.
If I learned anything this week it's that I'm in a different league now. The hobby of scratch building and kit bashing is more than just buying kits, cutting and gluing parts together. There's a reason not everyone does it and the cost is just part of it.
We're like archeologists. We study objects, do research and try to reverse engineer them in a hope of learning what their makers were doing. The models we build are our studies that we base our findings off of. That's why it's imperative that we share our information with information with each other. So we can all learn and make new discoveries or better ways of doing things in the future. But the best information is useless if you don't use it as I learned this week.
")