Andre771
Active Member
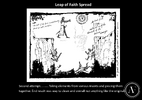
This one was a challenge for sure. When I first started wanted to recreate the grail diary this spread was the inspiration to do it. Something about it really appealed to me, the sense of mystery and adventure all in one place!

Over the years I have tried many different attempts to get this as accurate as possible but to no avail. Because of my initial screenshot source, my attempt turned out to be very blurry and I was not satisfied with it………..So back to the drawing board.

This time I decided to trace the screenshot and use elements from different sources to build up the finished picture. Not a bad attempt but still way off from the original.

This time I decided to try to use a 4k screenshot of the spread and work from that. Zooming in on the 4k screenshot produced a much better result and a better image to work from.

Using Photoshop and Lightroom I was able to “slice” up the screen shot into sections. This allowed me to work with each element and enhance and extract as much information from the pictures as possible. I would typically take the image and use a “black and white” filter to extract all colour followed by a “levels” filter. This allowed me to remove unwanted artifacts and produce a relatively clean image with a white background. A little tweaking in lightroom to sharpen and enhance the blacks and I was away.

The tricky part was then bringing all those elements back together and morphing them so that sat correctly to the main spread layout. I used the zoomed in screenshot as a background and proceeded to lay my edited and redrawn elements overlayed on top. This ensured my recreation, and its elements all lined up correctly. Any missing parts were then carefully hand drawn in. They were mostly just areas where an element would join to another ensuring a seamless picture. Once all the elements were in place then I deleted the background.
One of the hardest parts to recreate was the right and bottom section. Having Indy’s thumb over the area certainly didn’t help and looking at others work they were all very different in how they filled in this area. Without original source material I was going to have to draw this area in to look in keeping with the rest of the spread.

Here’s the final spread. Overall I am happy with how it has finally turned out, although there is always room for improvement…………………..Who knows I may give it another shot someday!

Over the years I have tried many different attempts to get this as accurate as possible but to no avail. Because of my initial screenshot source, my attempt turned out to be very blurry and I was not satisfied with it………..So back to the drawing board.
This time I decided to trace the screenshot and use elements from different sources to build up the finished picture. Not a bad attempt but still way off from the original.
This time I decided to try to use a 4k screenshot of the spread and work from that. Zooming in on the 4k screenshot produced a much better result and a better image to work from.
Using Photoshop and Lightroom I was able to “slice” up the screen shot into sections. This allowed me to work with each element and enhance and extract as much information from the pictures as possible. I would typically take the image and use a “black and white” filter to extract all colour followed by a “levels” filter. This allowed me to remove unwanted artifacts and produce a relatively clean image with a white background. A little tweaking in lightroom to sharpen and enhance the blacks and I was away.
The tricky part was then bringing all those elements back together and morphing them so that sat correctly to the main spread layout. I used the zoomed in screenshot as a background and proceeded to lay my edited and redrawn elements overlayed on top. This ensured my recreation, and its elements all lined up correctly. Any missing parts were then carefully hand drawn in. They were mostly just areas where an element would join to another ensuring a seamless picture. Once all the elements were in place then I deleted the background.
One of the hardest parts to recreate was the right and bottom section. Having Indy’s thumb over the area certainly didn’t help and looking at others work they were all very different in how they filled in this area. Without original source material I was going to have to draw this area in to look in keeping with the rest of the spread.
Here’s the final spread. Overall I am happy with how it has finally turned out, although there is always room for improvement…………………..Who knows I may give it another shot someday!