Jason's TOS Battlestar Galactica *WIP*

opal1970

Well-Known Member
Hi everyone,
*just a little confused about the hacked RPF site* I have been writing a whole novel there... kinda like the episode where Kirk is in the "Bad" universe. :eek

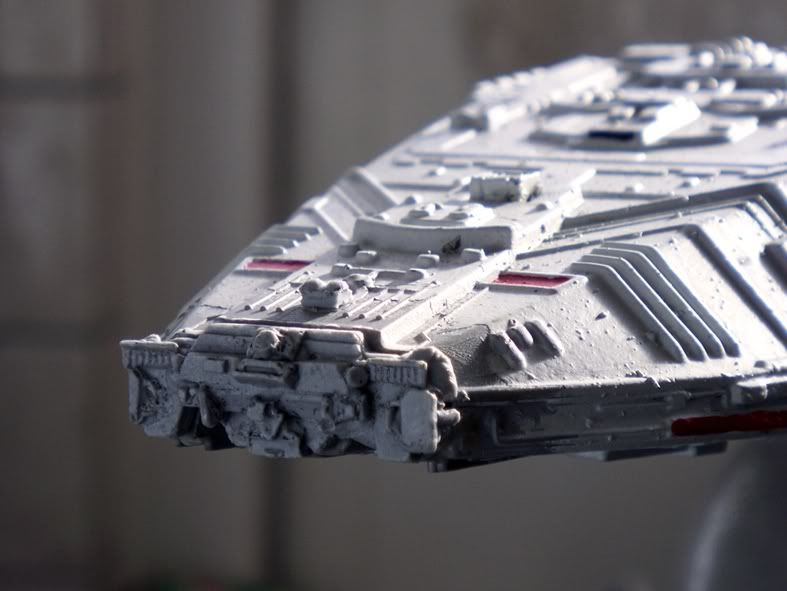
well anyway, as the title says, I will be protocolling my TOS Galactica build here. I am still waiting for some tools to arrive (some I have not ordered yet, but more on that later). So I do not have a lot to show yet. A little background on why...

Stardate unknown...

Another bad day in the office, laying back in the sofa I started playing with the idea of doing a lighted Enterprise version, and the more I thought about it, the more I liked the idea.

After doing a little research it was clear to me that the Polar Lights 1:350 Enterprise refit was really the only choice, but I wanted to sharpen my skills. Actually even more than that... I wanted to learn some of the things that were a mixture of totally unknown, BlackBox syndrom, down to really scary... things like Airbrushing, Molding/Casting, Lighting/Electrical, Weathering/realistic paintjobing, etc. :lol So I decided to do some other models first. The very first being the TOS Galactica, which is out of the box, a pretty straight forward kit. So why the Galactica first, you may ask... well, on the one side because it is so easy and on the other side... because it is so difficult. You see even though it is to be a practice build, I still want it to be a showcase.

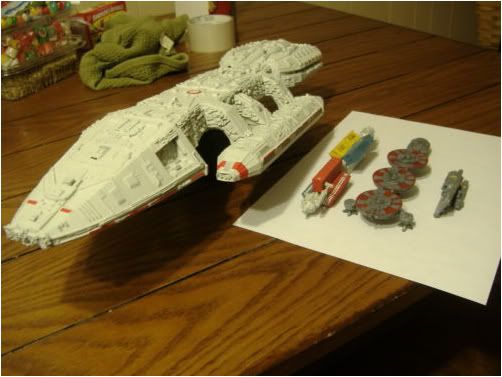
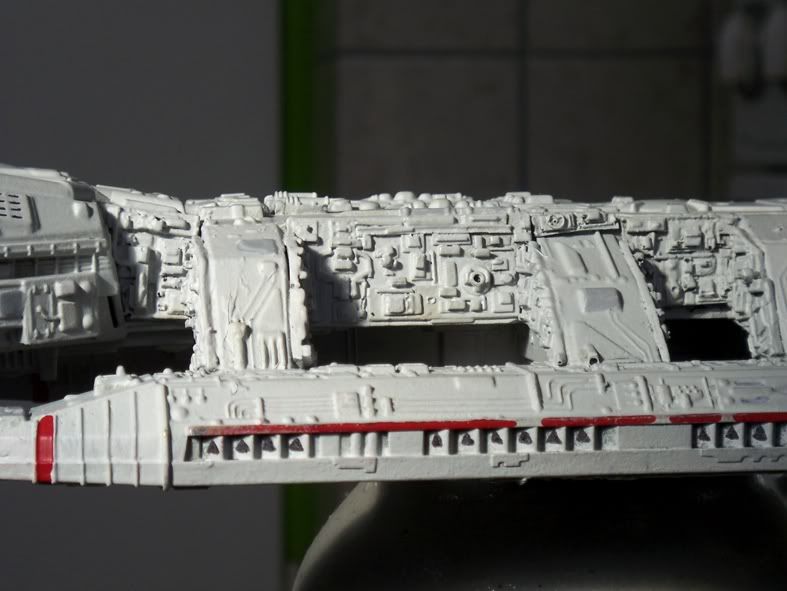
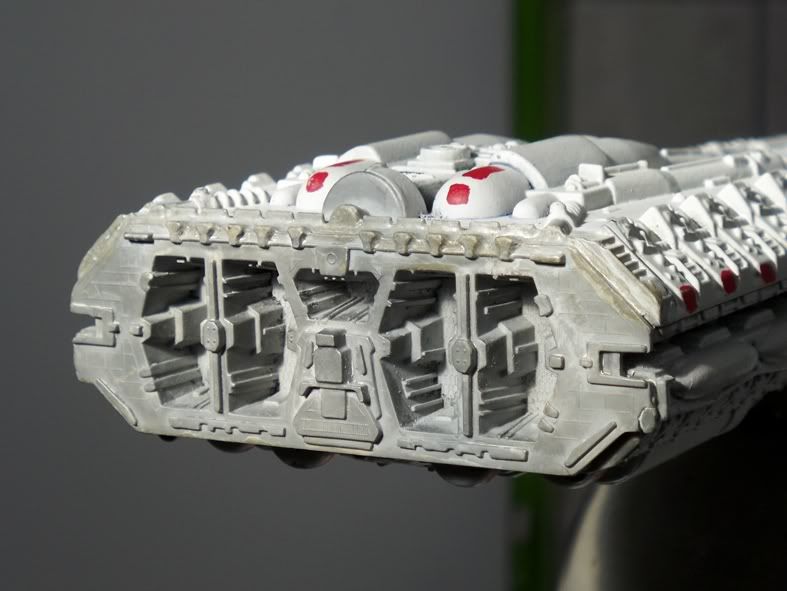
Well back in Nov 2011 I got a TOS Galactica kit and ordered all the aftermarket stuff I could find. Since and before, I have been reading the reviews, and sadly I have to agree… the TOS Galactica model from Revell is probably one of the worst made models I have ever seen as far as being accurate to the original. Furthermore, even at this stage I realize that the few pieces (under 15 pieces) are going to be a pain making everything fit together seamlessly. So you see, if I want to make her look good, I will have to do and learn alot.

Well that is the background on the whole thing, we will see how close reality comes to the picture in my mind's eye. I will be getting some pictures up as soon as I have anything tangible for you.

Thanks for reading,
Jason

PS - Just for future reference, if I get around to it I would like to document the progress in YouTube, I will add links to the videos here to this post so as to keep everything together.​
 
Last edited:
Accurization Kits

I ordered the only two acurization kits for the TOS Galactica that I could find. Have a little bit of mixed feelings about them. The first set was, well, ok (NOTE: after doing a little research I am not sure if the set I bought is from the original owner, in the set I have, there are pieces which I believe to be missing, so this may well have been a "copied" set)… at any rate, it provides needed detail but the casting was not done very good, quite a few bubbles, small details that did not get enough resin, and there is a typical orange skin effect on all the pieces. I am assuming that they either sprayed too much release agent onto the original mold, or sprayed too much into the mold during casting. Either way, the pieces do not have crisp details and being that the surface is completely different to the surrounding model they will stand out like a sore thumb without some major restoration work (which I am unsure will even be possible with all the nooks and crannies). On top of that, they really have nothing to do with "accurization" looking like a typical Star Destroyer detail, which really does not have any "set-in-stone" relief patterns (professional Star Wars modelers out there, please forgive my ignorance if this is not quite true ) but rather just random bumps, squares, towers, etc.

The other set from Arvey Model Products saved my day...
Battlestar Galactica Resin K - ARVEY Model Products

Thank you AMP for offering a very nice product that was worth every cent.
it has much more detail (requiring more than just a little surgical work on the original plastic model) but is astonishingly true to the original studio model and to my surprise a lot of extra pieces, even pieces that I have yet to locate in the directions. I am assuming that the doubled pieces are in case the casting did not go good on one part or another to ensure that there is almost always at least one backup and the “bonus” pieces just for good measure. I can’t argue with that.

Other than that, there does not seem to be alot out there for the TOS Galactica, if anyone knows better please feel free to shoot the links over to me.

Thanks for reading,
Jason
 
Resources

Compared to other SciFi topics the TOS Galactica does not have a lot of reference material. Here are some of the sources that I will be using to do my build:

Of course I had to go out and buy the DVD of the original series... My wife is already wondering if I am buying all this stuff to build a model or building the model so I can go out and buy this stuff. :lol

Nice kit reviews:

Original studio model photos by Gary Cannavo (Thanks Gary)

A very well done schematic of the Galactica by Jim Stevenson (along with a massive amount of other BSG blueprints):

For finer details here are some awsomely well done scratchbuilds

Jim Creveling: Galactica Miniature By Jim Creveling
Marko Osterholz: Battlestar Galactica | ROCKVOICE | Marko Osterholz
Here is a very nice resin kit, done by Scott Spicer: modelermagic.com

Here are some Battlestar Galactica related sites where there is really a wealth of information and experiences:

Well that is everything that I have for now, hope that helps anyone who wishes to attempt to turn the original Revell kit into something really special.

If I find any new resources I will update this post to keep this information in the begining of the thread and all together so that years later no one hast to search through many pages of posts in this thread to find the data.

Jason
 
Last edited:
Ok I have been doing a little research but am not certain about which airbrush I should buy. I am a little hesitant to get a "everything you need to get started for beginners" package... (even though that is probably exactly what I need). I am kinda a perfectionist and I want tools which can help me create a reality that mirrors the picture in the back of my head and I LOVE doing very fine detail.
I have been reading up on Iwata airbrushes and they sound pretty good but the price differences are pretty huge. I do not want to say that money is not a factor, but I do want something that will do the job right the first time.
The CM-C Plus has a pretty small nozzel (0.23 I believe) which would be more than small enough for any small detail jobs... however it comes with a nice price.

I have read comments that the HP-C Plus is also very good and its price is somewhat more affordable.

Is there anyone out there with experience with these or other airbrushes?
Please feel free to be critical... to be honest I do not even really know what I need, other than probably one for small detail and one for large spray coverage (i.e. lightblocking the inside and priming the outside of models).

Thanks
Jason
 
Ok last post for today,

as for where I want to go with this...

  1. definatly want it to be as close to the original as possible while not overdoing it on the workload level.
    .
  2. I will also be lighting it as close to the original as possible. For the most part I will be using a VERY fine fiberoptic and warm white LEDs(with exceptions - see below)
    .
  3. I will probably add a couple extra lighting goodies that have nothing to do with the original, but doing so in such a way so that I can turn them off if I just want to have the original in front of me. Things like:
    • Navigation and strobe lights similar to Star Trek ships... seems only logical that even a warship would have these mounted for peacetime or friendly territory travel and turn them off during wartime operations (which is why we would have never seen them in the series, right?).
      .
    • I would like a "Battle Mode" button, which turns on the typical red/orange explosions we always see on the underside everytime the Galactica is getting her butt kicked. Not quite sure how I am going to do this, but I have a couple ideas that I will have to try out.
      .
    • Landing Bay chaser lights... this would be difficult at best due to the size of the model anyway, but the accurization parts do not really make lighting up the landing bays an easy task.
      .
    • in addition to the white "main" engines, I want to have a flickering blue around the edges (barely visible with all the white light coming out)
      .
    • Also similar to the Star Trek ships, I would like to have an LED light up the "Galactica" on the landing bay sides... of course a very weak light that is just enough to light up the letters and little else.
      .
  4. I would love to really build up the landing bays with a squadron of vipers, shuttles, crates, transports, ect. but I am not really sure if it is even possible on this scale, just roughly judging it, I would say a cylon raider would be about the diameter of the spru-tree that the model parts are attached to. ouch.
    .
  5. One of the things that I love most about the classic series is the music that you hear in the begining... makes you feel kinda sad, kinda alone but nevertheless you feel a shimmer of hope and courage to go out and face the unknown... ok you know what I mean. I would like to have a button that starts this music, and maybe other sounds as well... things like battle sounds, engine sounds ect. don't know yet.

ok that is the extent of my madness for now, I will just have to see where this takes me. :cry

Jason
 
Last edited:
Hi Ozzy,
Thanks... yeah, I do have a plan alright... and it looks pretty good on paper, only problem is that reality has a habit of getting in the way. :)
 
Looking forward to your build.

I'm sure some members can give you some advice when you need it
 
Thank you Apollo (like the name btw ;) )
as for getting advice from all the others here, who rather than myself, know what they are doing... I am counting on it. :)
 
Almost forgot, since I started my research, I have gotten "friendly" with the idea of using self-coded microcontrollers to handle all the blinking and such. This will really come into play when I get around to doing the 1:350 Enterprise, but I will be putting some chips into the Galactica as well.

I will be using an Arduino board to do all the testing, which is a pretty awsome piece of hardware and amazingly cheap (considering the costs of most of the lighting kits out there) anywhere from $20 - $30.

Arduino home page: Arduino - HomePage
at anyrate, I found a page by M.I.T. that describes how to use the Arduino to export code to a Microcontroller such as an ATtiny85 which is about the size of a fingertip and costs around 20 cents for one.

ATtiny.jpg


and an excellent youtube video from the guys at Makezine.com showing the same.


The only drawback is that you do need to have programming skills and at least a basic knowledge of how microcontrollers work, both of which I have... to one degree or another.

The ATtiny chip is rather limited with its outputs, you have about 4 channels, 2 of which are capable of doing things like LED fading. Which might be ok for the Galactica project, but for the big "E" i am definatly going to need more. There are other chips that have more outputs but I will not go into that here.

Jason

PS - I will probably run all the electrical at 9 volts, I will definatly use a wall power source while it is sitting behind glass but I like the idea of having the possibility of hooking it up to a 9v battery, taking it down from its stand and passing it around with working lights... even though they will probably only remain lit for about 10 minutes... still it is a nice feature.​
 
Last edited:
I am not sure I agree with all of it but here are some specifications for the TOS Galactica taken from Tecr.com Battlestar Galactica: Colonial Battlestar (NOTE - specs are for standard Battlestars, values in brackets [] denote values for the Galactica):

CAPRICAN DOCKS COLUMBIA CLASS BATTLESTAR

SCALE: .................Capital
LENGTH: ...............1,265 meters
TONNAGE: ............20,000,000 metric tons
SPEED: .................0.2C sub-light
POWER: ...............1 Tylium energizer (7,360 Terawatts)
............................2 fusion reactors (43.8 Terawatts)
STANDARD CREW: ..496 [1,012]
............................24 officers [32]
............................200 warriors - 90 are fighter pilots [240 - 180 are fighter pilots]
............................272 crew [496 crew - 134 civilian]
PASSENGERS: ........510 troops [110]
CARGO CAPACITY : 600,000 metric tons
CONSUMABLE: .......18 months [9 months]
MANEUVERABILITY: class C
HULL/ARMOR: ........2.8 to 4 meters
EM-SHIELDS: .........20% - 40%
SENSORS: .............Short/Medium range, sub-light, 200,000 m^3/s
SCANNERS: ...........C at 300,000 kilometers
WEAPONS: ............32 Blaster batteries
............................2 Turbo-Laser cannons
............................12 20 megaton Solonite missiles (anti-capital ship)
............................2 400 megaton solonite bombs (planetary bombardment)

FIGHTERS: ............75 Starhound class Vipers [150 w/ pilots from Pegasus]
...........................12 Landram surface transports
...........................12 Mk. VI space shuttles​

I am unsure as to exactly which class the Galactica is supposed to be, I have found references to both Nova Class and Colombia Class. Perhaps the one or the other is this form factor mentioned in the new series. Does anyone have any information on this?

Thanks,
Jason
 
Last edited:
I sanded down the rough spots on the kit pieces today. The left insert wall that is suposed to fit in the head of model was terrible. The factory cast/mold was done poorly and it does not fit at all. Luckily, it was not a real big job to sand it back until both pieces fit without sanding away any exterior-showing surfaces. I would be interested to know if this is a general design fault or if it was just on my model. (I will try to get a picture of this added later today.)

I also sanded down most of the accurization pieces, my delight at the fine detail has dampened now... I think I will be looking cross-eyed for the next couple weeks until my eyes have time to straighten out after concentrating on these small things. :wacko I am going to go out and get a lighted desktop magnifying glass (no idea what the correct terminology for it is),I will have to see íf that makes the work on the small pieces any easier. For anyone who does the same, be really careful with the AMP Accurization kit, they are small and yet sturdy but the resin breaks easily if you apply too much pressure to the wrong area.

ok as always, thank you for reading,
Jason
 
Last edited:
Looking forward to watching your build. I did one of these back when the kit was first released. My first adventure fiber optics & accurizing. Have fun!
 
Hey Sapper,
i am having fun with it already, I don't really care if it takes weeks, months, or years because I am doing it for the fun of making it and not to have a cool piece of 3D art on the shelf collecting dust (which of course is also pretty cool ;) ).
Oh I know what you mean... I think I did a Cylon raider back then. Back then doing fiberoptics was a whole different ballgame as it is today... LEDs have made things alot of easier as well. Even back then I was interested in the whole lighting topic but never got around to starting.

Take Care,
Jason
 
Last edited:
alot of my electrical things arrived today... I am getting prepared to dive into the world of SMD (Surface Mounted Device) a.k.a. VERY small. Specifically I will be trying out some type 603 LEDs. I don't really need them for the Galactica as most all of the lights will be driven with normal LEDs and a bunch of fiber optics but I do want to put these SMD babies in the Enterprise and this will be a sort of first run... but MAN, these things are tiny.
Below is a picture of a "normal" LED, next to it a typical small green for nav lights... and then in the black strip are a couple SMD LEDs of the 603 variation. The resolution is not all that great but I think you get the picture...

LED_603.jpg
 
Last edited:
Hi Jason,

Accompanying pictures of your work in progress would be very nice :) and perhaps even quite usefull in the restoration of my TOS Battlestar Galactica which I purchased recently.

Not to hijack your excellent WIP :$ but rather to add . . . it came fully painted and had already the simpler resin additional parts that you mentioned in place (not the real excellent replacement set). Here's the ebay picture of the Battlestar Galactica as purchased :

Galactica02.jpg


After receiving it however I was quite appalled by the horrible paintjob, which was done very sloppy and quite thick, so all the 'nice' yet as you mentioned very crude additional resin details were gone completely, together with those on the original plastic kit and to top it of the paint used smells really, really bad :

BattlestarGalactica03.jpg


Then I found a thread in which there was mentioning of using grafitti-remover to get rid of all the spray-paint. So I bought it and started on the back section and it's looking promissing :

BattlestarGalactica02A.jpg


However when I applied some graffiti-remover on the additional resin part in the front, as a test, ... it slowly but surely began to desolve and disintegrate :cry

BattlestarGalactica01C.jpg


So lesson well learned ... I have to work very carefully around those parts and this is still very far from being done to my satisfaction.

Would you or someone else have a good suggestion what to use in totally removing those additional resin parts from the plastic kit?

Keep us up to date with your work in progress :)

-Chaim

P.S. The paintjob on those extra ships was rather delicate executed in comparison.
 
Hi everyone,

I have been working on the electrical and programming topics. Please bear with me, this is my first youtube video, so this is the "no-frills" version.

The first video is the the landing bay lights, at the moment I have them running off two chips, which is impossible to time them perfectly, meaning that after a couple cycles they are out of sync. I ordered a bigger chip with more pins to solve this. These will eventually be hooked up to fiber optics and power both landing bays.

The second film is an engine lighting test. I want the edges to be the common bright white with a very faint flickering blue (generally cameras pic up blue edges around white LEDs anyway but what you see in the video is pretty close to how it looks in real life). This is for test purposes only, I have two different toned blue LEDs that are flickering and two bright white LEDs in the middle, and the engine piece is not yet light-blocked on the non-lighted areas but you get a good idea of how it is supposed to be. Not perfect, but I think I am going in the right direction.

Video 1 - Landing Bay Chaser
or Here

Video 2 - Engine Test (lights off)
or Here


Well that is all for now, I do not have any pictures of the actual modeling progress because I am still waiting for some supplies to arrive and have not yet started.

Jason
 
Last edited:
Hi Sym-Cha,
thanks for droping by and the pics of your Galactica. Ouch sorry to hear about the remover... sounds like it was pretty heavy duty... you might want to just take some normal paint thinner/remover and get rid of all the paint so you can see what you are working with. Tip that I also learned from experience... if you are doing something that you are not sure about... always start in the least visible areas first. ;)

Jason
 
Last edited:
Hi Chaim,

sorry it was quite late in the night as I made that last post so I kept it short.

Would you or someone else have a good suggestion what to use in totally removing those additional resin parts from the plastic kit?
just looking at the pictures above, to be honest, I personally would probably get rid of the accurization pieces all together. I do not think I will put them on mine either. I can really recommend the other accurization kit though, a lot of detail that is about as studio correct as you can get without creating everything yourself. Either way you are going to have a lot of cleanup work to do (which is not meant to sound negative, that is how you learn alot). But yeah, the first thing that has to happen is that 1/4 inch thick coat of paint needs to go.


P.S. The paintjob on those extra ships was rather delicate executed in comparison.

Those are cool, I did not look very hard but I was not able to find any of the "rag-tag" fleet in that scale. I can't really see the detail in the pics but if nothing else those made the deal worth while (depending on how much you spent on the whole package).

Cheers,
Jason
 
Last edited:
This thread is more than 11 years old.

Your message may be considered spam for the following reasons:

  1. This thread hasn't been active in some time. A new post in this thread might not contribute constructively to this discussion after so long.
If you wish to reply despite these issues, check the box below before replying.
Be aware that malicious compliance may result in more severe penalties.
Back
Top