Jason's TOS Battlestar Galactica *WIP*

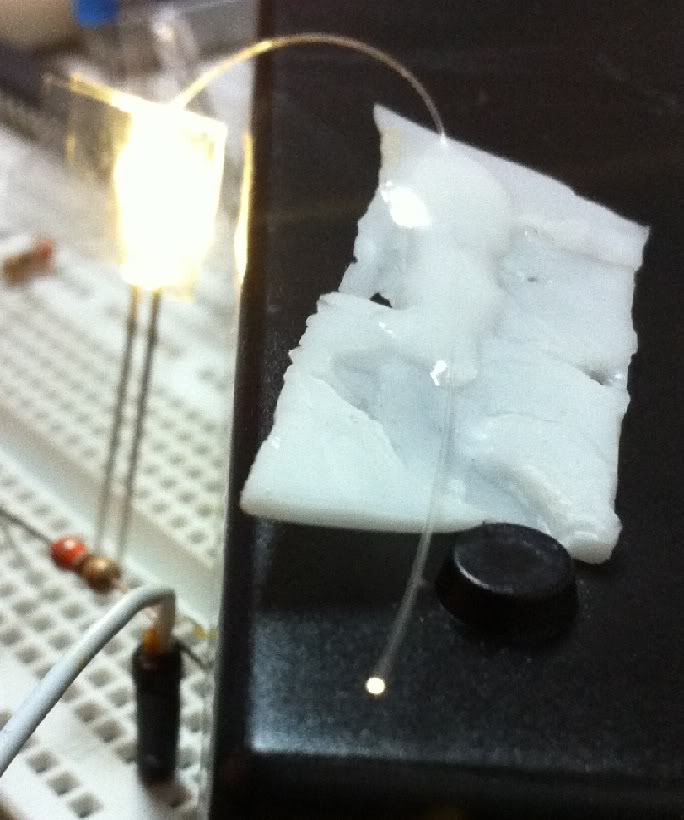
While looking for a way to mount fiber optics, I had an idea... I am not sure if anyone has ever tried this or not but I just wanted to know. I took a single strand of 0.25mm fiber optic and coated about an inch long segment with a 3 minute Resin. Knowing what happens when CA glue is used, I was very uncertain if it would destroy the fiber optic or its lighting capabilities. Needless to say, it is now about 6 hours later and it works like a charm. I also bent the strand back and forth and did not noticed any brittleness.

Knowing that this works, I may cast pieces with the fiber optics running though the mold to hard to get to model places (i.e. though the arms that go to the landing bays. In the accurization kit they are solid pieces, so I might just mold and cast them with the fibers needed in the bays).

below is a picture of the lighting test.

DISCLAIMER: Unless this is a known fact, if you plan on doing this yourself I recommend doing your own testing first, other resins may produce other results, as well as doing this with many strands in a bundle may have adverse effects that my test with a single strand did not show.

PS. this is the LED that will be running all of the window lighting in the Galactica. The LED is a Warm White LED with a 330 ohm resister softening the power flowing though it. In the series the window lighting is almost yellow, I did not really want it THAT yellow, but I definatly did not want to use the typical star Trek bright white that almost has a touch of blue to it. so I think this is a good middle.

Fiberoptic-Resin.jpg
 
Last edited:
Spent some time planing a board layout. On the layout below there is 1 ATmega328 and 3 daisy-chained TLC5940s, there may be place for a 4th TLC5940 on the right side. I don't know if I will need 3 or even 4 TLCs but I would like to make the board so that it will fit for future projects. Leaving one or more TLC out will not break the curcuit. (Thanks to Vixr for the tip about the PCB Editor expressPCB)

TLC-Boardv001.png
 
Last edited:
yoohoo, my airbrushes and compresser arrived on the weekend, two of the hoses had the wrong size connectors, but one of them was correct. I still need to get some paints and everything that goes with it, but I am really looking forward to taking them for a test run.

just for information I ordered:

Airbrush Veda 134E
Airbrush Veda 180
Airbrush BD-139 (0.3mm - 0.2mm) No idea which brand, it came with the compressor

Compressor - AS196 (2 Cylinder)
 
Last edited:
Ok, this Revell kit is really starting to /&%$ me off. sometimes I wonder if the designers ever really saw an ephisode of Battlestar Galactica. The more I dive into this, the more problem areas I find, some are easy to correct, others... not so easy. I really did not want to do a scratch job but I really do not see any way to get the results I want without drastic restructuring. I ordered the Galactica resin kit from Timeslip yesterday, which doesn't mean I have totally given up on the revell framework, worst come I do have a couple pretty cool ideas in the back of my head what I can do with her. As for the Timeslip kit I will have to look at it when it arrives so am not quite sure If I will use some of it, all of it, or none of it but it should be a better base to go with.
I know the main body is rotocast but the landingbays (and perhaps other parts) are solid, which also does not fit into my plans.
 
Ok, this Revell kit is really starting to /&%$ me off.
Well, in this instance I really, ACTUALLY feel your pain.:unsure
The landing bays on the Revell kit are not wide enough by at least 2mm... they need to be cut open & extended out. When I realized this, I decided mine was done enough.:lol
 
yeah, that is one of the major points that is kicking my butt at the moment, no matter how I turn the landingbay there is no "good" place to cut it to get the needed width, and when you take into account all of the details that are either missing or just downright "toy-like" all of which needing attention you really have to ask yourself if it is worth the effort.
 
no matter how I turn the landingbay there is no "good" place to cut it to get the needed width,
I'd cut it as close to dead center as possible & live with repairing greeble coverage affected.
and when you take into account all of the details that are either missing or just downright "toy-like" all of which needing attention you really have to ask yourself if it is worth the effort.
Depends on how accurate you want to make it. I settled for a percentage WELL below 100% because I just wanted the general look to be correct from a few feet away. That took me 2 months. An additional 2 months and I could have made it perfect, but no one was paying me, so no, not worth my effort.
I really like how mine came out, though. I's on a shelf four feet from where I work, and always looks good. Unlike my Vipers, I really never handle it close up.:)
When I think about all the work I did to it, it practically WAS a scratch build...

Revellogrombuildup039.jpg
 
Hi Chris,
I'd cut it as close to dead center as possible & live with repairing greeble coverage affected.
Which is probably what I will end up doing using the "close your eyes and hope for the best" method. :)

Depends on how accurate you want to make it.
Exactly that is where the problem begings, my goal is to get her as realistic as possible, I mean so realistic that you are not even really surprised when one of the little 1/4105 scaled officers moves and says "Hi there, we're looking for Earth but took a wrong turn somewhere along the way. If you could direct us that would be Fracken awsome!"
:behave

Something like this only in the 1/4105 scale. Amazing, you can even see the launch rails inside the launchtubes (which are not your typical simply holes but really Viper formed). Not sure who did this, found it on the Net.
 
Last edited:
yes, Marko's is top of the line. The accurization kit is also from Marko and his Galactica was required research right up there with Jim's studio scale build.

I think I could live with something like that. :)
 
Ok, I have not totally given up on this, but rather put the Revell kit indefinatly on ice. I ordered a Timeslip kit which should be arriving in the weeks to come. As mentioned in previous posts, to get this where I would like to have it I would need to basically do a complete restructuring of the basic framework... and I really did not want to go there.

Most if not all the ideas and methods that I did (or planned to do) on the Revell kit at least were not for nothing, as I will still be doing the same only on the TS kit.

Sorry to all of you who were waiting patiently to see this take off, which it did in a way, just the course is being adjusted. I will post a link to the new thread as soon as I get the TS kit on the workbench.
 
Hi Guys,

I have decided to do my protocoll over at Resin Illuminati due to the fact that there is a lot of information on the subject over there. I already got a couple of pictures up of the TimeSlip kit which arrived today :love I am telling you this thing is absolutly awsome. Couple things that make it less than perfect but still... I am still in awe of the details.

I will still be looking in here from time to time, and as soon as I start doing more "Trek" related stuff I will probably do the WIPs here.

If you get a chance to come over I would love to hear your thoughts.

Jason
 
This thread is more than 11 years old.

Your message may be considered spam for the following reasons:

  1. This thread hasn't been active in some time. A new post in this thread might not contribute constructively to this discussion after so long.
If you wish to reply despite these issues, check the box below before replying.
Be aware that malicious compliance may result in more severe penalties.
Back
Top