Iron Man Mk 2 Helmet

Cri7e

Active Member
Hello Guys,

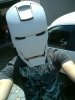
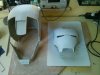
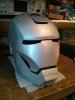
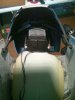
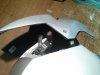
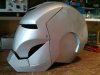
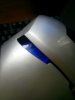
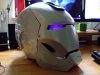
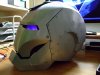
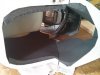
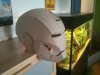
I just wanted to share my work of an Iron Man Mr 2 Helmet built. In this build I used 1.5mm cardboard due to the fact that paper always warped, when I tried to resin it. The cardboard is much sturdier right away and holds the shape much better. I used a pepakura file from a guy called Sharkhead and modified it a little bit to work with cardboard. if you want the modified file, feel free to contact me, we´re all here to share our work I guess.

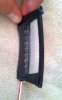
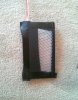
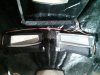
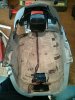
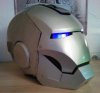
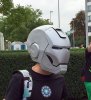
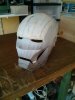
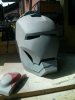
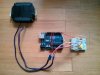
After gluing together all the pieces I started to fill up the gaps with car filler and sandet everything smooth. Of course I will add electronics into the helmet and wear it to GamesCom 2015!

The first part of my work can be found on Deviant Art (http://cri7e.deviantart.com/) but Im gonna share the rest of my work here, since I feel like this is a more suitable forum.

My next post will be about painting, and adding details to the helmet.
 

Attachments

  • IMG_20150420_173355.jpg
    IMG_20150420_173355.jpg
    2.1 MB · Views: 191
  • IMG_20150507_175223.jpg
    IMG_20150507_175223.jpg
    1.9 MB · Views: 217
  • IMG_20150514_145852.jpg
    IMG_20150514_145852.jpg
    2.2 MB · Views: 229
  • IMG_20150524_155258.jpg
    IMG_20150524_155258.jpg
    1.2 MB · Views: 207
Last edited:
Re: [WIP] Iron Man Mk 2 Helmet

Wow, this looks so good so far! I'm really looking forward to see the finished build! Keep this good work up buddy!
 
Re: [WIP] Iron Man Mk 2 Helmet

Thank you man! Unfortunately the helmet seems a little bit too big for my head, so I might end up doing a second one. Also its not as ridged as I would like due to the fact, that I did not fiberglas resin the inside. But so far Im quite happy with the results and the fact that up to this point this built only cost me about 50€!
 
Re: [WIP] Iron Man Mk 2 Helmet

You've got a good looking finish on that. It looks good and smooth so I don't think you need to worry about any ridges. Looking forward to seeing it painted.

Out of interest what have you used for the blocks to hold the servos together? Are you planning for a central mounting point at the top of the helmet?
 
Re: [WIP] Iron Man Mk 2 Helmet

Ikras yes the surface is smooth, but it has some cracks in the filler in some places but these are minor things I can look over, I guess! Im just such an perfectionist! :D

The servos are already mounted inside the helmet and the faceplate opens quite nicely (video coming soon). As for the material, I used some sort of hard plastic I found lying around at my workshop, unfortunately I dont know the name.
 
Last edited by a moderator:
Re: [WIP] Iron Man Mk 2 Helmet

After the helmet was all sanded down it was time to separate all three parts. I wanted to see how the servo mechanism works so that was my next project. ( I probably should have painted everything first but well! :D ) I am quite happy with the opening mechanics:

https://www.youtube.com/watch?v=4H-74rys2E8

After some testing I of course wanted to wear the thing and decided to take some Iron Man Selfies!
 

Attachments

  • IMG_20150614_145127.jpg
    IMG_20150614_145127.jpg
    304.8 KB · Views: 143
  • IMG_20150601_185808.jpg
    IMG_20150601_185808.jpg
    1.8 MB · Views: 169
  • IMG_20150522_100742.jpg
    IMG_20150522_100742.jpg
    2.2 MB · Views: 142
Re: [WIP] Iron Man Mk 2 Helmet

@Cri7e There'll always be something you can pick up on having made it but it looks great to me. Makes sense to me to work out the motors first, that away any modifications that might have been needed wouldn't have messed up some nice paint.

You've got a nice smooth motion on the opening and closing as well, looks good. Is it possible to see a bit more of how you attached the servos and hinges? Would be a great help. trying to gather ideas for my build at the moment and looking for all inspiration I can.
 
Last edited by a moderator:
Re: [WIP] Iron Man Mk 2 Helmet

Everything worked out fine and I decided to paint the helmet. I bought a can of chrome paint and a second can of clear coat. Unfortunately the chrome turned out to be more like a silver grey color than actual chrome but I still really like the color of it. The base coat was mat black, to give the chrome a more realistic look. After that I added two to three layers of chrome paint and two layers of clear coat. I had thought about light sanding the chrome to give it a brushed aluminium look but decided to just leave it as it is. I still cannot decide if I should leave the helmet as shiny as it is or if i should give it a mat finish.
@Ikras the last two pictures show details of how I attached the faceplate to the helmet. Unfortunately it is really hard to take pictures of. I attached some plastic sticks to the servos and added two more to support the faceplate. It is a really simple system. Also I did a lot of research on the internet and saw different approaches for an opening mechanism, but I liked the one with the servo in the middle the most.
 

Attachments

  • IMG_20150706_202523.jpg
    IMG_20150706_202523.jpg
    1.7 MB · Views: 169
  • IMG_20150708_173140.jpg
    IMG_20150708_173140.jpg
    930.2 KB · Views: 160
  • IMG_20150708_173156.jpg
    IMG_20150708_173156.jpg
    902.7 KB · Views: 181
  • IMG_20150705_101331.jpg
    2.4 MB · Views: 144
Re: [WIP] Iron Man Mk 2 Helmet

Cri7e Don't worry. It's still a great help. I'm favouring a central servo setup as well. I think that it'll be the easiest for me to get working without a doubt. Just need to reinforce my helmet first.
I'm guessing that's the same mystery plastic again? Might need to source something similar. I've got some acrylic coming for another project and that might be of use. Maybe something thinner still. Time will tell.

As for finish it really comes down to personal preference I guess. I think it looks good as is but if you to decide to go for a matt finish I'd test how it turns out on a smaller bit or something first before really going for it.
 
Last edited by a moderator:
Re: [WIP] Iron Man Mk 2 Helmet

Here in Germany I think the material is called Plexi, but not quite sure if thats it!

And I decided to leave the finish as it is, might use a different technique for my next built! I saw a method that really made plastic look like brushed aluminium! its just a black base coat and rub on silver paint rubbed on with a cloth. It looked fantastic! Im not even finished with this build and I already see so many things I will do better on my next one hahah
 
Last edited:
Re: [WIP] Iron Man Mk 2 Helmet

Today has been a very, very, very (yes three times very :D) productive day. As usually on Sundays I get the most done, since I have to work during the week.

Yesterday my Arduino Pro Mini arrived which will replace the Arduino Uno on which I have been testing my electronics up until this point. I have all the electronics figured out now and can move on by putting them into the helmet. WToday I wanted to put the eyes into the helmet. I used 1.5mm clear acrylic and formed it to shape by heading it up in the oven. Then I glued 9 Blue LEDs to the inside of the acrylic and glued mesh on the outside to give it a honeycomb look. The mesh diffuses the light and just in general looks awesome. I took inspiration for this by James from xrobots.co.uk who does beautiful Youtube videos of his builds, so you guys should go check him out. In the end I covered everything with black paper and electrical tape so that the LEDs wont shine into my eyes (after all I want to be able to look out of the helmet).

Second of all I finished painting the helmet. I only had to add a second coat of clearcoat and that was it. I decided to go with a glossy finish in the end which came out very nice.

And last of all I continued adding all of the little details, which the Mk 2 helmet has. I had to drill holes for all the little bolts and screws and glue in everything. Also note that I used real screw heads to give it a more realistic look.

Thats it for today, I made some big progress! But still a lot that has to bee done until August.
 

Attachments

  • IMG_20150712_171640.jpg
    IMG_20150712_171640.jpg
    902.5 KB · Views: 155
  • IMG_20150712_145628.jpg
    IMG_20150712_145628.jpg
    574.8 KB · Views: 147
  • IMG_20150712_145616.jpg
    IMG_20150712_145616.jpg
    655.6 KB · Views: 154
  • IMG_20150712_143518.jpg
    IMG_20150712_143518.jpg
    1.2 MB · Views: 148
Re: [WIP] Iron Man Mk 2 Helmet

I'll have a look into that when I get to that point. I'm guessing it's reasonably lightweight stuff? What servos are you using out of interest?

The eyes are looking great. I'm going with a similar system but with some cheap sunglasses and fabric mesh. Hopefully looks as good as yours have come out. Looking really good with all the extra detail on there and the finish has come out well.
 
Re: [WIP] Iron Man Mk 2 Helmet

Ikras well actually its not the most lightweight material, Im sure wood sticks would have been more light weight but not as durable as this plastic. Also I really like the fact, that you can easily cut it on my tiny table saw! :) The servos Im using are Sanwa l301, not even sure if they produce them anymore, I got them from an old RC plane that was totally destroyed. They still work great.

I actually used fabric mesh aswell, the stuff you use on windows to keep the bugs out, it works fantastically.

Thanks for all the kind works, really keeps me motivated to keep building. (FYI: The helmet might be on sale one day)

I also checked out your build, quite a lot of stuff you have built already, I probably will never have the patience to finish an entire suit! Or I would never finish because I would take forever with every little detail! :D
 
Last edited by a moderator:
Re: [WIP] Iron Man Mk 2 Helmet

@Cri7e Sounds good. That's my worry as well, something durable enough to hold but at the same time, something that I can actually cut with my jewellers hand saw. I do have dremel but I've not cut anything with it yet. That's no problem, just trying to gather info, don't suppose you know the torque of them?

Yeah, i've seen some people using that. Mine is being donated from a cheap bridal veil I found on amazon/ebay, I forget which. It arrived smelling heavily of fish though so got a good wash first. Hopefully is thick enough to give a good result or I might try multiple layers.

It's great getting to see other people work and talk shop with them about it. No problem.

Thanks for taking a look. It's been on the go for a very long time now due to reasons just like that, trying to get parts looking just right. Think I made my first purchases for it some time in 2013. So many little things to think of though, like how to connect parts, electronics wiring etc. Bit under 2 months target now though so it should be going faster (holiday time coming soon as well which should speed things up).
 
Re: [WIP] Iron Man Mk 2 Helmet

I finished working on the eyes today even though I was tired as hell from a festival I went to this weekend.

The second eye is built the same as the first eye and all glued in with hotglue.

Im thinking about putting some frosted acrylic on top of the LEDs to maybe diffuse the light a little bit better, Ill test that and tell you guys more.

The clear coat on the backsite of the helmet unfortunately got cracks now. I dont really know where it came from, maybe it got too hot during the drying process since it stood right behind the window. Maybe ill sand over it with 1500grid sandpaper and see what I can do.

Im not adding in Sound anymore since the project will get too expensive then.

See you in the next post.
 

Attachments

  • IMG_20150719_200744.jpg
    IMG_20150719_200744.jpg
    196.8 KB · Views: 152
Re: [WIP] Iron Man Mk 2 Helmet

Since Im staying home from work today due to my cold, i took the time to work on my helmet.

I put some frosted acrylic over the LEDs so now the light diffuses a little bit better.

Also I finished on most of the details, All I have to do now is to put the electronics in the Helmet and put black Foam on the inside so it wont slide of my head.

Take a look at how the Servos and the LEDs finally work together powered by an Arduino:

https://www.youtube.com/watch?v=55wRu151td8
 

Attachments

  • DSCF6365.JPG
    DSCF6365.JPG
    709.9 KB · Views: 133
  • DSCF6366.JPG
    DSCF6366.JPG
    703.1 KB · Views: 127
  • IMG_20150720_105515.jpg
    IMG_20150720_105515.jpg
    1.2 MB · Views: 132
Re: [WIP] Iron Man Mk 2 Helmet

So since I was sick the last two days I had some time to work on the helmet. It is getting near completion now.

I fitted all the electronics inside the helmet, and everything worked out well. In the beginning I wanted to add a gyro to open and close the helmet but in the end I just went with a button because of simplicity! I also added an on/off switch and wired everything up.

YES that is an Arduino Uno inside the helmet and YES I know it is really big, but since the helmet is too big anyways I still got a lot of space inside and I couldnt get the damn Arduino Pro Mini and the USB Cable to work with my PC so I simply decided not to use it.

Everything in the Helmet is powered by 4 AA batteries, we´ll see how long they last, hopefully they will get me trough the day. If not, Im bringing some more to the Con aswell.

I added some really nice foam padding to the inside of the helmet which I got left over from insulating my car. Not only does it look good, it has a sticky back to hold onto the helmet (no glue needed!!!) and keeps the helmet really tight on my head so it wont fall off.

Now all I have to do is finish the ears (or simply start working on them) and add a fan to the helmet. Im gonna buy a 40mm PC fan to go on the bottom of the helmet close to my chin to drive in fresh, "cold" air into the helmet so my lenses wont fog up and my face doesnt melt. After all the helmet is quite hot.
 

Attachments

  • IMG_20150723_171031.jpg
    IMG_20150723_171031.jpg
    896.2 KB · Views: 116
  • IMG_20150723_170953.jpg
    IMG_20150723_170953.jpg
    1,008.7 KB · Views: 116
  • IMG_20150723_170634.jpg
    IMG_20150723_170634.jpg
    374.2 KB · Views: 137
  • IMG_20150721_120214.jpg
    IMG_20150721_120214.jpg
    2 MB · Views: 141
Re: [WIP] Iron Man Mk 2 Helmet

So this is my followup post to this thread:

The helmet is no longer a work in progress and is now finished. I wore it to GamesCom 2015 in Cologne, Germany and had a blast. Even though I had very little visibility I really enjoyed walking around with the helmet, getting all kinds of amazed looks. So many people stopped and took photos of me, which was great. Usually the people in Germany tend to be very shy but it was nice to see people coming up to me and ask questions about the helmet. The one lady working at the Guitar Hero booth totally freaked out about the helmet lol.

It was a great journey and I learned a lot of new things while building this helmet. And the next project is already at its early stages, Mark 39 Starboost Armor. This time Im using PVC and EVA Foam to build the entire suit, that will hopefully save me a lot of sanding. So I guess I will see you all in my next post?
 

Attachments

  • IMG_20150814_183926.jpg
    IMG_20150814_183926.jpg
    824.7 KB · Views: 134
  • IMG_20150814_184007.jpg
    IMG_20150814_184007.jpg
    727.4 KB · Views: 118
  • IMG-20150809-WA0008.jpg
    IMG-20150809-WA0008.jpg
    36.8 KB · Views: 145
Real nice build man! I like the use of the foam in the jaw to 'fill in the blank'. Real nice work on the hinges too, I'm going through a hinge build as well, you executed very well!
 
Thanks for the kind words! :) Well actually its just cardboard painted black to fill up the gaps, and covered with foam on the inside, but it works nicely! :) For the hinge system I can only give you a good advice: Build the hinges so that the faceplate completely moves out of your field of view, mine was a little too low and I always had to look awkwardly to see people.
I want the faceplate to completely move to the top of the helmet in my next built! Good luck to you my friend!
 
This thread is more than 8 years old.

Your message may be considered spam for the following reasons:

  1. This thread hasn't been active in some time. A new post in this thread might not contribute constructively to this discussion after so long.
If you wish to reply despite these issues, check the box below before replying.
Be aware that malicious compliance may result in more severe penalties.
Back
Top