Iron Man Faceplate with Interior WIP (VashDstampede's Kit) PIC HEAVY

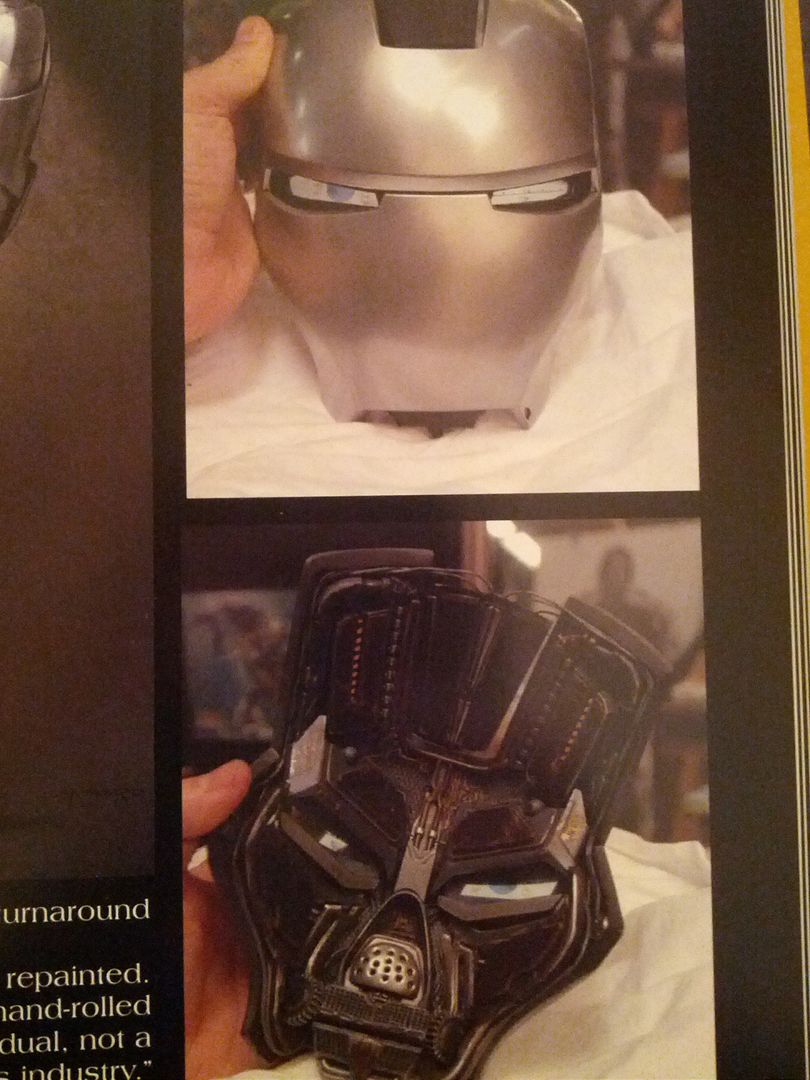
Hollywoodhardware got me in a panic and after some research it seems that Dupli Color Chrome, despite being gorgeous, is notorious for being delicate and never drying fully like he mentioned. Some folks on other forums let pieces set 3 months only to have it still pick up finger prints.

And this is the stuff I'm using on a replica prop that I am going to have to handle further just to finish it!?!

ARGH!!!

A couple of people indicated they had success applying a light coat of clear coat without it turning the chrome grey, followed by a heavy coat of clear. Has anyone else tried this, and if so, did it work? I don't want to have to track down another paint but I need to be able to hold the mask, going to be hard to finish the thing if I can't touch it.:unsure
 
The only advice I can offer is this: wear gloves when handling to avoid finger prints, and the piece in the movie wasn't quite a brilliant chrome either. So if it isn't a mirror finish, that's what you want anyways. The final mark II is where the chrome comes in, not the prototype face plate
 
Using professional Chromes like Mirra Chrome or Killer Chrome which are also available in rattle cans would do the trick. To prevent the Chrome from fogging when applying 2K clear, you can use a transparent waterbased basecoat inbetween.

I know that sounds complicated, but that's exactly what I did. But them, I am an auto body guy....
 
The only advice I can offer is this: wear gloves when handling to avoid finger prints

What kind would you recommend?

Using professional Chromes like Mirra Chrome or Killer Chrome which are also available in rattle cans would do the trick. To prevent the Chrome from fogging when applying 2K clear, you can use a transparent waterbased basecoat inbetween.

I know that sounds complicated, but that's exactly what I did. But them, I am an auto body guy....

I looked it up and that stuff looks amazing but I don't have the money to drop on the full kit right before Xmas, especially for one piece. I am going to try and make the Duplicolor work by using as little paint as I can get away with to reduce curing time and then try the clear coating techniques I read a few folks had success with.

What kind of water-based basecoat would you recommend? Is there a certain brand I should be looking for? I had a similar idea myself but was unsure what product I should be looking for.

Maybe I should just send it to you with some cash and let you sort it for me! :love

Thanks for all the feedback guys, I really appreciate it.
 
Update!

So I walked away from this for a few months because since my last post I have painted and sanded this mask at least a dozen plus times with 3 different paints and I was about to lose my mind so I took a break.

I've stayed away from the forums as I vowed I would not come back until I had some progress to show. I can finally return with my head up.

My wife and kids went out of town for a week to visit the in-laws and I couldn't tag along due to a recent promotion so I had a week to myself and decided to tackle the mask again. After MORE painting and sanding after unsuccessful attempts with primers and paints that didn't mix, and the wind knocking the mask to the dirt for the SECOND time, I finally found a combo that worked: Testors Semi-Gloss Grey Primer and Testors Chrome. Should have thought of companies that produce paints for model makers to begin with I guess...:unsure

Don't get me wrong, even with this combo it still took about 5 tries but finally, FINALLY, by the grace of God I got this thing painted and still kept my sanity. I'm afraid to touch it until it's had a few days to dry in case it decides to spontaneously combust just to spite me. The chrome is nice, it's reflective enough that you can see yourself but not so much that it's like looking in a mirror. There are some imperfections, but at this point I'm willing to live with them.

As a result of all the sanding I ended up just Dremeling the screws out and made some out of Sculpey that I painted up and will install once the thing is good and dry.

8538221458_93d51b084f.jpg


Once the thing is finished curing I can finally install the lovely inner pieces. I painted and weathered them all up with a screencap on hand trying to replicate the prop as much as I could. I also installed the leather bits and it's all ready to roll once the paint on the mask dries.

8537116843_1de3c96ec9_c.jpg


Here's a detail shot of the, "U" shaped piece with the gold prongs I created and mentioned in a previous post installed along with the leather. I'm pretty pleased with how they turned out:

8538221600_463a69ef6b.jpg


Funny thing about all this? I bought another faceplate from TJack awhile back that was going to be a companion piece done in gold, kind of like the prototype and final mask side by side. I knocked it out this week too and seriously, it couldn't have been any easier. Three coats of paint with minimal sanding and BAM, done.

I don't know what I did to jinx myself with this kit, but I finally seem to have gotten over that hump (*Fingers crossed*) and may actually finish this kit sometime this year. Hell has apparently frozen over...

I should have regular updates again now that I finally have the mask painted. Next time, I'm hiring someone with an airbrush...:rolleyes
 
Last edited:
Also, forgot to mention, on the prop is it just me or does it look like most of the hard angles on the mask where outlined in black marker to anyone else? It's especially visible above the eyes along the brow line. Am I crazy?

original.jpg


Just wanted to get some feedback as I was thinking of including it when I add the text to the mask but noticed no one else has marked theirs up with black so I was starting to second guess my eyes. I see black along the brow and cheek bones, just bad lighting, or facial details outlined in black marker...?

Thoughts?
 
I agree. I can see what you are saying, but I think it is just lighting playing tricks on your eyes
 
Hey guys, thanks for the feedback! I still had this nagging feeling at the back of my mind so I broke out my IM DVD and stepped through it with VLC. Unfortunately I don't have a Blu-Ray disc, but even with standard disc I found my answer: The lines exist.

I took about 30 screencaps and can verify that irregardless of lighting there are lines present on the cheekbones and brow, as well as the bridge of the nose and there also appears to be thin lines around the bottom of the eyes as well. Basically, the entire eye was outlined and connected one to another via the nose bridge and brow. I'm not sure why the forehead edges are unmarked, but they are.

Here are some of the most clear screencaps. Again, I checked carefully and in some you can actually see the lighting reflected IN the lines, rather than the lines appearing/disappearing with the lighting. Have a look for yourself:

Brow and Right Cheek:
8551794912_53cbffd3d0_c.jpg


Lower Eye (Notice no Forehead Lines):
8551794610_42f8237781_c.jpg


Right Cheek (Again, no Forehead):
8551794534_e425af683a_c.jpg


Brow:
8550692793_4bc7b242b1_c.jpg


Brow and Right Cheek (Brow line reflects light):
8550692723_673f591096_c.jpg


Brow and Right and Left Cheek (No similar line shadows on forehead):
8550691911_9503dc0da8_c.jpg


Brow, Lower Eye, Right and Left Cheek (Look under his right middle finger, Left Cheek plainly visible):
8551793496_fda736cec6_c.jpg


Brow and Right Cheek, both reflecting light (Lower eye outline visible too):
8551793412_f053d17216_c.jpg


Money shot for Brow/Right Cheek, compare to forehead:
8550691509_9476258727_c.jpg


Nose Bridge and Outer Eye Outline:
8550691431_95bd0c7f7a_c.jpg


The Ever Elusive Left Cheek (Again, compare to forehead):
8551792844_4103cf316d_c.jpg


So, I'm adding the lines! Arguments could be made against the small lines following the lower eye but after stepping through the film frame by frame I'm convinced the brow, nose bridge and cheek bones are all outlined by what looks like black marker. Why the forehead edges were excluded I don't know, but they are clearly not marked and some of these caps make that pretty obvious.

I'm almost ready to start marking up the outside, just giving the chrome paint another day or too to be safe. I'm kind of paranoid at this point with this mask...:lol
 
You make a compelling case, however this image from The Art of Iron Man doesn't show any lines...

IMG_20130312_233454_zpsdd995fb8.jpg


Granted, it also doesn't show any of the other markings, but I still believe there are no lines.
 
'no lines' is my stance as well..

I think the 'brow' (indentation) is play tricks on you.. its not FLAT..

the eye 'section' is 'pushed in' a bit... giving the shadow and 'marker line' look. IMHO..
 
I think it's actually a combination of both. The image from The Art of Iron Man is without the "notes" that are in the movie. If you are considering these lines as part of those notes then I guess you can add them if you're adding the rest. However I don't see any reason for him to make note of the edges, I haven't studied his notes but the seem to have more of a purpose then just pointing out dings. I think the lines are actually to COUNTERACT lighting, perhaps the prop master/DOP decided that they edges were being lost in the lighting of the set and needed some definition, so they outlined them for the scene. I can understand wanting to see the amazing brow line in that shot. In a case like that I don't know if you'd want to add them, since it may look odd in whatever lighting you display it. Also I can see difficulty in making the lines look nice up close and not just like sharpy marks.
 
I don't see any reason to make note of them either, especially given the fact that the forehead edges are unmarked, but I can't unsee them and I remember noticing that when I saw the movie the first time. You guys may be right but I think I'm still going to mark it up with the black marker.

If I'm wrong I'm wrong but I feel certain those lines are there.
 
And ultimately it's your vision, your decision... One of the great things about this hobby :):thumbsup

BTW, I appreciate all the feedback you guys. I know this prop has been done half a dozen times before, thanks for chipping in and giving me your insight and encouragement.
 
Well, in trying to figure out the hand writing on the mask all I can say is tweaking the levels of the screencaps above in Photoshop reinforced my beliefs on the marker lines... :p

So, it took some research but between my own observations and the builds by Vash and Bigturc I put together the following diagram to help me mark the mask up this weekend. I noticed no one else had done anything similar and hoped by doing this it would help others out as well as myself.

I will note that what I've listed in my diagram is a combination of sources and that the only things all builds tend to agree on are what's on the front of the face. The sides and upper portions near the screws vary with each build so I went with what made the most sense to me and, in some cases, made my own contributions altogether (Guide Mount 30° for instance).

That said, take this with a grain of salt. If nothing else hopefully it will help serve as a general layout guide and others can insert their own notes from Tony as they wish.

Also, looking at my screencaps from the film, the two circles on the right side of the mask (our left) seem to be centered around small holes carved in the mask. Anyone else notice this detail?

Should have some progress pics by the end of the weekend.

8560810916_6a531dd742_c.jpg
 
Nice work! I'm redoing the front of my Faceplate, it was packed, face down on the silicone mat that was going to be used inside, and the oils transferred onto my finish. I hadn't got to the markings yet, so this will help.

Yeah, I can't find anything better to disprove any of your suggestions for the more obscure markings, so i'll go with this.
 
Yeah, I can't find anything better to disprove any of your suggestions for the more obscure markings, so i'll go with this.

Glad it helped someone, thanks for the kind words!

Ok, so I marked up the front this weekend and it was a mixed bag. The black lines turned out great but my white marker had a much fatter tip than I thought and rather than be paitent and buy another I tried to make it work. Ended up in some fat, borderline unreadable portions. Also, I didn't draw my targeting line close enough to the center and that's bugging the OCD part of my personality.

I've read online in a few places that rubbing alcohol will remove the Oil Sharpies but I'm not sure how it will affect the chrome paint so I'm going to test in on the inside of the mask on an area that will be covered by an inner greeblie. If any of you guys or gals has any firsthand experience on this I'm all ears.

Worse case scenario I'm stuck with what I have, which isn't awful, just not as good as it could have been had I been more patient and well rested. That's what I get for trying to work on the kit just because my kids finally went to sleep early one night. I didn't want to lose anymore time so instead I traded it for extra work and/or substandard quality. :behave

Anyways, judge for yourselves...Pics!

8570008980_b357b39b4c_z.jpg


8568910825_3b37023b27_z.jpg


8568910553_ef08c158a4_z.jpg


8568910655_5cf97890bf_z.jpg


8568910909_b109ed1291_z.jpg


Thoughts? Any tips on removing the Sharpie without damaging the chrome or am I stuck?

Thanks folks...
 
Back
Top