You are using an out of date browser. It may not display this or other websites correctly.
You should upgrade or use an alternative browser.
You should upgrade or use an alternative browser.
Immortan Joe Progress Log - 3d Models, W.I.P. photos, and Con Results!
- Thread starter Ein
- Start date
Ein
Sr Member
Re: Immortan Joe Progress Log - 3d Modelling and various other bits.
ahoudini: I use my own FTP server to host the files I offer for download, but you can always throw them somewhere like megaupload, dropbox, jumpshare, or any of the other free alternatives and just link to it on the forums.
Morgenes - Damn good find! I just bought one of those. I still intend on modelling one up for Shapeways, but I appreciate you sharing it with the rest of the class.")
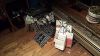
Okay, on my own progress, two things. The first is that I garbage-picked a neat thing from down the upholstery shop down the road:

Fabric swatches... fabric swatches for miles.

(In this analogy I am Buzz and my girlfriend is Woody contemplating where the hell I am going to keep this in our tiny house)
I flipped through these quickly and I'm confident I can scavenge pretty much any texture, color, or fabric I need to get my badge ribbons done, so I expect I'll bust out the sewing machine soon and have a go of it.
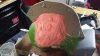
On the other hand, my mask had some extra scary work done. I used a scrollsaw to cut an MDF divider for the mask and bolted it together so I could start making the hard mother mold out of Smooth-On's Plasti-Paste. I then rubbed the whole rubber mask down with Sonite wax and sprayed it with Ease Release 200 so I could remove the subsequent layers easily.

And then it was time to start heaping that stuff on! Plasti-Paste has a consistency, texture, and stickiness all comparable to applesauce while it's freshly mixed. Kinda gross. Extremely annoying to work with but also gets the job done pretty effectively.


It sets very quickly, and you can apply coats over it while it's still tacky. I spent about an hour and a half getting it all over my clothes, my work surface, and occasionally even the piece I was working on! When it came time to do the final coat, my girlfriend had the bright idea of tamping everything down with paper towels and letting them be the outer surface, because this stuff tends to dry somewhat spiky and hard to handle otherwise.

Then I broke it apart, peeled the rubber off, removed the master, and bolted everything back together!

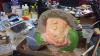
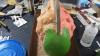
All things considered, this is probably way overdone for the size of the mask that I'm casting, but this is the first time I've made a mold in this fashion, so I was trying to be a bit overcautious. I immediately threw caution to the wind, though, and started trying to slush cast Smooth-On's 65D, pictured here:

Messy, but I think it's doing the job nicely. I'm going to let it cure for a bit and peel it out and see what I have to work with as far as how the mold went!
ahoudini: I use my own FTP server to host the files I offer for download, but you can always throw them somewhere like megaupload, dropbox, jumpshare, or any of the other free alternatives and just link to it on the forums.
Morgenes - Damn good find! I just bought one of those. I still intend on modelling one up for Shapeways, but I appreciate you sharing it with the rest of the class.
Okay, on my own progress, two things. The first is that I garbage-picked a neat thing from down the upholstery shop down the road:
Fabric swatches... fabric swatches for miles.
(In this analogy I am Buzz and my girlfriend is Woody contemplating where the hell I am going to keep this in our tiny house)
I flipped through these quickly and I'm confident I can scavenge pretty much any texture, color, or fabric I need to get my badge ribbons done, so I expect I'll bust out the sewing machine soon and have a go of it.
On the other hand, my mask had some extra scary work done. I used a scrollsaw to cut an MDF divider for the mask and bolted it together so I could start making the hard mother mold out of Smooth-On's Plasti-Paste. I then rubbed the whole rubber mask down with Sonite wax and sprayed it with Ease Release 200 so I could remove the subsequent layers easily.
And then it was time to start heaping that stuff on! Plasti-Paste has a consistency, texture, and stickiness all comparable to applesauce while it's freshly mixed. Kinda gross. Extremely annoying to work with but also gets the job done pretty effectively.
It sets very quickly, and you can apply coats over it while it's still tacky. I spent about an hour and a half getting it all over my clothes, my work surface, and occasionally even the piece I was working on! When it came time to do the final coat, my girlfriend had the bright idea of tamping everything down with paper towels and letting them be the outer surface, because this stuff tends to dry somewhat spiky and hard to handle otherwise.
Then I broke it apart, peeled the rubber off, removed the master, and bolted everything back together!
All things considered, this is probably way overdone for the size of the mask that I'm casting, but this is the first time I've made a mold in this fashion, so I was trying to be a bit overcautious. I immediately threw caution to the wind, though, and started trying to slush cast Smooth-On's 65D, pictured here:
Messy, but I think it's doing the job nicely. I'm going to let it cure for a bit and peel it out and see what I have to work with as far as how the mold went!
Attachments
-
 0e7Iydxh.jpg108.6 KB · Views: 89
 -
 wuYRDyoh.jpg74.8 KB · Views: 94
 -
 wuYRDyoh.jpg74.8 KB · Views: 84
 -
 wuYRDyoh.jpg74.8 KB · Views: 95
 -
 wwlBjIFh.jpg105.8 KB · Views: 92
 -
 wwlBjIFh.jpg105.8 KB · Views: 91
 -
 wwlBjIFh.jpg105.8 KB · Views: 92
 -
 wuYRDyoh.jpg74.8 KB · Views: 94
 -
 wuYRDyoh.jpg74.8 KB · Views: 99
 -
 nEQTHZ3h.jpg7.3 KB · Views: 93
 -
 0e7Iydxh.jpg108.6 KB · Views: 95
 -
 0e7Iydxh.jpg108.6 KB · Views: 99
 -
 0e7Iydxh.jpg108.6 KB · Views: 91
 -
 0e7Iydxh.jpg108.6 KB · Views: 92
 -
 nEQTHZ3h.jpg7.3 KB · Views: 96
 -
 nEQTHZ3h.jpg7.3 KB · Views: 102
 -
 nEQTHZ3h.jpg7.3 KB · Views: 105
 -
 nEQTHZ3h.jpg7.3 KB · Views: 99
 -
 PuzOQ5rh.jpg99.1 KB · Views: 105
 -
 PuzOQ5rh.jpg99.1 KB · Views: 86
 -
 PuzOQ5rh.jpg99.1 KB · Views: 105
 -
 PuzOQ5rh.jpg99.1 KB · Views: 96
 -
 PuzOQ5rh.jpg99.1 KB · Views: 102
 -
 hw2GDpdh.jpg87.9 KB · Views: 98
 -
 wwlBjIFh.jpg105.8 KB · Views: 100
 -
 wwlBjIFh.jpg105.8 KB · Views: 99
 -
 hw2GDpdh.jpg87.9 KB · Views: 108
 -
 hw2GDpdh.jpg87.9 KB · Views: 102
 -
 hw2GDpdh.jpg87.9 KB · Views: 89
 -
 hw2GDpdh.jpg87.9 KB · Views: 102
 -
 jTBlc9Th.jpg99.4 KB · Views: 99
 -
 jTBlc9Th.jpg99.4 KB · Views: 104
 -
 jTBlc9Th.jpg99.4 KB · Views: 95
 -
 jTBlc9Th.jpg99.4 KB · Views: 100
 -
 jTBlc9Th.jpg99.4 KB · Views: 88
 -
 OCcBurjh.jpg79.6 KB · Views: 84
 -
 OCcBurjh.jpg79.6 KB · Views: 92
 -
 OCcBurjh.jpg79.6 KB · Views: 85
 -
 OCcBurjh.jpg79.6 KB · Views: 88
 -
 OCcBurjh.jpg79.6 KB · Views: 86
Last edited by a moderator:
Bigboss1o1
Active Member
Re: Immortan Joe Progress Log - 3d Modelling and various other bits.
Looks awesome ein I'm sure it will look fantastic
Sent from my iPhone using Tapatalk
Looks awesome ein I'm sure it will look fantastic
Sent from my iPhone using Tapatalk
Re: Immortan Joe Progress Log - 3d Modelling and various other bits.
Here are the codpiece castle nut .stl files: https://www.dropbox.com/s/p8287im9yzaofzh/immortan_codpiece_nuts.stl?dl=0
https://www.dropbox.com/s/3u6r2rk6odkm5mr/immortan_codpiece_nuts_2.stl?dl=0
Here are the codpiece castle nut .stl files: https://www.dropbox.com/s/p8287im9yzaofzh/immortan_codpiece_nuts.stl?dl=0
https://www.dropbox.com/s/3u6r2rk6odkm5mr/immortan_codpiece_nuts_2.stl?dl=0
Ein
Sr Member
Re: Immortan Joe Progress Log - 3d Modelling and various other bits.
Do you mind if I rehost these and add them to the OP, with notes that they're your files? I just want to create a single post with all the info.
Here are the codpiece castle nut .stl files: https://www.dropbox.com/s/p8287im9yzaofzh/immortan_codpiece_nuts.stl?dl=0
https://www.dropbox.com/s/3u6r2rk6odkm5mr/immortan_codpiece_nuts_2.stl?dl=0
Do you mind if I rehost these and add them to the OP, with notes that they're your files? I just want to create a single post with all the info.
Ein
Sr Member
Re: Immortan Joe Progress Log - 3d Modelling and various other bits.
I'd love to see a picture of how the acetone treated ones came out if you have the time, but yeah - my intention at this point was probably to print one of each size, XTC-3d them smooth, then make rubber molds of each and just keep them nearby while I am casting other stuff. I'll pour extra resin from my other projects into them and just pop out a collection of them while I get the rest of these things done.
I'd love to see a picture of how the acetone treated ones came out if you have the time, but yeah - my intention at this point was probably to print one of each size, XTC-3d them smooth, then make rubber molds of each and just keep them nearby while I am casting other stuff. I'll pour extra resin from my other projects into them and just pop out a collection of them while I get the rest of these things done.
Immortan Joe Progress Log - 3d Modelling and various other bits.

Left, treated. Right untreated. For some reason (vibration? Extruder temp?) the treated one came out really rough and so that is why I chose it to try out in the vapor bath.
Basically, it makes it shiny.
Sent from my iPhone using Tapatalk
Left, treated. Right untreated. For some reason (vibration? Extruder temp?) the treated one came out really rough and so that is why I chose it to try out in the vapor bath.
Basically, it makes it shiny.
Sent from my iPhone using Tapatalk
Re: Immortan Joe Progress Log - 3d Modelling and various other bits.
Sure. http://www.lionribbon.com/c-187-grosgrain.aspx
CMB76: that was a nice link. Can you repost it please?
Sure. http://www.lionribbon.com/c-187-grosgrain.aspx
Ein
Sr Member
Re: Immortan Joe Progress Log - 3d Modelling and various other bits.

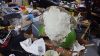
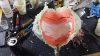
Look at that! It worked! There's some black speckling on the white cast where the paint transferred off the master onto the mold and then onto the urethane resin. Gotta get my technique down so the back of the mask is a bit smoother, but the finished part is strong, caught all the detail, and doesn't have too much in the way of bubbles on the surface for me to fix. I might try brushing the first layer of my next cast on to see if I can reduce or eliminate the air bubble issue on detail spots like the rivets and the screws.
Look at that! It worked! There's some black speckling on the white cast where the paint transferred off the master onto the mold and then onto the urethane resin. Gotta get my technique down so the back of the mask is a bit smoother, but the finished part is strong, caught all the detail, and doesn't have too much in the way of bubbles on the surface for me to fix. I might try brushing the first layer of my next cast on to see if I can reduce or eliminate the air bubble issue on detail spots like the rivets and the screws.
Bigboss1o1
Active Member
Immortan Joe Progress Log - 3d Modelling and various other bits.
Looks awesome man you I knew it would come out great!
Sent from my iPhone using Tapatalk
Looks awesome man you I knew it would come out great!
Sent from my iPhone using Tapatalk

Bigboss1o1
Active Member
Re: Immortan Joe Progress Log - 3d Modelling and various other bits.
Are those military jump boots?
Sent from my iPhone using Tapatalk
Ein's piston toe caps, right off the printer, unpainted and on my, as yet, unweathered boots. Thank you, Ein!
View attachment 515368
Sent from my iPhone using Tapatalk
Are those military jump boots?
Sent from my iPhone using Tapatalk
Similar threads
- Replies
- 2
- Views
- 213