Immortan Joe Progress Log - 3d Models, W.I.P. photos, and Con Results!

Re: Immortan Joe Progress Log - 3d Modelling and various other bits.

I use Rub and Buff for the metallics. It comes in a tube and rubs on over the flat black primer and really pops. Then I went back in and dirtied it up with acrylic washes (watered and thinned down paints)


Sent from my iPhone using Tapatalk
 
Re: Immortan Joe Progress Log - 3d Modelling and various other bits.

Quick question Ein, I've been following these threads for a long time, but never posted anything on the offical RPF forums before.

I went the same route as you with the PETG, and even down to the same Roman armor, because it was an inspired way of doing this. (Plus, who doesn't want some Roman armor lying around?)

What did you do about the "paunch" on the model? Just didn't push the PETG down over it as much? Because it looks absent from your Immortan Joe abs.

Thanks for all your posts, I hope to one day be as helpful!
 
Re: Immortan Joe Progress Log - 3d Modelling and various other bits.

Hooooo boy. Things have been absolutely crazy for me lately, so I apologize for leaving this untouched for a couple days.

I just added the air filter to the OP, as well as an update to the codpiece badge files. Thanks for reminding me, guys. :p
AltTab: If you mean the gut part of the model, I didn't form it as tightly to that area. There's still a bit of a bulge to it, but it's minimal. I did actually grab a rubber mallet before any forming occurred and I hammered the sides of the waist out wider a bit more because the metal armor was pinching me quite badly while wearing it, which did a lot to help keep the armor comfortable after it was heat-formed.

Not sure if I actually answered your question, to be honest!
 
Last edited by a moderator:
Re: Immortan Joe Progress Log - 3d Modelling and various other bits.

Oh man! That's exactly what I have to do. It's pinching me somethin' fierce when I'm wearing it. The sides needed to come out a little for me too. I'll go ahead and try again.

Thanks for the info!
 
Re: Immortan Joe Progress Log - 3d Modelling and various other bits.

That costume is looking amazing! Just wanted to show the progress of the mask casting bought off Ein in the junk yard. I think it turned out great! Thanks for putting in the hard work on the sculpt. uploadfromtaptalk1443320884091.jpguploadfromtaptalk1443320895868.jpguploadfromtaptalk1443320907013.jpg

Sent from my SM-G900V using Tapatalk
 
Re: Immortan Joe Progress Log - 3d Modelling and various other bits.

Does anyone here have any of the badges for the shin greaves for sale? Looking for the "medals", GX, XL, 500, and 1100 badges. Can pay via paypal immediately. Please let me know!! Thanks much!!
 
Re: Immortan Joe Progress Log - 3d Modelling and various other bits.

That costume is looking amazing! Just wanted to show the progress of the mask casting bought off Ein in the junk yard. I think it turned out great! Thanks for putting in the hard work on the sculpt.View attachment 533806View attachment 533807View attachment 533808

Sent from my SM-G900V using Tapatalk

Ok big man what did you make the bellows out of because it looks great


Sent from my iPhone using Tapatalk
 
Re: Immortan Joe Progress Log - 3d Modelling and various other bits.

Ok big man what did you make the bellows out of because it looks great


Sent from my iPhone using Tapatalk
Haha made it out of Walmart shower curtain and dress binding, my girlfriend did the hard work of sewing it together lol. After it was all together I made a good batch of colored mod podge and went at it!uploadfromtaptalk1444685243117.jpguploadfromtaptalk1444685262122.jpguploadfromtaptalk1444685280167.jpguploadfromtaptalk1444685296730.jpguploadfromtaptalk1444685305757.jpg

Sent from my SM-G900V using Tapatalk
 
Re: Immortan Joe Progress Log - 3d Modelling and various other bits.

Does anyone have an extra Texas patch that's on his shoulder below the bottle caps?

Sent from my SM-G900T using Tapatalk
 
Re: Immortan Joe Progress Log - 3d Modelling and various other bits.

***EDIT*** LOL! I totally forgot about that patch. Sorry, I misunderstood. ~~~ I think we missed the boat on that run. I was thinking of just printing it out, bonding it to some canvas scrap & distressing the heck out of it.
Does anyone have an extra Texas patch that's on his shoulder below the bottle caps?

Sent from my SM-G900T using Tapatalk

- - - Updated - - -

I think I saw in a thread someone 3D printed them, with some difficulty, I believe. You'll have to dig. I don't remember which thread.
Does anyone here have any of the badges for the shin greaves for sale? Looking for the "medals", GX, XL, 500, and 1100 badges. Can pay via paypal immediately. Please let me know!! Thanks much!!

- - - Updated - - -

I agree with Bigboss101, great work!!!
That costume is looking amazing! Just wanted to show the progress of the mask casting bought off Ein in the junk yard. I think it turned out great! Thanks for putting in the hard work on the sculpt.View attachment 533806View attachment 533807View attachment 533808

Sent from my SM-G900V using Tapatalk
 
Last edited:
Re: Immortan Joe Progress Log - 3d Modelling and various other bits.

Decided this was going to be something I finished, and it is warm enough that I don't mind dusting off my workspace again, so I'm chugging through getting the rest of this done.

I got my boots done with the 3d printed toe caps and bike chain that I salvaged from a bike that my neighbor was throwing out.


Both the toe cap and bike chain were attached pretty securely with E6000 adhesive (in black) and in the interest of screen accuracy I actually hand-sewed some leather straps over the ends of the bike chain. It's not 100% right, but it's close enough.

I'm actually a little concerned that the bike chain will prevent the boots from being easy to walk in, as they prevent the toe from flexing over the bridge of the foot mid-stride, but I'm sure I'll get used to walking with a bit more Frankenstein in my gait.

Played around with a couple weathering techniques on these, and ultimately ended up coating them with what I hope will be a pretty thick layer of matte varnish to try and save them from the inevitable scuffing and scraping of wear. Some of these weathering techniques ended up being kinda neat on the badges for the chest, so I think I'll end up using a couple of these.


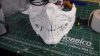
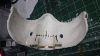
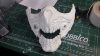
I also started playing around more seriously with actually getting my mask done... Since the movie mask has the ability to open and close the lower jaw, I figured I'd give it a shot to see how hard it'd be. Still not sure it'll end up working out, but baby steps and a bit of engineering should get me there. I took a jeweller's saw and did a bit of careful work separating the lower jaw, and then carved out a bit of space between the teeth for some character's sake. I may actually reshape the teeth a bit more with putty now that I've done that, since I can see some problem areas.


Last edited:
Re: Immortan Joe Progress Log - 3d Modelling and various other bits.

i3NRtc3l.jpg


Immortan Joe's mask opens up for added drama and intimidation!

Today's engineering challenge: Make that damn jaw open and close in a way that is durable and robust.

Today's results: ... it opens, I guess? :D

I was trying to come up with a hinge design that didn't involve being totally in the way of my face and decided that I could make something fairly flush to the mask's interior if I limited the movement of the jaw to straight up and down. I also wanted to make sure the rails or other mechanism it moved along were hidden, as it would ruin some of the appeal of the effect if you could see bars or whatever across the open mouth.

I did a quick bit of soldering of some brass plate and rod and came up with something that seems to be working alright.

Qn0vp3wl.jpg


Each brass plate is screwed into the resin in two places. Once I finalize things I'll probably JB Weld / glue them for a bit of extra strength, but I'm still playing with the mechanism for now. The brass actually has a little bit of flexibility to it, which is good, because the design requires the two rods to be perfectly parallel, which I can guarantee they are absolutely not.

However...

GnECeOWl.jpg


pNw8Eugl.jpg


It works! And it's a totally invisible solution. Right now there's enough stiffness in the mechanism that the jaw will stay up or down if I move it manually with my hands. I'd like to get it to the point where it'll freely and easily articulate up and down, but that'll take a significant amount of refinement. My end goal is to attach a plate that'll sit under my chin, two extension springs on either side of the back of the lower jaw, and have the mask open if I open my mouth all the way and close itself back up if I close my mouth.

Bonus slightly fumbly video!


Attachments

  • GnECeOWl.jpg
    GnECeOWl.jpg
    46.5 KB · Views: 58
  • GnECeOWl.jpg
    GnECeOWl.jpg
    46.5 KB · Views: 55
  • GnECeOWl.jpg
    GnECeOWl.jpg
    46.5 KB · Views: 54
  • GnECeOWl.jpg
    GnECeOWl.jpg
    46.5 KB · Views: 67
  • Qn0vp3wl.jpg
    Qn0vp3wl.jpg
    30.3 KB · Views: 53
  • Qn0vp3wl.jpg
    Qn0vp3wl.jpg
    30.3 KB · Views: 53
  • Qn0vp3wl.jpg
    Qn0vp3wl.jpg
    30.3 KB · Views: 44
  • Qn0vp3wl.jpg
    Qn0vp3wl.jpg
    30.3 KB · Views: 47
  • i3NRtc3l.jpg
    i3NRtc3l.jpg
    37.4 KB · Views: 47
  • i3NRtc3l.jpg
    i3NRtc3l.jpg
    37.4 KB · Views: 54
  • i3NRtc3l.jpg
    i3NRtc3l.jpg
    37.4 KB · Views: 52
  • i3NRtc3l.jpg
    i3NRtc3l.jpg
    37.4 KB · Views: 62
  • pNw8Eugl.jpg
    pNw8Eugl.jpg
    39.3 KB · Views: 53
  • pNw8Eugl.jpg
    pNw8Eugl.jpg
    39.3 KB · Views: 39
  • pNw8Eugl.jpg
    pNw8Eugl.jpg
    39.3 KB · Views: 46
  • pNw8Eugl.jpg
    pNw8Eugl.jpg
    39.3 KB · Views: 50
Last edited by a moderator:
Immortan Joe Progress Log - 3d Modelling and various other bits.

Very nice work! Thanks for sharing your design.


Sent from my iPhone using Tapatalk
 
Re: Immortan Joe Progress Log - 3d Modelling and various other bits.


I detached the brass hingework for now, but took the opportunity to add the gas mask hose connectors and sub-piping. That sub-piping is actually made of very thick electrical copper wire - couldn't tell you the gauge, I just eyeballed something close to right while I was at the hardware store. I could have done copper pipe instead, but hollow pipe tends to crimp and fold easily as you're trying to bend it, whereas a solid-core wire won't do that. I'm a little sad I can't bend the copper wiring a bit more precisely, but it is thick and stubborn and requires a mallet to bend in any meaningful way, so I'm just glad I got something that looks good from the outside of the mask done. It thankfully doesn't get in the way of either my face or the brass mouth assembly.

The tan plugs are only loosely superglued on - I'll snap them off when time comes to paint so that I can finish the whole mask easier.

The holes through the gas mask hose connectors were drilled open pretty easily. I have a minor pipe dream (pun... intended?) about making the mask ventilated for comfortable wear. Something involving a quiet air compressor in the bellows in the back behind my head pumping cool air through the hoses and into the mask to keep me from sweating to death in what is almost certainly going to be a miserably hot getup. I don't know if it's really a feasible option, but it's something I'm going to consider. I actually hooked all the gas mask hoses up and had my girlfriend blow in the other end, and you get a pretty solid breeze coming through. I can only imagine what the neighbors would think if they saw us testing that, though.
 
Re: Immortan Joe Progress Log - 3d Modelling and various other bits.

I spent a bit of time tidying up the torso sections of my armor so that I could get ready to trim them. Bought moleskin tape, but I'm practicing trying to shape it around a curve before I go crazy on the armor.


I hate that I don't have a vacuum forming rig. Honestly, even if I had the time to sit down and build one, I wouldn't have the space - my workshop is a glorified shed. Because of that, the thought of trying to shape something like the complex curves on the shoulders was agitating me, because I knew that trying to do it manually was going to be an invitation to wrinkling plastic and frustration. That, or I'd have to make a significant go of making a buck out of MDF or something that wasn't heat-sensitive to try and make pulls off of.

Fortunately, I may have found an accidental solution at my local Party City this afternoon in the form of a 2.5 gallon Beverage Dispenser. It's marked as "Amscan 410020.86" and cost me twenty bucks. It looks to be acrylic, and fairly thick - thicker than the PETG I used for the breastplate armor - but workable.


I used a dremel with a cutting wheel to take the bottom of the dispenser off, then cut it up each side to divide it into the two halves for each shoulder.


I think it's a pretty good size - actually a fair bit bigger than I need, but fortunately I can cut it down into a pretty good egg shape to fit around my arm. I hammered out the bottlecaps and arranged a patch on my workspace so I have a good idea of exactly how much room I'll need on my shoulder to fit everything.


Tomorrow I will break out the dremel and try and figure out how to cut the shoulder shape out... but first, I need to figure out how to make roughly symmetrical outlines to cut!
 
Re: Immortan Joe Progress Log - 3d Modelling and various other bits.

I used my 3\4 motorcycle helmet and it was perfect

Sent from my LG-H901 using Tapatalk
 
Re: Immortan Joe Progress Log - 3d Modelling and various other bits.

I figured I'd get the bottlecaps for the shoulder done and out of the way so I had them to use as a scale reference against this kind of side shot:


I'm 6'3"... but holy ****, Hugh Keays-Byrne must be a monster of a man to have armor that size.


As it stands, this shoulder's already going to have to be pretty sizable to accommodate the correct details. I may actually end up losing a row and column of the bottlecaps and scaling the design down a bit, but I'm going to see how it looks stacked up against the torso armor before I make that decision.
 
Re: Immortan Joe Progress Log - 3d Modelling and various other bits.

I could have spent a lot of time coming up with a pattern to make sure everything was symmetrical and even... but that sounded annoying, so I decided we'd just eyeball things and do the best we could. Started by masking the approximate curves of the shoulder out with some tape for guides and then drawing marker lines on.


Having the medals and patch draped over the shoulder helped keep things roughly the right size. I took the parts out and used a cutting wheel to get the rough shape, then a sanding drum to slowly work my way in to the marked lines. Once it all got done...


I need to spend some time figuring out how the front and back torso plates are going to connect before I get the hardware installed to hold the shoulders, too. It also still needs some more demelling and cleanup, but I think this is actually coming together pretty reasonably!
 
This thread is more than 7 years old.

Your message may be considered spam for the following reasons:

  1. This thread hasn't been active in some time. A new post in this thread might not contribute constructively to this discussion after so long.
If you wish to reply despite these issues, check the box below before replying.
Be aware that malicious compliance may result in more severe penalties.
Back
Top