IG 88 Head - my own version

calico1997

Active Member
I was never a fan of the IG-88 design from Empire Strikes Back. It looked to me like the tin man from Wizard of Oz or some kind of robot that one would see from a 1930s piece. That all changed when I saw what an IG droid in action could look like when watching The Mandalorian. I think he stole the show (yes, so the "the child".)

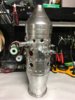
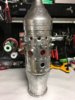
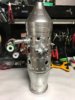
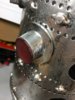
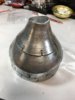
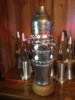
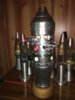
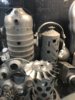
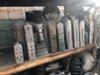
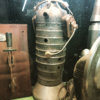
I decided to make my own as a display piece using some real steel parts, as I prefer to avoid 3D printed parts as much as possible. The Rolls Royce Derwent jet engine combustion chamber used for this piece is very hard to get these days, so I settled for something similar and easier to get / pay for: The Rolls Royce Dart jet combusion Chamber used for aircraft like the Fokker F27. It's isnt the exact same thing, but similar and I'm on a budget. Perhaps this is some other model of IG droid not yet seen in the Star Wars Universe?? ;) This particular one came to me with a wooden display base wired to be used as a lamp. So that makes display easy at least.
 

Attachments

  • d98aefd5771ca36d0682918be44b0d39--wonderful-wizard-of-oz-tin-man.jpg
    d98aefd5771ca36d0682918be44b0d39--wonderful-wizard-of-oz-tin-man.jpg
    7.9 KB · Views: 152
  • Photo Jan 09, 8 04 14 PM.png
    Photo Jan 09, 8 04 14 PM.png
    1.4 MB · Views: 260
  • Photo Jan 04, 4 15 26 PM.png
    Photo Jan 04, 4 15 26 PM.png
    887.6 KB · Views: 246
I wanted to keep this project simple and pretty quick. I needed to make the jet flame tube look a little more like the IG droid. The main thing that did need 3D printing was what I call the "top hat funnel". My jet flame chamber has a bullet shape at the top, but IG has an odd and distinctly funnel look to it. I 3D printed just this piece in PLA, downloaded from Thingiverse. It slips over the top nicely, once being reduced by about 16%. It was then wet sanded with 100 grit, and coated with brush on clear epoxy to smooth out the 3D printing texture.

I could have made the "eyes" out of parts from the hardware store, but opted also 3D print a certain part of the eyes - the rectangular pieces. The two tubes are standoffs from ACE Hardware.
 

Attachments

  • top.jpg
    top.jpg
    135.2 KB · Views: 97
  • Photo Feb 01, 2 49 40 PM.jpg
    Photo Feb 01, 2 49 40 PM.jpg
    1.7 MB · Views: 105
  • eyes.jpg
    eyes.jpg
    105.9 KB · Views: 90
For the telescope type eye, I used 1/2" copper reducing pipe and a small PVC joint, from Home Depot. I put a red "lens" in the end of it using pinball round red playfield inserts from the Pinball Life company.
 

Attachments

  • Photo Feb 01, 2 44 00 PM.jpg
    Photo Feb 01, 2 44 00 PM.jpg
    1.5 MB · Views: 110
Last edited:
For paint, I used Rustoleum sandable gray primer, followed by Rustoleum Bright Coat silver. Weathering for all parts was then applied by dabbing black acrylic craft paint diluted with water on a cloth, and then mist spraying brown acrylic craft paint diluted with water in a spray bottle to create a slightly pitted, rusted look.
 

Attachments

  • Photo Feb 01, 2 48 39 PM.jpg
    Photo Feb 01, 2 48 39 PM.jpg
    2.3 MB · Views: 89
Again for the red lights or "eyes"?, I used more red pinball playfield inserts of various sizes from Pinball Life company. I attached them from inside the flame tube with some small pieces of JB Weld plastic epoxy putty.
 

Attachments

  • Photo Feb 01, 2 44 52 PM.jpg
    Photo Feb 01, 2 44 52 PM.jpg
    1.6 MB · Views: 92
There are a couple large round ports on the side of this flame tube and also the correct one used for IG-88 and IG-11. The ports have some sort of ring or round bushing on them. I added my own ring/bushings with these black rubber ones, that were painted with the same primer and silver paint.
 

Attachments

  • Photo Feb 01, 2 45 17 PM.jpg
    Photo Feb 01, 2 45 17 PM.jpg
    1.4 MB · Views: 100
There are some connectors on the sides of the IG droid that look like small hydraulic compression fittings. I added 6-7 brass ones that were purchased from Home Depot. These were painted in the same paints and applied with JB Weld epoxy putty.
 

Attachments

  • Photo Feb 01, 2 47 00 PM.jpg
    Photo Feb 01, 2 47 00 PM.jpg
    1.5 MB · Views: 135
Here is the final result, with paint, a few 3D parts including the top hat, the red pinball inserts, the hydraulic fittings, the piping for the "telescope", etc. This real jet flame tube is extremely heavy, solid steel. It's the real deal as far as a genuine original aviation part. While not identical to the one used in Star Wars, it looks decent in my opinion.
 

Attachments

  • Photo Feb 04, 11 09 39 AM.jpg
    Photo Feb 04, 11 09 39 AM.jpg
    1.6 MB · Views: 215
  • Photo Feb 04, 11 09 59 AM.jpg
    Photo Feb 04, 11 09 59 AM.jpg
    1.6 MB · Views: 257
  • Photo Feb 04, 11 10 13 AM.jpg
    Photo Feb 04, 11 10 13 AM.jpg
    1.5 MB · Views: 187
  • Photo Feb 01, 2 51 54 PM.jpg
    Photo Feb 01, 2 51 54 PM.jpg
    1.6 MB · Views: 165
  • Photo Feb 01, 2 45 51 PM.jpg
    Photo Feb 01, 2 45 51 PM.jpg
    1.2 MB · Views: 180
  • Photo Feb 01, 2 46 05 PM.jpg
    Photo Feb 01, 2 46 05 PM.jpg
    1.4 MB · Views: 168
Mounted on the lamp base, shown here with a 25W (2w LED) light inside of it. The red inserts look bright cherry red in reality, but the camera can't capture that color very well due to the lighting used. I used an LED bulb to avoid excessive heat, which might otherwise damage my plastic parts and paint. I also inserted an aluminum lamp shield cone from a clamp lamp inside the "neck area" so one cannot just see through the holes without seeing something substantial and metal inside. I've seen many different jet flame tubes / combustion chambers in Star Wars films and shows, just laying around or used as lamps and fixtures. To me this is a nice add to my Star Wars prop room and was pretty darn easy to make once the parts were tracked down. Thanks for looking!
 

Attachments

  • Photo Feb 04, 11 14 15 AM.jpg
    Photo Feb 04, 11 14 15 AM.jpg
    1.5 MB · Views: 158
  • Photo Feb 04, 11 14 23 AM.jpg
    Photo Feb 04, 11 14 23 AM.jpg
    1.2 MB · Views: 160
I'd kill to get a balance pipe from a not Rolls Royce engine for a custom saber.
 

Attachments

  • F77EE92C-AE5C-40C9-9C02-9975FF80EF6A.jpeg
    F77EE92C-AE5C-40C9-9C02-9975FF80EF6A.jpeg
    1.9 MB · Views: 179
  • 44F74846-E03F-462A-9241-70BB7BFD0A89.jpeg
    44F74846-E03F-462A-9241-70BB7BFD0A89.jpeg
    2.9 MB · Views: 145
  • F38FEDC5-9779-40FC-98A1-7A594A187B61.jpeg
    F38FEDC5-9779-40FC-98A1-7A594A187B61.jpeg
    2.6 MB · Views: 193
I love all those jet combustion chambers. They look like droid heads or cantena lamps in the making. You can see them laying all around Tatooine.
 
This thread is more than 4 years old.

Your message may be considered spam for the following reasons:

  1. This thread hasn't been active in some time. A new post in this thread might not contribute constructively to this discussion after so long.
If you wish to reply despite these issues, check the box below before replying.
Be aware that malicious compliance may result in more severe penalties.
Back
Top