How to Accurize the MR Falcon

Looks awesome Steve!

Amazing job scratch building those parts. One minor nitpick. The Morser Karl piece has some additional thin details missing on yours:
sdmf04.jpg


Note the thin details on the left side of the part.
Reference pic:
Missing_LeftMandible_A1.jpg


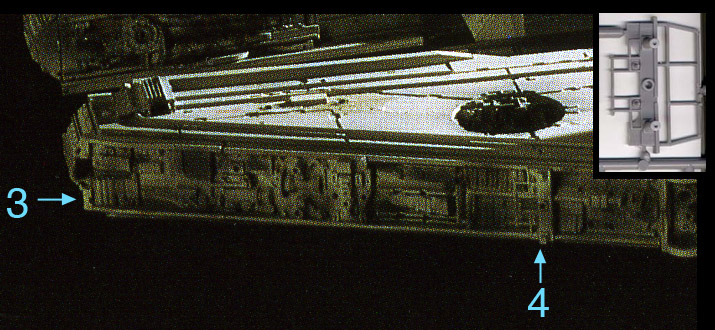
A small detail and easily changed if you care to.
I'm debating on adding the ILM names to mine too.

Thanks a ton for those notes! I plan to go over every square inch of mine and update some of the paint details and parts. Those notes will help a lot when I do.

Thanks guys! Great thread!

Yaaaaah. I saw that framework on the MK part. I used the similar part next to the engine exhaust for reference. However:

1) I am too lazy

2) I was afraid that if I recreated the framework in plastic strip or brass that it would be SO thin as to be too fragile.

3) I am too lazy

I MAY pick up the correct kit at some point and replace that part. That is the one piece that is a place-holder for now. It took very little time to scratch and I KNOW it isn't completely correct. I also have to do some more airbrush blending on a few of the added parts. They are still a bit too "added later" looking.

I didn't notice the red overspray on the pipes before. I went back and looked at the reference pics and yup...there it is. I have to go do that now. See? THAT is what I was talking about! Thanks!

OH! I almost forgot. The three "hole" things on the tops of the docking port "hallways" (I don't know the "lingo" for what you guys call these things...) There are two on the port side and one on the starboard side. You have to drill them through. On the filming model, they were hollow and you could look into the interior through them. And the adjacent C-shaped depressions get painted black.

There are also about ten locations where ILM drew geometric designs on the model with a pencil. I guess someone was bored. I did all of these in...pencil. If you pour over the reference images you will start to spot them if you look real-hard-like.

AND the numbers 2, 3, and 5 are written pretty large on the underside with a marker. So, I did that too.

Sorry, I am trying to remember 60 hours worth of modifications in a couple of posts...

And based on the OTHER thread...

(Capt. Picard voice)

THERE......ARE......EIGHT......PARTS!

missing...

:lol

I will post some overall shots later...
 
i know i will replace the missing parts and the signatures but as to drilling hols in it I don't thik I will
 
Steve,

That looks absolutely BEAUTIFUL!
The best paintjob I've seen BY FAR.
Nice to see Han and Chewie in there too. :)

Great work!

Chris
 
AND the numbers 2, 3, and 5 are written pretty large on the underside with a marker. So, I did that too.

I thought those were pencil.
Those numbers are labeling the landing gear bays and they are ALL labeled 1,2,3,4, and 5.

1 - front port
2 - front center
3- front starboard
4- rear starboard
5- rear port

The panels are removable. Underneath are holes to plug in the landing gear (see Chronicles p.178). They're numbered so they get put back in the right spots.
 
Last edited:
(Capt. Picard voice)

THERE......ARE......EIGHT......PARTS!

I think I found a ninth missing part.
Bottom side, rear port (near the #5 gear bay). There are two rectangular pieces each with 4 ridges sticking up. Next to them is a glue mark of similar size. Maybe from a third piece exactly the same?

Anyone have decent shots of the Falcon's underside during filming?

Nevermind - found pics. The underside shot in Chronicles shows it clearly and it's a repeat of the same parts on the starboard side. Will update the parts thread.
9 parts!
 
Last edited:
I didn't notice the red overspray on the pipes before. I went back and looked at the reference pics and yup...there it is. I have to go do that now. See? THAT is what I was talking about! Thanks!

:cheers

Thanks for taking my nit-picking in stride! And I totally know that when it comes to painting, especially stuff like the splatter or over-spray, that it really IS nit-picky! But it's all towards to the greater goal of a dead-on kck-ass Falcon!
 
Awesome thread!

Great info Steve, and wonderful pics.


My Only Point of Difference is:

" about half of the surface details (this saves having to recreate each part from the scan from scratch)."

We supplied WELL over half! Come on! hahah

Frank
 
Last edited by a moderator:
This really is fantastic info! Thanks for sharing Steve. Its really awesome to see the end product of your efforts as well. Just amazing. Do you have any progress shots? I know I would love to see the metamorphosis others probably would as well even if it just focused on one area.
 
WOW Great paint job!!!

I've seen some nice repaints but this one has to be the best.

GFollano
 
Last edited:
I repainted about 95% of it. Some of the factory gray panels were fine, so I left them alone. 98% of the body color stuff was repainted. A couple of BC panels were actually perfect, so I left them alone. The entire model got the spatter treatment and weathering overall. This really helped to blend the repainted/non-repainted areas together.

I still have to lower the orange rectangles on the front of the cockpit tunnel. The lowest one should actually be the TOP one if they were oriented correctly. Have to get to that. And I have to add the couple of new-found missing parts. Until they find MORE missing parts...

I don't have any progress shots, sorry. Just the ones I took after the first time it was done. And the second time when it was finally done. And then the THIRD time when it was REALLY finally done. :wacko
 
I just want to say thank you to Steve for coming in here and providing the information to make these things accurate. He didn't have to do it yet he did it anyway.

I would also like to thank Frank and Moe for chiming in on the other threads that are currently going on about the Falcon, (and anybody else who chimed in). This is what this forum is all about.

In closing, I thing that all these threads need to be archived. But not only archived for the information but the pics as well. I hate reading archived threads and all the pics are a big red ex's!!!

I say archive everything in these threads!
 
Last edited:
Reason I ask is that after looking at overall shots of the model, things like the heavily airbrushed over weathering streaks, hull blast marks, as well as all the airbrushed spaced dots along the edges of the rear deck still seem to have the signature factory look to them. There's other small details as well that only a falcon nut like myself who's familiar with many of the small details of the paint job would even notice. Not trying to be a jerk or a kill joy, just some observations.
 
Reason I ask is that after looking at overall shots of the model, things like the heavily airbrushed over weathering streaks, hull blast marks, as well as all the airbrushed spaced dots along the edges of the rear deck still seem to have the signature factory look to them. There's other small details as well that only a falcon nut like myself who's familiar with many of the small details of the paint job would even notice. Not trying to be a jerk or a kill joy, just some observations.


As has been posted before, photos tend to wash out details and digital cameras under $1000 average the contrast.

Having seen this up close, you can see the signature; the differences in the paint splatters; the different hues used to weather the ship; the subtle washes between the panels.

These Wide Shots especially wash out and increase contrast. Closeups are easier to see on digital camera. Matching red & grey colors that were added are close to the original; these photos weren't taken under ideal tabletop still photographic conditions. Still you get an idea.

It's more subtle. Honest.
 
I'd like to see these pics if anyone has them. The thread is five years old and the pics are gone.
 
Back
Top