mktodd
Sr Member
Hi, I'm a long time reader, but this is my first post to this forum. I took advantage of the new members sign up period and thought I'd introduce myself with a couple of examples of my recent work. I've already posted these to the Starship Modeller forum and I got some good feedback. I'd love to hear what you guys think. :thumbsdown :thumbsup ?
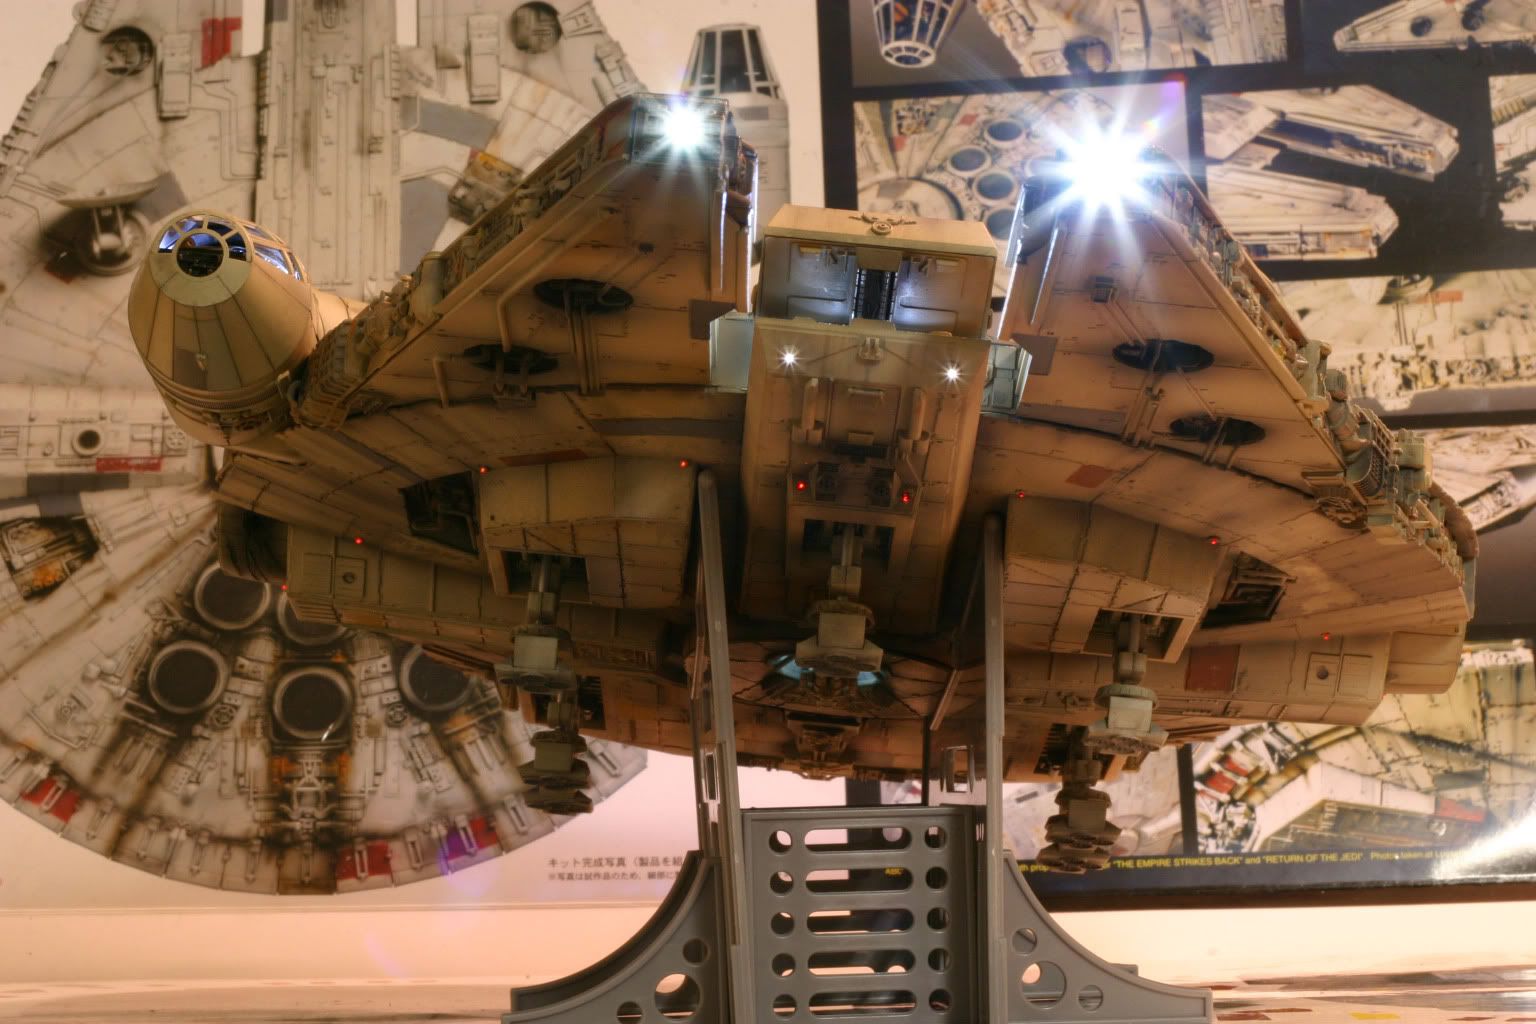
This is my Fine molds Falcon. I finally finished the wiring last week and I'm pretty pleased with the look. There are a couple of issues that I intend to address soon, the gaps in the piping being the main one.
The cockpit back wall is a backlit tarnsparency of a cockpit graphic I knocked up, the console, 3PO's eyes, red running lights and small lower mandible lights are fiber optics.


The engine uses Falcon Designs clear engine piece recasts (Thanks Alex, they look great) with some EL tape running behind them. I lightly sprayed the thrusters with a mist of silver so that when the lights are off it's so dark in there they look solid, not clear.


There are Leds in the gunwells and headlights. The gunwell walls have decals I made of the interior based on screenshots and reference, not that you can see much of the gunwell interior in the pics, they look better in person.


Here are the running lights.


The Blast Damage I added


I carved out the overhang between the mandibles and the hull plates, the notches on the rims and insets. I trimmed the plates back from the outer edge entirely in three spots to match the shooting miniature.


http://i53.photobucket.com/albums/g54/mktodd/FM%20FALCON/IMG_2414.jpg[/img
I didn't "correct" the madible angle as I didn't feel it was worth the effort and risk. To me, it's not that big a deal. I did add some more detail to a few spots and might go back later and add some
more to the Upper Jaw box sides and front, a la Quarz' [url="http://12-parsecs.blogspot.com/"]http://12-parsecs.blogspot.com/[/url] but for now, I'm going to give it a break as I've been working on this since the kit came out and I'm in danger of ruining it if I do too much. When I saw Quarz' piece on accurizing the docking port plating I kicked myself because I should've done the same, but I'd already carved the damage, assembled and painted the pieces.
I might revisit them later, maybe if I can get hold of a extra set as they are held on with magnets (and fiber optics, but that doesn't matter) The screw covers and the side "Gearbox" pieces are also held on with magnets so I can get in to replace the four 9v batteries when they die. I have two circuits inside, one for the engine EL strip and another for the LED's. The switch for both is the Dish. Everythings turned on by twisting it.
I think this kit is probably the best mass produced kit I have ever seen or had the pleasure to build. Every other kit manufacturer should take a leaf out of FineMolds book. The detail and engineering is amazing. I know it's lacking in a few places, but the quality far outshines any deficiencies, most of which can be adressed easily.
I hope you like it
[url="http://s53.photobucket.com/albums/g54/mktodd/FM%20FALCON/"]http://s53.photobucket.com/albums/g54/mktodd/FM%20FALCON/[/url]
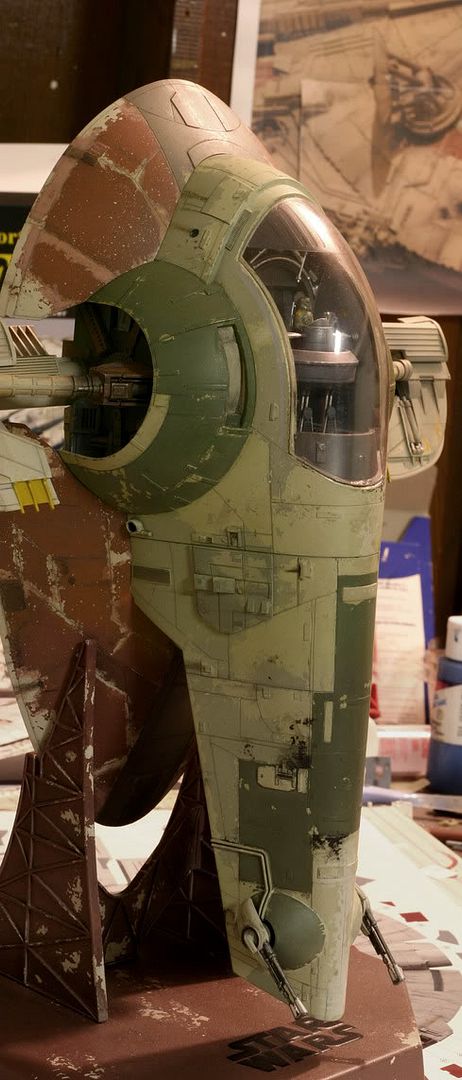
Here is my Slave 1
[img]http://i53.photobucket.com/albums/g54/mktodd/FM%20Slave-1/IMG_2485.jpg


This is the album...
http://s53.photobucket.com/albums/g54/mktodd/FM%20Slave-1/
it's based on the Jango Fett one and I didn't go to a lot of effort to correct the differences. I should've waited for the Boba version obviously...
So, there you have it. I look forward to hearing what you think...
Thanks
Toddski
This is my Fine molds Falcon. I finally finished the wiring last week and I'm pretty pleased with the look. There are a couple of issues that I intend to address soon, the gaps in the piping being the main one.
The cockpit back wall is a backlit tarnsparency of a cockpit graphic I knocked up, the console, 3PO's eyes, red running lights and small lower mandible lights are fiber optics.


The engine uses Falcon Designs clear engine piece recasts (Thanks Alex, they look great) with some EL tape running behind them. I lightly sprayed the thrusters with a mist of silver so that when the lights are off it's so dark in there they look solid, not clear.


There are Leds in the gunwells and headlights. The gunwell walls have decals I made of the interior based on screenshots and reference, not that you can see much of the gunwell interior in the pics, they look better in person.


Here are the running lights.


The Blast Damage I added


I carved out the overhang between the mandibles and the hull plates, the notches on the rims and insets. I trimmed the plates back from the outer edge entirely in three spots to match the shooting miniature.


http://i53.photobucket.com/albums/g54/mktodd/FM%20FALCON/IMG_2414.jpg[/img
I didn't "correct" the madible angle as I didn't feel it was worth the effort and risk. To me, it's not that big a deal. I did add some more detail to a few spots and might go back later and add some
more to the Upper Jaw box sides and front, a la Quarz' [url="http://12-parsecs.blogspot.com/"]http://12-parsecs.blogspot.com/[/url] but for now, I'm going to give it a break as I've been working on this since the kit came out and I'm in danger of ruining it if I do too much. When I saw Quarz' piece on accurizing the docking port plating I kicked myself because I should've done the same, but I'd already carved the damage, assembled and painted the pieces.
I might revisit them later, maybe if I can get hold of a extra set as they are held on with magnets (and fiber optics, but that doesn't matter) The screw covers and the side "Gearbox" pieces are also held on with magnets so I can get in to replace the four 9v batteries when they die. I have two circuits inside, one for the engine EL strip and another for the LED's. The switch for both is the Dish. Everythings turned on by twisting it.
I think this kit is probably the best mass produced kit I have ever seen or had the pleasure to build. Every other kit manufacturer should take a leaf out of FineMolds book. The detail and engineering is amazing. I know it's lacking in a few places, but the quality far outshines any deficiencies, most of which can be adressed easily.
I hope you like it
[url="http://s53.photobucket.com/albums/g54/mktodd/FM%20FALCON/"]http://s53.photobucket.com/albums/g54/mktodd/FM%20FALCON/[/url]
Here is my Slave 1
[img]http://i53.photobucket.com/albums/g54/mktodd/FM%20Slave-1/IMG_2485.jpg


This is the album...
http://s53.photobucket.com/albums/g54/mktodd/FM%20Slave-1/
it's based on the Jango Fett one and I didn't go to a lot of effort to correct the differences. I should've waited for the Boba version obviously...
So, there you have it. I look forward to hearing what you think...
Thanks
Toddski
