You are using an out of date browser. It may not display this or other websites correctly.
You should upgrade or use an alternative browser.
You should upgrade or use an alternative browser.
He-man Toy/Comic Style Power Sword
- Thread starter Maul
- Start date
Maul
Well-Known Member
Re: He-man Toy/Comic Style Power Sword - BACK from the drawing board!
Zombie project, back from the dead just in time for Halloween!
Well... I said I'd do it differently if I had it to do over again. This project has brought about a lot of old phrases, such as "Be careful what you wish for..." :confused
I owe you guys an apology. Another phrase that comes to mind is "can't see the forest for the trees." I got caught up in the technique and such, that I was missing the big picture and that the sword's proportions weren't very good. This thing was pretty crappy now that I can finally see it for what it was. Lol, I didn't even see it when looking at the silhouettes. It was WAY too fat and stubby. It did kinda have that toy proportion feel, but I only wanted to translate a little bit of that into the final product, not make it look ridiculous. And the thickness. Man, I was WAY off. :facepalm That one I kind of saw coming though, but I didn't want to believe it. When working on it, I would think it looked a little thick, but kept thinking it was because it was on the masonite template, it would come together once both halves were together, etc. NOPE! Again, missed the forest for the trees.
So, I started over. This time, I thought I would try to avoid molding the half and make it all in once piece. Well, that didn't go well either. I won't go into it in detail, but I made a new template that was double sided, meant to run down the cutting edge sides and shape the blade on both sides of the edge. That part worked, but it was virtually impossible to keep the cutting edge straight. Unfortunately this was pretty much a big waste of time.
I started AGAIN. The original idea DID give me a straight cutting edge on the sides. I had to fight the center line a little bit to keep it straight, using the bodywork trick of taping down the line and bodyworking one side, etc. This time, I figured I'd go all out and split it into quadrants. Hopefully it won't backfire again, but I think this is going to work out really well. I made two quadrants. I can work them laying flat, to get the 'face' of the blade done, as well as work them standing on end, to work the cutting edge. Once I have them both good to go, I'll join them and mold. At least that's the plan, but we all see how the plans have gone already, lol.
Anyway, here's a few pics. I didn't want to show anything else until I was pretty sure it was going to work.
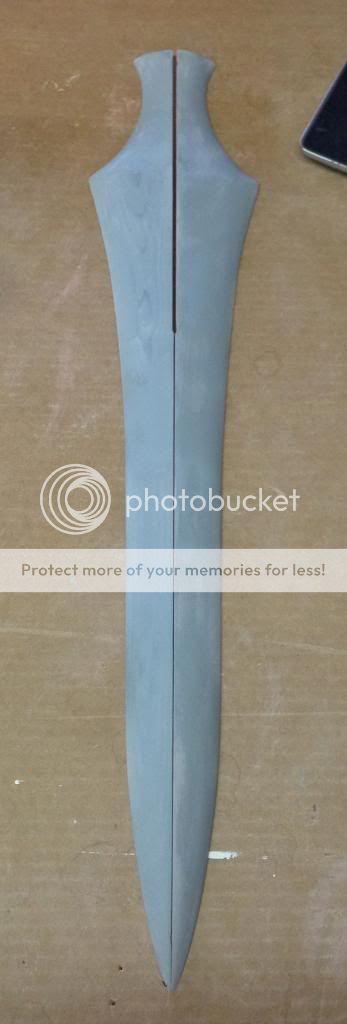
Laying flat for the 'face':


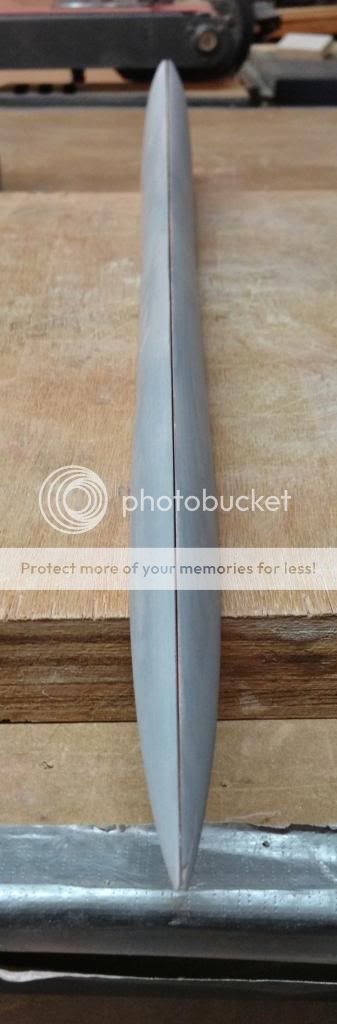
On end for the cutting edge. The gap is pretty much gone once it's clamped:

It really is laughable how thick the other one was. This one is about half as thick. After looking at the toys, etc., it was kind of obvious my other one was completely wrong.
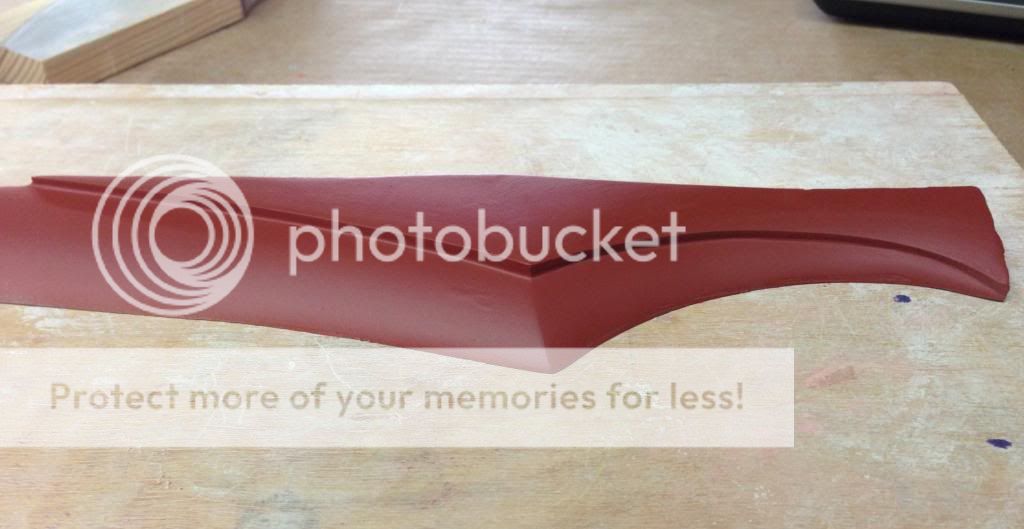
Beginning work on the raised area in the middle, still a ways to go:


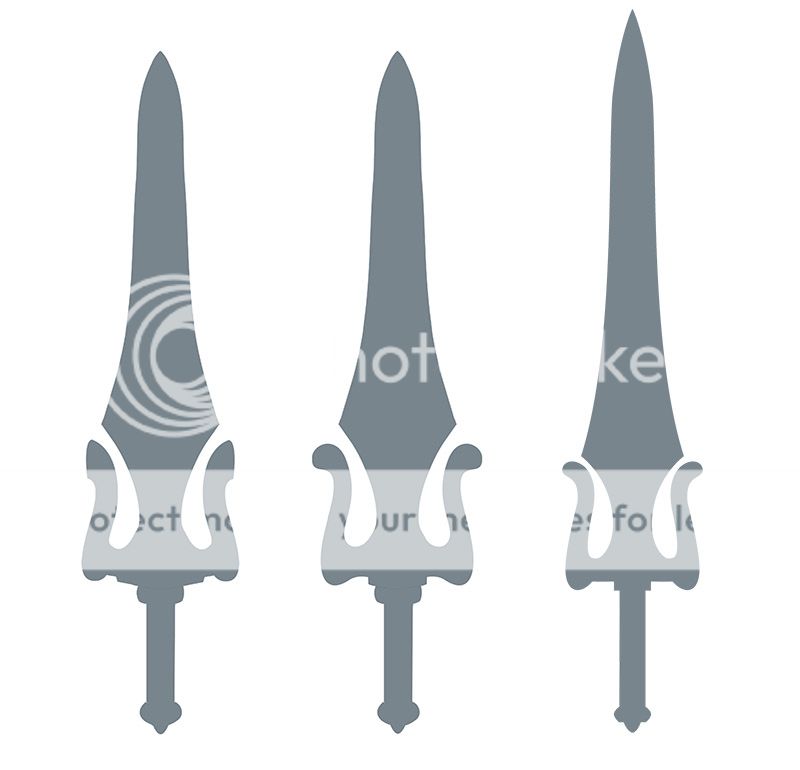
Finally, new silhouettes. This may not be an exact comparison, as I don't remember the exact length of the old one offhand. I believe it was coming in at 35-36". The new one will be about 38". I tried to stretch the blade out and thin the proportions down as well. It still has a little of that thick, toy feel when viewed from the side, but I think it works. It's basically just leaner and meaner. (I hope! :$ )
I'd love to hear any feedback, and sorry again for being so blind before!
Zombie project, back from the dead just in time for Halloween!
Well... I said I'd do it differently if I had it to do over again. This project has brought about a lot of old phrases, such as "Be careful what you wish for..." :confused
I owe you guys an apology. Another phrase that comes to mind is "can't see the forest for the trees." I got caught up in the technique and such, that I was missing the big picture and that the sword's proportions weren't very good. This thing was pretty crappy now that I can finally see it for what it was. Lol, I didn't even see it when looking at the silhouettes. It was WAY too fat and stubby. It did kinda have that toy proportion feel, but I only wanted to translate a little bit of that into the final product, not make it look ridiculous. And the thickness. Man, I was WAY off. :facepalm That one I kind of saw coming though, but I didn't want to believe it. When working on it, I would think it looked a little thick, but kept thinking it was because it was on the masonite template, it would come together once both halves were together, etc. NOPE! Again, missed the forest for the trees.
So, I started over. This time, I thought I would try to avoid molding the half and make it all in once piece. Well, that didn't go well either. I won't go into it in detail, but I made a new template that was double sided, meant to run down the cutting edge sides and shape the blade on both sides of the edge. That part worked, but it was virtually impossible to keep the cutting edge straight. Unfortunately this was pretty much a big waste of time.
I started AGAIN. The original idea DID give me a straight cutting edge on the sides. I had to fight the center line a little bit to keep it straight, using the bodywork trick of taping down the line and bodyworking one side, etc. This time, I figured I'd go all out and split it into quadrants. Hopefully it won't backfire again, but I think this is going to work out really well. I made two quadrants. I can work them laying flat, to get the 'face' of the blade done, as well as work them standing on end, to work the cutting edge. Once I have them both good to go, I'll join them and mold. At least that's the plan, but we all see how the plans have gone already, lol.
Anyway, here's a few pics. I didn't want to show anything else until I was pretty sure it was going to work.
Laying flat for the 'face':
On end for the cutting edge. The gap is pretty much gone once it's clamped:
It really is laughable how thick the other one was. This one is about half as thick. After looking at the toys, etc., it was kind of obvious my other one was completely wrong.
Beginning work on the raised area in the middle, still a ways to go:
Finally, new silhouettes. This may not be an exact comparison, as I don't remember the exact length of the old one offhand. I believe it was coming in at 35-36". The new one will be about 38". I tried to stretch the blade out and thin the proportions down as well. It still has a little of that thick, toy feel when viewed from the side, but I think it works. It's basically just leaner and meaner. (I hope! :$ )
I'd love to hear any feedback, and sorry again for being so blind before!
Maul
Well-Known Member
Small update to give a little better idea of the overall feel of it. The handle is by no means final. I was honestly just ready to start working on it and get out of Photoshop for a little while, lol. I've also started work on the side pieces, just didn't get any pics yet.


Maul
Well-Known Member
No, this project has not died. :rolleyes I spent most of November and all my free time of December working on the dollhouse for my daughter's Christmas. Then my vacation time up until now has been mostly spent soaking in as much of this precious time while the kids are at this golden age and enjoy Christmas so much. We all know that they just grow way too fast. :cry On a good note, I got my son Classics He-man and Battlecat and he loves them! Even my daughter knows about and seems to like He-man as well, so the seed is taking root, lol. My wife just shakes her head and says there's no hope, it's in their blood. :cool
I'm back on this now and trying to get the raised area on the blades just right. I've gotten a little bogged down on them, but they have to be right before I can move on. Then I can get the pieces stood up, glued together and then get the cutting edge done. I hope to make some real progress soon.
Thanks everyone who has contacted me for the interest and compliments!

Maul
Well-Known Member
Thanks a lot! Nice pic! I would like to do a Filmation sword eventually, but would probably need to do a project or two in between, lol. I personally like the one on the right better. I know there's some shots where it clearly had the round balls, but I just never really saw it like that.
Sorry for the lack of updates. I wanted to wait until I could make a decent one, not just "I'm still working on it." If there's one thing I've learned on this project, it's to not be afraid to re-do something. I wasn't happy with the raised area. It just didn't flow and looked like it just sort of landed on it, not something that flowed with the design. So... it had to go.

That was pretty tough actually, lol. They didn't look the best, but I had some time invested in them. I decided to go a different route and try some new techniques. I was pretty happy with the profile at the center of the sword, just not the edges. So before eradicating what I had so far, I traced that onto some styrene, cut it out, and then made a second copy. This would give me the profile on each side of the sword that already matched, instead of trying to make it match up on my own. The problem is that the pieces would add thickness to the width of the blade. Probably only a little over 1/16", but still. To account for that, I routed out a small bit on each piece to make the pieces fit flush. I'd just sprayed the primer and the discoloration is just it soaking into the filler versus the wood at different speeds.


So now I had a center point to start from. Switching colors occasionally helps see things better. Just working on smoothing out the blade before re-doing the raised areas.
Unfortunately, there's some spaces in places where the blade halves don't meet tight like before. I guess from moving it around so much while working it, and maybe just from warping over time? I'll deal with that soon.

I cut styrene shapes to layout the base of the raised area. I used garage sale signs, so ignore the writing. I also put in the curved line in the middle to set the symmetry for it on both sides. I've seen a lot about Apoxie Sculpt, but never tried it. Ordered some and I have to say so far that I LOVE it! I couldn't believe how quick I was able to do two of the four areas. Between it and the styrene, it sped things up a good bit. It would have taken a much longer time with the other methods I'd been using. They're not 100% and will still need some smoothing once they set, but still.


Again, there will be some more refining needed. One last overall shot.
I'm not sure why I didn't have the blade pressed tighter there. 2 steps back, three steps forward! It's getting there.
Sorry for the lack of updates. I wanted to wait until I could make a decent one, not just "I'm still working on it." If there's one thing I've learned on this project, it's to not be afraid to re-do something. I wasn't happy with the raised area. It just didn't flow and looked like it just sort of landed on it, not something that flowed with the design. So... it had to go.
That was pretty tough actually, lol. They didn't look the best, but I had some time invested in them. I decided to go a different route and try some new techniques. I was pretty happy with the profile at the center of the sword, just not the edges. So before eradicating what I had so far, I traced that onto some styrene, cut it out, and then made a second copy. This would give me the profile on each side of the sword that already matched, instead of trying to make it match up on my own. The problem is that the pieces would add thickness to the width of the blade. Probably only a little over 1/16", but still. To account for that, I routed out a small bit on each piece to make the pieces fit flush. I'd just sprayed the primer and the discoloration is just it soaking into the filler versus the wood at different speeds.
So now I had a center point to start from. Switching colors occasionally helps see things better. Just working on smoothing out the blade before re-doing the raised areas.
Unfortunately, there's some spaces in places where the blade halves don't meet tight like before. I guess from moving it around so much while working it, and maybe just from warping over time? I'll deal with that soon.
I cut styrene shapes to layout the base of the raised area. I used garage sale signs, so ignore the writing. I also put in the curved line in the middle to set the symmetry for it on both sides. I've seen a lot about Apoxie Sculpt, but never tried it. Ordered some and I have to say so far that I LOVE it! I couldn't believe how quick I was able to do two of the four areas. Between it and the styrene, it sped things up a good bit. It would have taken a much longer time with the other methods I'd been using. They're not 100% and will still need some smoothing once they set, but still.
Again, there will be some more refining needed. One last overall shot.
I'm not sure why I didn't have the blade pressed tighter there. 2 steps back, three steps forward! It's getting there.
Weaselhammer
Sr Member
Looking very nice so far ! Good luck with the rest of the build !
Monkeybark
New Member
Any new updates? I am looking forward to seeing how this shapes up.
Maul
Well-Known Member
Sorry, not the best pic, but I ran out and snapped one before work this morning. I've been refining the raised center section. I'm not sure if the angle of the pic is doing it or what, but it looks more symmetrical in person. Or maybe I've just been looking at it too long. :wacko The divots on the sides near the widest part are from testing clamping it together to see how much of the warping will straighten out. The good news is that most all of it did. There's definitely going to be some cleanup do to along the entire edge though. That's why I think I'll be better off gluing it together so I can finish the cutting edge to perfection and then molding it. If I'm going to have to do something twice, I'd rather it be the center line when it's laying flat I think.

Maul
Well-Known Member
Thank you very much!
I plan on making multiple copies, actually. One of which I would like to paint half gray or silver and half purple. Beside's He-Man and Skeletor's, I also really want Faker's orange one. It would be awesome to see all the colors of the toys, honestly.
I've been out of town and was busy with life again, lol. I look forward to starting back this week!
Last edited:
Maul
Well-Known Member
An update, finally! It was finally time to join the two halves and finish the cutting edge. The edges weren't exactly even any longer just due to all the shaping. I had a couple more blanks already cut from when I originally planned on making all four "quadrants", for lack of a better word, rather than just make two and mold them. I clamped the pieces to one of the blanks so I'd have a template to build up both sides to. Some refinement would still be needed, but it would get me pretty close.

Some parts were closer than others:


I used Apoxie Sculpt to build up to the edge:


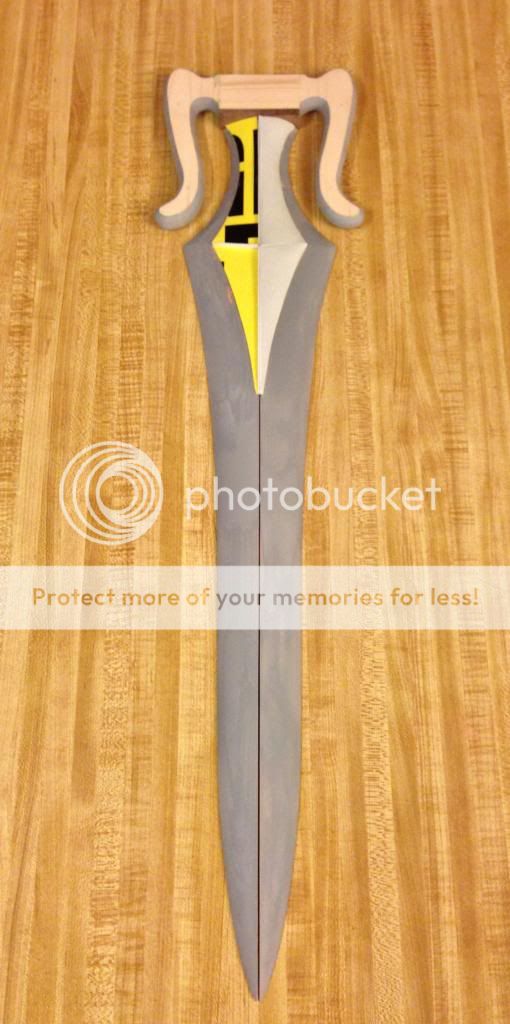
Again, there was some refinement afterwards, but not much. The halves are now joined, cleaned up the lines and it's FINALLY time to move on to hilt. I wasn't happy with the space between the wide part of the blade and the closest part of the cross guard, so I added in a couple of strips of masonite to space them out more.

Roughly trimmed:

I'm working on building the cross guard thickness with Apoxie Sculpt, blending etc., now. I hope to have some more updates soon. I don't expect this part to take as long, but we'll see. I've actually gotten a little further than these pics, but they're all I have for the moment.
Thanks again for the kind words everyone!
It was finally time to join the two halves and finish the cutting edge. The edges weren't exactly even any longer just due to all the shaping. I had a couple more blanks already cut from when I originally planned on making all four "quadrants", for lack of a better word, rather than just make two and mold them. I clamped the pieces to one of the blanks so I'd have a template to build up both sides to. Some refinement would still be needed, but it would get me pretty close.
Some parts were closer than others:


I used Apoxie Sculpt to build up to the edge:


Again, there was some refinement afterwards, but not much. The halves are now joined, cleaned up the lines and it's FINALLY time to move on to hilt. I wasn't happy with the space between the wide part of the blade and the closest part of the cross guard, so I added in a couple of strips of masonite to space them out more.

Roughly trimmed:

I'm working on building the cross guard thickness with Apoxie Sculpt, blending etc., now. I hope to have some more updates soon. I don't expect this part to take as long, but we'll see. I've actually gotten a little further than these pics, but they're all I have for the moment.
Thanks again for the kind words everyone!
Similar threads
- Replies
- 1
- Views
- 824
- Replies
- 1
- Views
- 244