This is my build post of my daughter's X-Men Storm costume.
Background: I am a novice prop builder and costumer. My experience includes some pepakura basics including the early start (i.e. unfinished) of a 12ft tall Optimus Prime from cardboard, a foam build of an Iron Man for my 7 year old son for Halloween 2012, and several unfinished bondo projects (BSG Cylon and Boba Fett helmets, Herbie the Love Bug, and a human-sized lego hand). Lots of unfinished projects.
The Project: My oldest daughter (age 11) has wanted to dress up as Storm for the last couple of years. Her inspiration was the 2008 Wolverine and the X-men animation. We searched for other similar source pictures and discovered a whole universe of Storm that is not age-appropriate for an 11 year old's costume. Ha! We stuck with the 2008 source material.

Purchased: We purchased a black catsuit and a wig.

Recycled: We found a pair of knee-high boots at Goodwill and added several coats of white Plastidip followed by several more coats of Blaze yellow Plastidip. This was my first experience with Plastidip. I knew it would take many coats, but I was really surprised by how many it took to do the job. The Blaze yellow was not exactly the color we wanted, but we settled for it as a function (Plastidip coverage) over aesthetics decision. We were fortunate to match the paint with fabric, later in our build.


After the rigors of Halloween, especially the rain in the Houston area, the paint on the boots was well used and starting to separate. Oh well.
The Build: We made the belt, cuffs, some badges, and the headdress out of foam, and went to the fabric store for materials for the cape.
Belt - We used floor-mat foam to cut a very basic 2.5" wide band. We used contact cement to glue two pieces together for length. We hit the foam with a heat-gun to prepare the surface for painting. We started with the blaze yellow Plastidip, but after several coats, it was apparent that we were never going to achieve the color of the boots. One coat of white Plastidip, followed by two coats of yellow made all the difference. Lesson learned.
We also had an afterthought about making an 'X' impression in the foam. It could have been a good feature, but it should have been done on the unpainted foam and would have required much more precision and detail than we had time for. After the paint, we hit the inside of the belt with the heat gun to build in the curve. We used sewing elastic to lace the ends of the belt together for a good snug fit, knowing that the back of the belt would not be visible. The badge was glued on with contact cement, so we prepped the belt by using a dremel to remove the Plastidip

Badges - We made three badges, one for the belt and two for the shoulders. We used sheets of craft foam to cut a black circle and a white "X" emblem. The white pieces were painted with a few coats of Plastidip. The Blaze covered the white foam nicely. We used contact cement to adhere the "X" to the black base. The shoulder badges used magnets on the back to keep them in place on the bodysuit.


Cuffs - We used paper on my daughter's arm to come up with a simple shape for the cuffs. We transferred the paper shape to thin craft foam, glued the shape with one end open to allow putting her hand through the cuff. We finished it up with several coats of Plastidip.

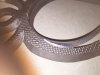
Headdress - Again, foam floor mat material was used. The shape was free-hand drawn from various source images. The foam was sealed with the heat-gun, and painted with several coats of black Plastidip. The foam was glued to a black headband in a skewed position so the headband could sit by behind the ears while the headdress framed the face.


Cape - Thankfully, my wife has some sewing skills. My daughter and I went to the fabric store and returned with what we thought was great materials. The yellow fabric was a stretchy fabric (sorry I can't be more descriptive of the materials) that was a spot on match for the Blaze Plastidip. The black fabric was also a stretchy fabric with some black sequin-like features on one side. Our seamstress informed us that we could not have purchased a more challenging combination of fabrics. We told her that we believed in her and her skills. We started out in our mind's eye with a very elaborate cape shape and collared system, with just the right swoopy draping effect. In the end, we sewed on a yellow border to the top and bottom edge of a rectangular piece of the black fabric. We used safety pins to attach the cape to the body suit and undershirt. We sewed some loops of sewing elastic to attach the cape to the wrists. In the end, I was surprised by how difficult the sewing component can be.


Summary: In the end, both my daughter and I were very pleased with the end product. The only disappointment was the lack of recognition by the general public. My daughter was mildly frustrated that most people had no idea who she was dressed as. A few of the more intelligent and informed people complimented her on a well done Storm costume.
The proof photo and finished product will follow in the next post.
Background: I am a novice prop builder and costumer. My experience includes some pepakura basics including the early start (i.e. unfinished) of a 12ft tall Optimus Prime from cardboard, a foam build of an Iron Man for my 7 year old son for Halloween 2012, and several unfinished bondo projects (BSG Cylon and Boba Fett helmets, Herbie the Love Bug, and a human-sized lego hand). Lots of unfinished projects.
The Project: My oldest daughter (age 11) has wanted to dress up as Storm for the last couple of years. Her inspiration was the 2008 Wolverine and the X-men animation. We searched for other similar source pictures and discovered a whole universe of Storm that is not age-appropriate for an 11 year old's costume. Ha! We stuck with the 2008 source material.
Purchased: We purchased a black catsuit and a wig.
Recycled: We found a pair of knee-high boots at Goodwill and added several coats of white Plastidip followed by several more coats of Blaze yellow Plastidip. This was my first experience with Plastidip. I knew it would take many coats, but I was really surprised by how many it took to do the job. The Blaze yellow was not exactly the color we wanted, but we settled for it as a function (Plastidip coverage) over aesthetics decision. We were fortunate to match the paint with fabric, later in our build.
After the rigors of Halloween, especially the rain in the Houston area, the paint on the boots was well used and starting to separate. Oh well.
The Build: We made the belt, cuffs, some badges, and the headdress out of foam, and went to the fabric store for materials for the cape.
Belt - We used floor-mat foam to cut a very basic 2.5" wide band. We used contact cement to glue two pieces together for length. We hit the foam with a heat-gun to prepare the surface for painting. We started with the blaze yellow Plastidip, but after several coats, it was apparent that we were never going to achieve the color of the boots. One coat of white Plastidip, followed by two coats of yellow made all the difference. Lesson learned.
We also had an afterthought about making an 'X' impression in the foam. It could have been a good feature, but it should have been done on the unpainted foam and would have required much more precision and detail than we had time for. After the paint, we hit the inside of the belt with the heat gun to build in the curve. We used sewing elastic to lace the ends of the belt together for a good snug fit, knowing that the back of the belt would not be visible. The badge was glued on with contact cement, so we prepped the belt by using a dremel to remove the Plastidip
Badges - We made three badges, one for the belt and two for the shoulders. We used sheets of craft foam to cut a black circle and a white "X" emblem. The white pieces were painted with a few coats of Plastidip. The Blaze covered the white foam nicely. We used contact cement to adhere the "X" to the black base. The shoulder badges used magnets on the back to keep them in place on the bodysuit.
Cuffs - We used paper on my daughter's arm to come up with a simple shape for the cuffs. We transferred the paper shape to thin craft foam, glued the shape with one end open to allow putting her hand through the cuff. We finished it up with several coats of Plastidip.
Headdress - Again, foam floor mat material was used. The shape was free-hand drawn from various source images. The foam was sealed with the heat-gun, and painted with several coats of black Plastidip. The foam was glued to a black headband in a skewed position so the headband could sit by behind the ears while the headdress framed the face.
Cape - Thankfully, my wife has some sewing skills. My daughter and I went to the fabric store and returned with what we thought was great materials. The yellow fabric was a stretchy fabric (sorry I can't be more descriptive of the materials) that was a spot on match for the Blaze Plastidip. The black fabric was also a stretchy fabric with some black sequin-like features on one side. Our seamstress informed us that we could not have purchased a more challenging combination of fabrics. We told her that we believed in her and her skills. We started out in our mind's eye with a very elaborate cape shape and collared system, with just the right swoopy draping effect. In the end, we sewed on a yellow border to the top and bottom edge of a rectangular piece of the black fabric. We used safety pins to attach the cape to the body suit and undershirt. We sewed some loops of sewing elastic to attach the cape to the wrists. In the end, I was surprised by how difficult the sewing component can be.
Summary: In the end, both my daughter and I were very pleased with the end product. The only disappointment was the lack of recognition by the general public. My daughter was mildly frustrated that most people had no idea who she was dressed as. A few of the more intelligent and informed people complimented her on a well done Storm costume.
The proof photo and finished product will follow in the next post.
![IMG_1017[1].JPG](https://therpf-f28a.kxcdn.com/forums/data/attachments/268/268851-c0670aaea2658a5448bc74415f1d16af.jpg)
![IMG_0995[1].JPG](https://therpf-f28a.kxcdn.com/forums/data/attachments/268/268854-377044190b6c5c865324f119711e394c.jpg)