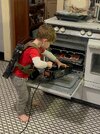
Check out this video.does the silence mean No? Is no one going to show these in action? If you already did, please point me in the right direction for the vid.
You are using an out of date browser. It may not display this or other websites correctly.
You should upgrade or use an alternative browser.
You should upgrade or use an alternative browser.
Haslab Ghost Trap & PKE Meter
- Thread starter ghostryder
- Start date
Great job!!Thought I'd share my quick-and-easy mods to help take these items out of the toy world and make them look a bit more prop-like...
I like my Ghostbusters gear old, dirty, and abused. And although the weathering on this set is nice as far as it goes, a heavy layer of black acrylic wash (about 50-50) helped take it to the next level:
View attachment 1888695 View attachment 1888696 View attachment 1888697 View attachment 1888698 View attachment 1888699 View attachment 1888700 View attachment 1888701
The wet wash was applied with a big paintbrush, and then removed with dry cotton balls.
Maybe I overdid it a little, but I like it dirty!
For the trap, I did the same thing, including the interior.
There is also a molded "electrical tape" feature at the elbow bend of the handle. I covered this with real electrical tape for realism.
View attachment 1888702 View attachment 1888703 View attachment 1888704 View attachment 1888705 View attachment 1888706 View attachment 1888707 View attachment 1888708 View attachment 1888709
I felt the hose needed the biggest mod, so in addition to the black wash, I also wrapped it in 1/4" ID split loom tubing, wrapped the ends with red electrical tape, and clamped the ends down with small cable ties.
Before/after pics:
View attachment 1888710 View attachment 1888711
Now they're ready for display and cosplay.")
Finally got a shipping confirmation for mine. They threatened it might be the New Year for U.K. orders but i'm hoping it'll be delivered tomorrow.
Mine was delivered today in the UK
Nice Christmas present for myself
Nice Christmas present for myself


DaveDW
New Member
For anyone wanting to print some custom trap bars (yellow made a very brief appearance ) I've made these today.
My first proper bit of 3D modelling, getting these working. Designed as close to the OG parts as possible, with the flat bottom on them.
Personally would recommend metallic colours, as they'll look machined.
Some caveats:
- Please only print vertically, when testing the first design of this, I found out the hard way about printing horizontally when the end pieces both snapped off inside my trap and I had to remove them with hot glue - This was the cause of a small amount of panic and a large amount of swearing )
- Use / modify your trap at your own risk.
- You may need to tidy up the connector ends where they've had supports on them, a nail file will do it (it can make one side longer than the other and mean they won't go in)
Hope you like them;
GB1 version (with notch): Two In the Box ghost trap bars - GB1 version by Dave W
GB2 version (no notch): Two In the Box ghost trap bars - GB2 version by Dave W
) I've made these today.My first proper bit of 3D modelling, getting these working. Designed as close to the OG parts as possible, with the flat bottom on them.
Personally would recommend metallic colours, as they'll look machined.
Some caveats:
- Please only print vertically, when testing the first design of this, I found out the hard way about printing horizontally when the end pieces both snapped off inside my trap and I had to remove them with hot glue
- This was the cause of a small amount of panic and a large amount of swearing )- Use / modify your trap at your own risk.
- You may need to tidy up the connector ends where they've had supports on them, a nail file will do it (it can make one side longer than the other and mean they won't go in)
Hope you like them;
GB1 version (with notch): Two In the Box ghost trap bars - GB1 version by Dave W
GB2 version (no notch): Two In the Box ghost trap bars - GB2 version by Dave W
Sahare Studios
Active Member
Ok so help me out with this.
The most inaccurate paint on all of the Haslab (to me) is the silver weathering on the red taser guard plastic cover.
That red cover is supposed to be plastic, according to the Savage video and the screen used prop (and makes most sense).
I had hoped that the silver weathering on that red platsic cover would be removeable. But unlike the wand (where the weathering can be removed using alcohol) on the PKE it can't. It's like the Haslab pack and not like the Haslab wand.
It appears the weathering, on atleast the red taser cover, cannot be removed using the liquids I mentioned.
I tried alcohol (which removed silver and brown weathering on the wand instantly) terpentine and napthta.
It appears that the weathering on the Haslab Two in the Box is identical to the Haslab Spenglers Pack, i.e. baked in. Not like the wand.
It looks like the Magic Eraser is the only way to remove the weathering, like on the pack.
Anyone know of a substance that will remove it? I can't wait to hit it with black RnB mixed with naptha to make it look like it's pooling black grime like in this picture.

Sahare Studios
Active Member


DaveDW
New Member
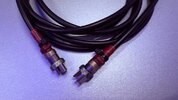
Published these yesterday for the trap and pedal, replacement covers for the connectors.

 makerworld.com
Made them screw in to be more secure, can print them in silver or bronze for a GB1 or 2 look.
Haslab Two In The Box ghost trap connector cover by Dave W
Replacement end cap to cover the Two In The Box connector cover on both the trap and trap pedal, modelled on the brass foster connectors used on the film props. These are threaded so screw on, rather than snug fit like the supplied rubber ones you got with the TITB kit. You'll be less likely to...
makerworld.com
Made them screw in to be more secure, can print them in silver or bronze for a GB1 or 2 look.
Sahare Studios
Active Member
This video isn't entirely accurate apparently:
1. You don't need to insert screws into the plugs to get them out. Just use a thin and long philips head, they reach the screws through the plug. That's why they have holes.
2. Haslab trap is identical in terms of molds and connecting pieces to the trap Ben Eadie sent to members of the Afterlife crew in 2019 that YHS also received. You can tell by the circular details on the bottom of both side plates. It's identical in terms of construction, size, knob sizes, etc. So what Tested is saying isn't entirely accurate. The knobs are not this size to accomodate electronics. They are identical to Ben Eadie's crew trap.
Those comments are from the video
Beardie
New Member
I took mine off with a little White Spirit on a baby-wipe. Came off easy.Ok so help me out with this.
The most inaccurate paint on all of the Haslab (to me) is the silver weathering on the red taser guard plastic cover.
That red cover is supposed to be plastic, according to the Savage video and the screen used prop (and makes most sense).
I had hoped that the silver weathering on that red platsic cover would be removeable. But unlike the wand (where the weathering can be removed using alcohol) on the PKE it can't. It's like the Haslab pack and not like the Haslab wand.
It appears the weathering, on atleast the red taser cover, cannot be removed using the liquids I mentioned.
I tried alcohol (which removed silver and brown weathering on the wand instantly) terpentine and napthta.
It appears that the weathering on the Haslab Two in the Box is identical to the Haslab Spenglers Pack, i.e. baked in. Not like the wand.
It looks like the Magic Eraser is the only way to remove the weathering, like on the pack.
Anyone know of a substance that will remove it? I can't wait to hit it with black RnB mixed with naptha to make it look like it's pooling black grime like in this picture.
Similar threads
- Replies
- 2
- Views
- 518
- Replies
- 0
- Views
- 131
- Replies
- 1
- Views
- 290