Han Solo Holster - Screen Accurate Pattern

It it looks like you are doing some really in depth work on this. I wouldn't say that there is little interest, there are a lot of views, I think it's just that very few people have looked into this as extensively as you and as such have little to constructively add other than "looks good, keep going". I'm very interested to see how you develop this and how you are able to innovate, and improve on what's been done already. Very noble that you would be willing to share this excellent work with the community.

Hey Egon,

First, I wanted to say thanks for participating in this thread. Strangely, I'm not getting a lot of interest it seems, which makes this a lot harder, but it is encouraging and nice to know someone out there is getting something out of this. :D

I was reading a lot of threads on this, and other forums about the weight pulling on the belt. While I am sure this contributes to the "V" to some degree, when I look at the photo of Han above, something really says to me that the angle of the clasp couldn't be achieved if it were just straight.

In my brain, the explanation is one of the following:

1. There is a pivoting clasp allowing the belt to move
2. The clasps were welded at an angle
3. The belt is being pulled down, which is causing the clasp to not sit flush. This is a bit hard to explain.

I have seen about four methods online for creating this. I'm not sure which one is closest. I'll have to think on it. :)
 
It it looks like you are doing some really in depth work on this. I wouldn't say that there is little interest, there are a lot of views, I think it's just that very few people have looked into this as extensively as you and as such have little to constructively add other than "looks good, keep going". I'm very interested to see how you develop this and how you are able to innovate, and improve on what's been done already. Very noble that you would be willing to share this excellent work with the community.

Totally agree. This has been on my ever growing to-do list, and I have just never had the time. Now, thanks to you, I may actually get to it at some point.
 
Thanks guys!

It is nice to know that people are keeping an eye on this. I'm having a blast making this, so either way it is worth it, but I'm happy that it is raising some eyebrows.

....

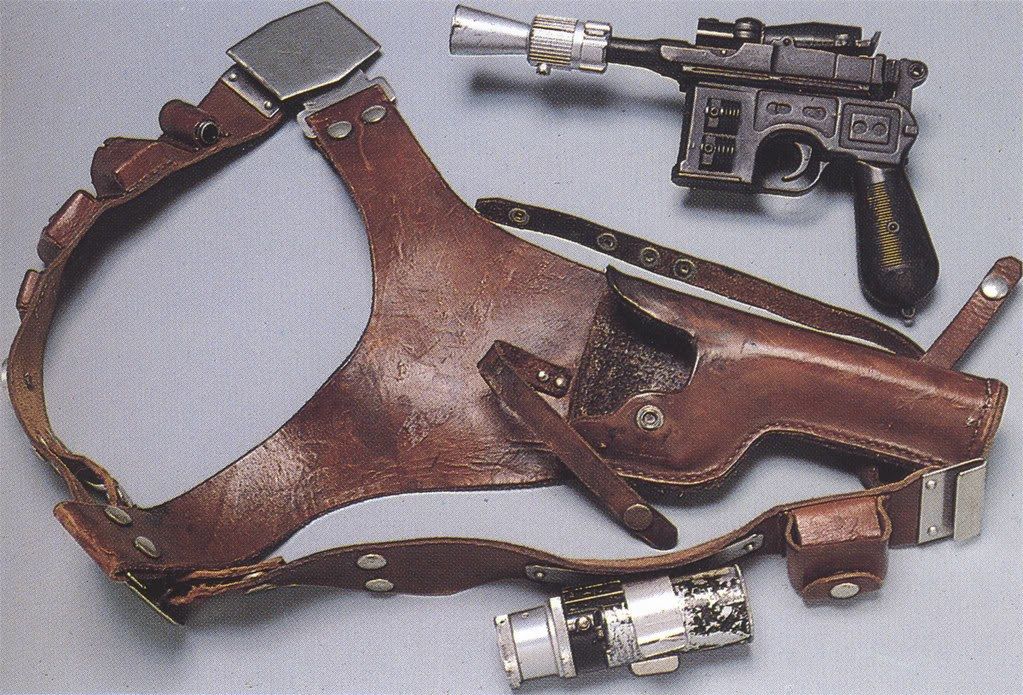
ESB Holster
v 1.0

Buckles: Updated

Yesterday a user sent me some high resolution photos they took of the ANH version (I will post if I get permission).

The images are the best I have seen showing the back of the ANH buckle, and they really helped me redesign the hooks and "Y" connector. Seeing them so close and in such detail allowed me to actually draw right on top of them as a base shape.


StarWars-HanSolo-Holster-Buckles-1.png

Change Log:

- Created new shaped for the left and right hooks

- Added bevel to the front and back buckles

- Completely redesigned the "Y" connector to better represent size, shape, and position.

- Adjusted the rivet sizes

- Adjusted the size of the ESB straight hook

....

Thoughts

Based on the new information, I think I have come very close to nailing the ANH version of the buckle. The only thing I was not really able to determine was whether the fixed loop was angled or not.

I opted to make it angled as it seemed that the hook was sitting basically straight on the fixed loop.

What I'm still not sure about is on the ESB version, and what is happening with the right hook (looking from back of buckle). From the images I have available, it does seem to curve down like the ANH version, but not to the same extreme angle.

The thing that does look strange to me is that the curve of the angle does seem to match the same angle as the ANH version. This makes me wonder if they just reused the same pattern?


StarWars-HanSolo-ESB-Reference-1.png

You can see in this that it does seem to curve at a similar angle. It even looks like you can see the other side of the hook slightly above the buckle. This is very curious to me.

I added in the ANH version to the image above to see how it looks...it is very curious I think.
 
This is some seriously awesome work, the attention to detail is incredible. I have nothing of value to add but it looks like you are on your way to creating some very accurate replicas. My dad and brother work with leather and I'm sure they would love a go at this prop.
 
ESB Holster
v 1.0

Buckles: Updated

I dun goofed! :D

... I think.

So, I was going along organizing layers and cleaning up the file, when something started gnawing at me like a Mynock on a power cable.

I decided to superimpose the buckle and hooks on top of one of the new images provided. After adjusting angles and such, I realized that my buckle seems to be the totally wrong size/shape.

StarWars-HanSolo-Holster-Buckles-ANH-Error-1.jpg

Now, I realize there is some lens distortion, and that some of the parts are in perspective, but I think that it is pretty clear that my buckle is not correct.

I am going to adjust it, but before I do, I figured I would post it here and see if you guys had any thoughts?


This is some seriously awesome work, the attention to detail is incredible. I have nothing of value to add but it looks like you are on your way to creating some very accurate replicas. My dad and brother work with leather and I'm sure they would love a go at this prop.

Thanks!

It would be great to have some leather workers take a look at this to make sure my patterns are leather compatible. I suspect I'll be going through some test pieces of leather only to realize parts of the pattern don't work well when the thickness is factored in.
 
ESB Holster
v 1.0

Buckles: Updated

Well, three hours later and I think I've fixed the buckle, and a bunch of other little nitpicks.

StarWars-HanSolo-Holster-Buckles-2.png

I think the most frustrating and interesting part is how one small change can have a knock-on effect for the rest of the parts. Once I resized the buckle, I realized that the hooks were going to sit differently. It has also been challenging trying to figure out what is happening under the buckle. As you can see from the image above, it seems like a drunken party behind the buckle where everything is attaching all willy-nilly.

I've stared at these buckles and tweaked them to the point where I am confident they are almost 100%. There are a few super small questions I have, and I am hoping they might get solved if the museum gets back to me, but I can't see how I can make this any more accurate with the resources I have available to me.

That's not to say I don't invite you guys to tear it apart. If you can find flaws, or mistakes, by all means let me know.

...On to the belt. :D
 
Last edited:
That looks spot on ... and yeah as for the 'drunken party backstage' ... the propmakers were under much stress to deliver many props in the nick of time for production, so most are cobbled together and function good enough for those seconds on screen ... although I suppose these leather parts could withstand some strain and heavy use. Looking forward to your progress :)

Chaim
 
This is excellent excellent work! I wouldn't say that there is little interest, it's just that you are doing so much work that no one else can really contribute! hah!

Super pumped for this. I am commissioning one of these soon and this will ensure great results!
 
Crazylegsmurphy, this is what my dad had to say after looking at a pic of the leather,

"I would recommend a latigo leather, pre dyed. Pre dyed leather won't fade much. A medium brown color. Tanneries all have different names for the colors they offer so he'll have to make a choice there. The thickness is given in ounces. This looks like 8-9 oz., about 1/8 of an inch thick. Your example is hand sewn. Go on the internet for a "how to" tutorial. The key here is making a good pattern. VERY important."


ESB Holster
v 1.0

Buckles: Updated

I dun goofed! :D

... I think.

So, I was going along organizing layers and cleaning up the file, when something started gnawing at me like a Mynock on a power cable.

I decided to superimpose the buckle and hooks on top of one of the new images provided. After adjusting angles and such, I realized that my buckle seems to be the totally wrong size/shape.

View attachment 430136

Now, I realize there is some lens distortion, and that some of the parts are in perspective, but I think that it is pretty clear that my buckle is not correct.

I am going to adjust it, but before I do, I figured I would post it here and see if you guys had any thoughts?


Thanks!

It would be great to have some leather workers take a look at this to make sure my patterns are leather compatible. I suspect I'll be going through some test pieces of leather only to realize parts of the pattern don't work well when the thickness is factored in.
 
Also, for your pouch patterns you might try 1/8" foam from michals or similar craft store in order to account for the thickness of leather.


Just a quick update.

I have been working on the pouches. I think I have got them mostly correct. I decided to do a paper mockup of one of them to test how it might feel for size, shape, and construction. I think it worked out well, but I am concerned that the corners on the front flap aren't exactly the right shape.

I'm also not sure what effect the thickness of the leather will have on some of the pattern pieces. For example, I'm not sure you could actually put this together in the same way as the paper version due to the thickness of the leather getting in the way. I will have to test it and see. It would be a fairly minor adjustment, as I would just have to add in the thickness on the pattern.

What do you guys think?

View attachment 427872
 
That looks spot on ... and yeah as for the 'drunken party backstage' ... the propmakers were under much stress to deliver many props in the nick of time for production, so most are cobbled together and function good enough for those seconds on screen ... although I suppose these leather parts could withstand some strain and heavy use. Looking forward to your progress :)

Chaim


Thanks, Sym-Cha.

Oh, I remember when I was working in the industry...man, the things we did to cut corners. It sucks too, because being super into costumes and props, I always had the best intentions to document everything so if the thing I was working on became really loved, I would have the answers to the questions people might ask. Unfortunately this is so hard in reality. I often said, "Ok, I don't have time this second, but I'll go back and document it when it's done...for sure!"

Then, the next job comes in, and that is that....:D


This is excellent excellent work! I wouldn't say that there is little interest, it's just that you are doing so much work that no one else can really contribute! hah!

Super pumped for this. I am commissioning one of these soon and this will ensure great results!


Thanks, Egon.

It is taking a lot of hours, but I suppose that is a perk of working for yourself that I can just take some time and work on this. I really hope that the final pattern makes your holster something you really love.


Don't know if these will help you or not. I took these when the Star Wars exhibit was in Chicago in 2007.


Entropy, yes!

I had some of those, but not in high res. It is bitter sweet because it is great to have them, but at the same time the second I open them I realize all the little details I have wrong. I appreciate the images though, they helped a lot.


Crazylegsmurphy, this is what my dad had to say after looking at a pic of the leather,

"I would recommend a latigo leather, pre dyed. Pre dyed leather won't fade much. A medium brown color. Tanneries all have different names for the colors they offer so he'll have to make a choice there. The thickness is given in ounces. This looks like 8-9 oz., about 1/8 of an inch thick. Your example is hand sewn. Go on the internet for a "how to" tutorial. The key here is making a good pattern. VERY important."


Thank your dad for me. :p

I'll look into that for sure when I get around to actually making this. I also figured it was 8-9 oz. I grabbed the standard leather thickness chart from Tandy Leather and have been using it to add it to the pattern where I think it is needed. I watched something like 20 "how to" tutorials on leather last night. Everything from pattern making, holster making, sewing, cutting, choosing, etc.

I'm very hopeful these patterns will work.


Also, for your pouch patterns you might try 1/8" foam from michals or similar craft store in order to account for the thickness of leather.


That is a great idea!

I'll head down there today. Thanks.


Update

Yesterday was basically cleaning up the file. Deleting stray points, double checking that everything is measured correctly and lining up right. Checking for errors in layers, naming layers, and various other house keeping.

I also got parts of the project started that I think you're all going to like, but I'll keep that on the down low for now.

At this point I have the following 95% complete.

- Pouches
- Front Buckles
- Back Buckles
- Belt (buttons, pouch placement, disk placement, etc) mostly rough blocked

I say 95% because the following are questions I need answering.

1. What is the exact placement of the back buckle on the ESB version
2. Is the button pouch riveted or sewn, or both (I think riveted)
3. What is the length of the "post" that attaches the "Y" connectors
4. Why do some of the costume test photos of the ANH version not have rivets on the hooks

I'll be posting some more patterns later in the day, so everyone have a great Sunday....oh, GOG has X-Wing v.s TIE Fighter on sale....go get it. :D :D
 
Last edited:
ESB Holster
v 1.0


Sorry for the late update. I realized a few things after researching leather craft that I wanted to incorporate into the patterns.

Belts

Here I have the first version of the belts. As you can see, the Droid Caller isn't done, and I have both belt types on there for reference. So far, I think this version is getting pretty close. Check it out.


StarWars-HanSolo-Holster-Belts.png


Thoughts

One of the things I am having a really hard time determining is the actual length of the belts. I realize that the belt will have to adjust slightly to fit the individual, but I wanted to get the placement of everything right, before worrying about length.

What I ended up doing was positioning the hooks at the end, and then carefully measuring each gap before placing the next element. I worked my way along the belt until I got to the end. There, I added the thickness of the leather, and then made sure the buttons lined up.

IF my calculations are correct, the belt should be about the right length (It is currently about 23" without any folds). From there I figured the best place for the "break" in the pattern would be just before the first set of buttons. I figured that would be a good place to add extra, or take a few inches away if needed as it would keep the look of the belt intact while viewing from the front and back.

Issues

There are of course a few things I'm not too happy about.

I am having a very hard time visualizing how the thickness of the leather will affect the pattern. It has been suggested to me that I should go get some 1/8" foam and attempt a mockup build. I think that is a great idea, and I plan on doing that this week if I can find the time to get out.

The second issue is that there are a few measurements I am unsure of. The "Disk" for example is pure guesswork. I don't have the specs for the one being sold, nor do I have clear enough photos of the actual one to determine the size.

This has the potential to throw all the measurements off at the back of the belt. I would really like to get some more concrete info.


Things to note


I have had a few people tell me that they've begun creating their belts using these patterns. I highly discourage this as the patterns are constantly changing. As well, the images I am uploading are not 1:1 scale and even though I have measurements on them, these are often very rough, or even wrong.

When this is done, I will make available a printable version that is 1:1 and ready to go. Trust me. :D


Project Update


I am at the point now where I am about 90% complete the belts. I just need to finish the droid caller, track down the size of the disk, and go over the whole thing to make sure every line is in place, and all the measurements are correct.

The pouches are done and the buckles are done. Once I get the belts completed, I can finish off the holster, and then prepare everything for distribution.


Questions

1. What is the diameter of the "disk"?
2. Are the elements on the belt in the correct positions?
3. What is the length of the belt?


See you guys soon. :D


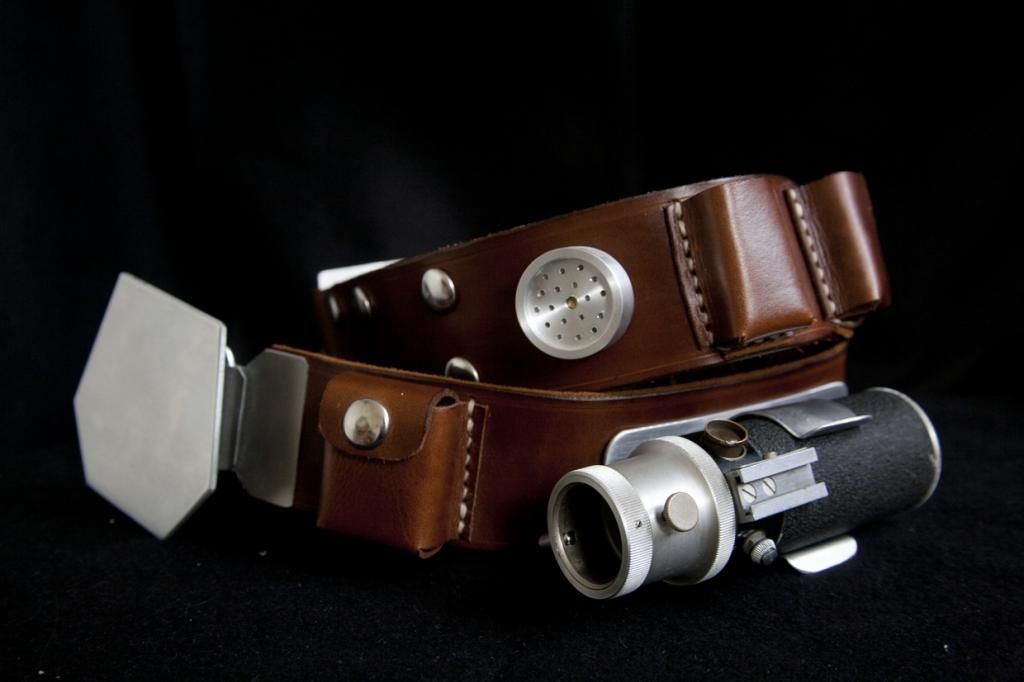
That's the original ESB pictured above. And the disk on my belt below is about 3.2 cm in diameter ... if that helps :


... though I believe it's a bit to thick in size :wacko

Chaim
 
Hey Chaim,

Thanks for the images. Your measurements at least give me something to go on...and it turns out my guess was pretty close. :D

From what I can see, the disk on the originals wasn't as refined as the ones seen on many of the holsters...it almost looks painted. I can't seem to find any decent images, so I'm going to have to throw on the movies and see if I can't find something.

The question will then be, what is screen accurate, and what is idealized?

I might contact the well known seller of these disks, and ask for the specs in return for a plug in the pattern. :p
 
Hey Chaim,

Two quick questions if you don't mind.

Is that an accurate droid caller, and if so, would it be possible for you to measure the diameter of the front and back, and the total length?

How are the hooks attached to the leather?

As I mentioned before, I have seen ANH versions with no rivets. I would like to know how this is done because my pattern currently has rivets, and I think it is totally wrong.

Thanks. :D
 
@ Crazylegsmurphy indeed it's an accurate ANH Droidcaller and the sizes are : front about 35mm; back 40mm and total lenght 125mm or 12,5 cm.

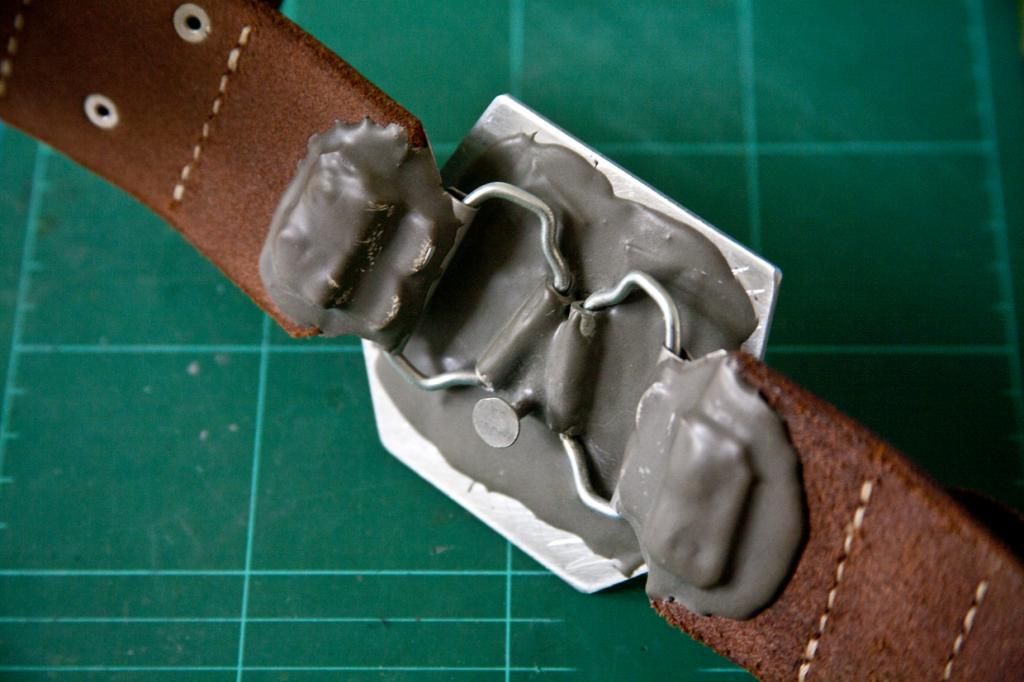
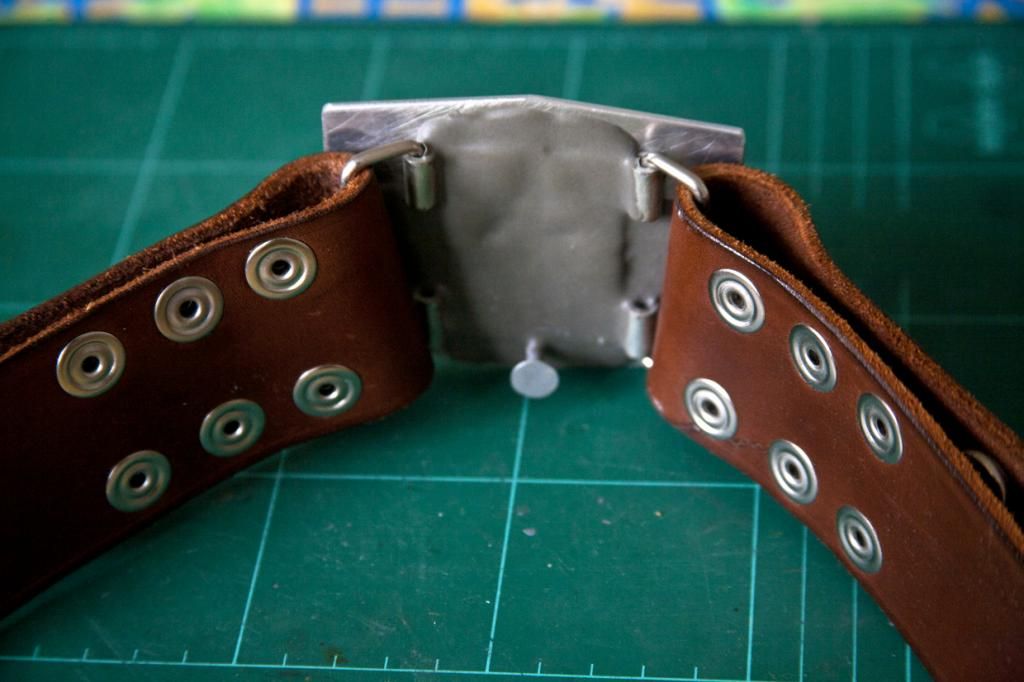
Best to show you my ANH hooks and stuff with pictures ... it's an ugly mess ... real propmaker's way of finishing just with jb weld and how I like it ;)


Also notice the multiple additional 'buttons' from the back ... to be able to adjust the lenght of each belt to any proper waist ... of course for Harrison's belt they had his waist size so no need to add so many.

Chaim
 
Last edited:
lol, wut!?

That is a epic amount of JB weld! Love it!

That really helps me though. I was so close with my Droid Caller clip, but I was off by about 1/2 cm or so in both directions. So thank you!

As for the ANH clips.....that is a head scratcher. I wonder how it was done?

I have an idea, but.....


Thanks for your help. I really appreciate it.
 
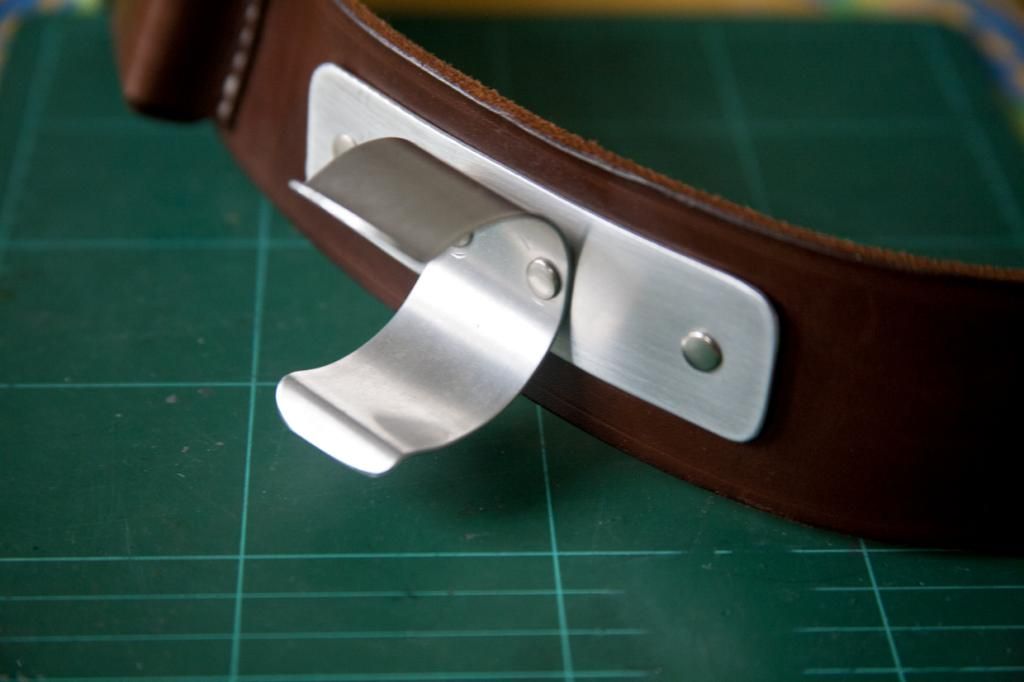
So the clip that holds the Kobold is about 30mm and the length of the rest behind the clip and riveted to the leather belt is about 105mm or 10.5 cm on mine ... but looking at that real holster ... it could be the same size as a Kobold :wacko Just remember : 'Don't make it real, make it believable' ... hence I like the use of heavy JB weld ... eventhough the real prop might have gone without :)

Chaim
 
Back
Top