You are using an out of date browser. It may not display this or other websites correctly.
You should upgrade or use an alternative browser.
You should upgrade or use an alternative browser.
Gb1 Style Ghostbusters Proton Pack
- Thread starter Warrenzo
- Start date
Warrenzo
Well-Known Member
Just a quick update before i start my Thrower build updates.
I was putting off making the Ribbon Cable as i was a little unsure of the route i wanted to take on making this. I finally decided that the cheapest and quickest option would be to use a sheet of sticky back plastic. To do this we peeled off the backing and lay the wires down on the sticky side like in the pic below.

Once that was done we doubled over the sticky plastic and twisted the cable to replicate how it looked in the movie. Once that was done, it was secured in place with the Ribbon Cable Clamp and P Clamp, then finally passed through the hole in the pack.
I'm not completely happy with how it turned out, but for a cheap option until i get a better one it's not bad.

I was putting off making the Ribbon Cable as i was a little unsure of the route i wanted to take on making this. I finally decided that the cheapest and quickest option would be to use a sheet of sticky back plastic. To do this we peeled off the backing and lay the wires down on the sticky side like in the pic below.
Once that was done we doubled over the sticky plastic and twisted the cable to replicate how it looked in the movie. Once that was done, it was secured in place with the Ribbon Cable Clamp and P Clamp, then finally passed through the hole in the pack.
I'm not completely happy with how it turned out, but for a cheap option until i get a better one it's not bad.
Warrenzo
Well-Known Member
Ok, so now that the Pack is practically finished bar electronics/sound and weathering, it's time to begin the thrower.
So here is a pic of all the parts needed to make up the thrower. The white toilet roll holder is now redundant as i gave up on implamenting the extending barrel idea, mainly due to the fact that i wanted the hat light at the tip of the barrel to light up and this would cause a bit of hassle with the wires. The Gun Kit im using is Nick-a-tron's who also made all my resin bits for the pack.

I forgot to include the clear barrel tube in the pic above so here it is lol!!

The job was to cut out the bar graph section, the hole for the handle and drill all the holes for the switches, clip lights, hat lights and atatchments.


I also drilled the holes on the bottom of the Gun Body for the bottom plate to screw on. I also glued in some fitings for the cap screws to screw into. Unfortunately one of the screws would have been right at the end of the post so i used some fillers to make it up a bit.

Next it was time to attach the Gun knobs to the body...yes i know i screwed up on this, but i did fix it i promise...keep reading to find out how. I also attatched the Heatsink to the otherside of the body. For this i used 4 cap screws and small amount of Super Glue for added security.


Of course once that was done, it was time to accidentaly drop the thing on the concrete floor and smash the fins of the Heatsink into loads of tiny sections....at this point i was ready to fire the whole lot across the room and give up altogether with the build/costume, but JT calmed me down a little and we worked on supergluing all the sections back on again to make the best of a bad situation considering the thing was stuck to the gun body and i really didn't want to start pulling it apart if it was salvageable.


So here is a pic of all the parts needed to make up the thrower. The white toilet roll holder is now redundant as i gave up on implamenting the extending barrel idea, mainly due to the fact that i wanted the hat light at the tip of the barrel to light up and this would cause a bit of hassle with the wires. The Gun Kit im using is Nick-a-tron's who also made all my resin bits for the pack.
I forgot to include the clear barrel tube in the pic above so here it is lol!!
The job was to cut out the bar graph section, the hole for the handle and drill all the holes for the switches, clip lights, hat lights and atatchments.
I also drilled the holes on the bottom of the Gun Body for the bottom plate to screw on. I also glued in some fitings for the cap screws to screw into. Unfortunately one of the screws would have been right at the end of the post so i used some fillers to make it up a bit.
Next it was time to attach the Gun knobs to the body...yes i know i screwed up on this, but i did fix it i promise...keep reading to find out how. I also attatched the Heatsink to the otherside of the body. For this i used 4 cap screws and small amount of Super Glue for added security.
Of course once that was done, it was time to accidentaly drop the thing on the concrete floor and smash the fins of the Heatsink into loads of tiny sections....at this point i was ready to fire the whole lot across the room and give up altogether with the build/costume, but JT calmed me down a little and we worked on supergluing all the sections back on again to make the best of a bad situation considering the thing was stuck to the gun body and i really didn't want to start pulling it apart if it was salvageable.
Warrenzo
Well-Known Member
I then glued the Palm Rest in place.

Next it was time to turn my attention to the Trigger Box. Once marking out where they had to go we drilled the holes for the Intensify push button and the Activate switch.
Whilst doin that i couldn't resist having a play with the handles just for a quick photo.

While i had the handle there i thought it would be a good idea to drill the holes to attach the front handle to the Body.

For the Gun Track, we marked out where it had to be and then glued it to the Gun Body bottom plate. Once that was done we screwed the other half of the Gun Mount to the Gun Track


OK, back to the Trigger Box, and this time the Rear Instrument Bar was glued to the Trigger Box.

Once this set, 2 self tapping screws where screwed into place to make sure it was doubley strengthend.


In order for this to happen 2 holes had to be drilled in the side of the Trigger box, which were then filled.

[/quote]
Next it was time to turn my attention to the Trigger Box. Once marking out where they had to go we drilled the holes for the Intensify push button and the Activate switch.
Whilst doin that i couldn't resist having a play with the handles just for a quick photo.
While i had the handle there i thought it would be a good idea to drill the holes to attach the front handle to the Body.
For the Gun Track, we marked out where it had to be and then glued it to the Gun Body bottom plate. Once that was done we screwed the other half of the Gun Mount to the Gun Track
OK, back to the Trigger Box, and this time the Rear Instrument Bar was glued to the Trigger Box.
Once this set, 2 self tapping screws where screwed into place to make sure it was doubley strengthend.
In order for this to happen 2 holes had to be drilled in the side of the Trigger box, which were then filled.
[/quote]
Warrenzo
Well-Known Member
In the pics above u can see i have also glued a piece of wood into the Instrument Bar where i intend to use a screw from inside the Gun Body to hold it in place. What u don't see is a groove that had to be cut in order for the wires to be allowed to pass through to the Slo-Blo cap light.
Remember the Gun Knobs i screwed up on?? Well here we go, all fixed. I literally had to take a block of wood and a hammer to it to remove it from the front of the Gun Body. This fewer concretes my love for using Plastic Weld for building things :001_smile:

U will also notice that i have added the trigger used to extend the barrel....basically i used a 4mm Allen Key and shoved some green tubing over it.
Next it was time to glued the Rear Cylinder on and put wut i had done so far together for a few pics and an idea of how it's all coming together.


I wasn't happy with the top Clip Light hole as the drill walked a bit whilst drilling the hole, so we decided to add a little bit of fillers to this also.

Once that was done, i sprayed all the knobs that still need attached silver. For the front knob i drilled a hole and glued a screw into place as wanted to attach it with nuts instead of glue.

Next after sanding the Rear Grip to make it sit flush, i glued it to the aluminium handle and sprayed everything Satin Black


Remember the Gun Knobs i screwed up on?? Well here we go, all fixed. I literally had to take a block of wood and a hammer to it to remove it from the front of the Gun Body. This fewer concretes my love for using Plastic Weld for building things :001_smile:
U will also notice that i have added the trigger used to extend the barrel....basically i used a 4mm Allen Key and shoved some green tubing over it.
Next it was time to glued the Rear Cylinder on and put wut i had done so far together for a few pics and an idea of how it's all coming together.
I wasn't happy with the top Clip Light hole as the drill walked a bit whilst drilling the hole, so we decided to add a little bit of fillers to this also.
Once that was done, i sprayed all the knobs that still need attached silver. For the front knob i drilled a hole and glued a screw into place as wanted to attach it with nuts instead of glue.
Next after sanding the Rear Grip to make it sit flush, i glued it to the aluminium handle and sprayed everything Satin Black
Warrenzo
Well-Known Member
So next it was time to begin the front section. So i marked out the areas that needed to be frosted by masking it off and sanding it. I also sanded the front of the barrel to a 45 Degree angle.

I then sprayed the Barrel Spacer and Trigger Tip silver and glued them in place.


While that was left to set i glued the Gun Lock and Trigger Ear to the Front Grip.

On the movie packs im guessin the Gun Lock was held in place with the Cap Screw so i added this to mine also.

I also did the same to the Trigger Ear, but recessed it and filled it as it shouldn't been seen.

Next i drilled the hole in the Barrel Ear, and glued another fitting in so that the Banjo scre has something to hold it in place.

I then glued this on to the Front Handle and also glued the rest of the bits to it. U can also see the line that was lathed near the back of the handle to replicate the join of the screen used Thrower.

And this is pretty much where im up to for now.
I then sprayed the Barrel Spacer and Trigger Tip silver and glued them in place.
While that was left to set i glued the Gun Lock and Trigger Ear to the Front Grip.
On the movie packs im guessin the Gun Lock was held in place with the Cap Screw so i added this to mine also.
I also did the same to the Trigger Ear, but recessed it and filled it as it shouldn't been seen.
Next i drilled the hole in the Barrel Ear, and glued another fitting in so that the Banjo scre has something to hold it in place.
I then glued this on to the Front Handle and also glued the rest of the bits to it. U can also see the line that was lathed near the back of the handle to replicate the join of the screen used Thrower.
And this is pretty much where im up to for now.
nick-a-tron
Well-Known Member
You are doing a great job on that thrower! Is the heatsink removeable? If so I can send you one of my new super accurate wavy finned sinks free of charge.
Warrenzo
Well-Known Member
My mate JT finished building my Proton Pack light kit so thought i'd update you all on this.
Basically I found a wiring diagram of how to build it and JT ordered everything and built it for a whole heap cheaper than what i would pay for a ready made kit. Here's a pic of it working below.

At the minute it's just working on a 9V battery, but when i have the pack finished im hoping to have both the Pack and Gun light kits running off a 12V CCTV Rechargable battery, but in order to reserve battery life we will be fittin a Transister or too to make the circuit only take 9V from the battery, thus extending the amount of time i can run everything before the next charge.
For the Cyclotron lights i bought 4 small torches from ASDA and glued the LED's to the reflectors of the torches. This helps to brighten the output of the already super bright LED.


Once that was done, we hot glued them into the pack. For the Powercell lights i took a scrap piece of plastic, drilled holes in it at even spacing and pushed the LED's through the holes. This was then also Hot Glued in place and here's the final result in this short video.
Proton Pack Powecell & Cyclotron Lights Installed - YouTube
Basically I found a wiring diagram of how to build it and JT ordered everything and built it for a whole heap cheaper than what i would pay for a ready made kit. Here's a pic of it working below.
At the minute it's just working on a 9V battery, but when i have the pack finished im hoping to have both the Pack and Gun light kits running off a 12V CCTV Rechargable battery, but in order to reserve battery life we will be fittin a Transister or too to make the circuit only take 9V from the battery, thus extending the amount of time i can run everything before the next charge.
For the Cyclotron lights i bought 4 small torches from ASDA and glued the LED's to the reflectors of the torches. This helps to brighten the output of the already super bright LED.
Once that was done, we hot glued them into the pack. For the Powercell lights i took a scrap piece of plastic, drilled holes in it at even spacing and pushed the LED's through the holes. This was then also Hot Glued in place and here's the final result in this short video.
Proton Pack Powecell & Cyclotron Lights Installed - YouTube
Warrenzo
Well-Known Member
Ok, time for another update. The pack is now finished.....thank you and goodnight.
.
.
.
.
.
.
.
.
.
.
.
What's that?? Oh you want pictures and an explanation and all that jazz?? Oh alrite then...here goes.
Well next up I glued the front barrel into place, screwed the Banjo's on and begin fitting all the switches and light caps as seen below.

You can see here i have installed the wires for the switch hat will play the Ghostbusters theme and the LED.

In the pics below u can see i've fitted all the light caps, some of the dry-rub transfers, the hose barbs, some of the knobs the Intensify button and the activate switch.


For the hose barbs u can see i've used 2 more of the brass inserts that i used on the gun box and banjos at the front of the barrel.

You can see below that the wireing had already become a rather large time consumer for myself and JT's dad. Intensify button and Activate switch both wired up.

The more i looked at it and toyed with it, the more i hated the 1 screw idea for the Rear Instrument box..soooo, i decided to add another screw to stop it twisting and turning with the slightest wee knock.

.
.
.
.
.
.
.
.
.
.
.
What's that?? Oh you want pictures and an explanation and all that jazz?? Oh alrite then...here goes.
Well next up I glued the front barrel into place, screwed the Banjo's on and begin fitting all the switches and light caps as seen below.
You can see here i have installed the wires for the switch hat will play the Ghostbusters theme and the LED.
In the pics below u can see i've fitted all the light caps, some of the dry-rub transfers, the hose barbs, some of the knobs the Intensify button and the activate switch.
For the hose barbs u can see i've used 2 more of the brass inserts that i used on the gun box and banjos at the front of the barrel.
You can see below that the wireing had already become a rather large time consumer for myself and JT's dad. Intensify button and Activate switch both wired up.
The more i looked at it and toyed with it, the more i hated the 1 screw idea for the Rear Instrument box..soooo, i decided to add another screw to stop it twisting and turning with the slightest wee knock.
Warrenzo
Well-Known Member
A few pics of where we're up to now before the next bit.


So next i glued the Vent light into the gun, using the same method as the Cyclotron lights i surrounded it in a torch reflector.

Once the electronics had been completely built, tested, changed around half a dozen times, repaired and re-repaired it was time to get them fitted.

In the photo below u can see how i have arranged everything inside the pack.

With that done, i took apart an old Playstation 2 controller solely for the vibrating motor, so that when u hit the Intensify button it would give the sense that the gun was vibrating which have to say is rather effective") I attached it to the bottom door of the Gun Box as this seemed to be the most stable place for it.
I attached it to the bottom door of the Gun Box as this seemed to be the most stable place for it.

Red wire added to the banjos at the front of the barrel

Top knob added and the 1,2,3 dry-rub transfers stuck on. You can also see below that when i tried to add the Bar Graph lights dry-rub transfer that i royaly screwed it up, but never fear...i know a guy who can get me another, so i'll be replacing this atrocity very soon.

You can also see the green tubing added to the hose barbs and the other two switches which activate the gun lights and vent light.

So next i glued the Vent light into the gun, using the same method as the Cyclotron lights i surrounded it in a torch reflector.
Once the electronics had been completely built, tested, changed around half a dozen times, repaired and re-repaired it was time to get them fitted.
In the photo below u can see how i have arranged everything inside the pack.
With that done, i took apart an old Playstation 2 controller solely for the vibrating motor, so that when u hit the Intensify button it would give the sense that the gun was vibrating which have to say is rather effective
I attached it to the bottom door of the Gun Box as this seemed to be the most stable place for it.
Red wire added to the banjos at the front of the barrel
Top knob added and the 1,2,3 dry-rub transfers stuck on. You can also see below that when i tried to add the Bar Graph lights dry-rub transfer that i royaly screwed it up, but never fear...i know a guy who can get me another, so i'll be replacing this atrocity very soon.
You can also see the green tubing added to the hose barbs and the other two switches which activate the gun lights and vent light.
Last edited:
Warrenzo
Well-Known Member
So with the gun assembled, lights fitted and the sound connected up...all that was left to do was attach the hose, weather it up to match the pack and add the Slo-Blo and he last remaining Danger sticker.


A few shots of it attached to the pack
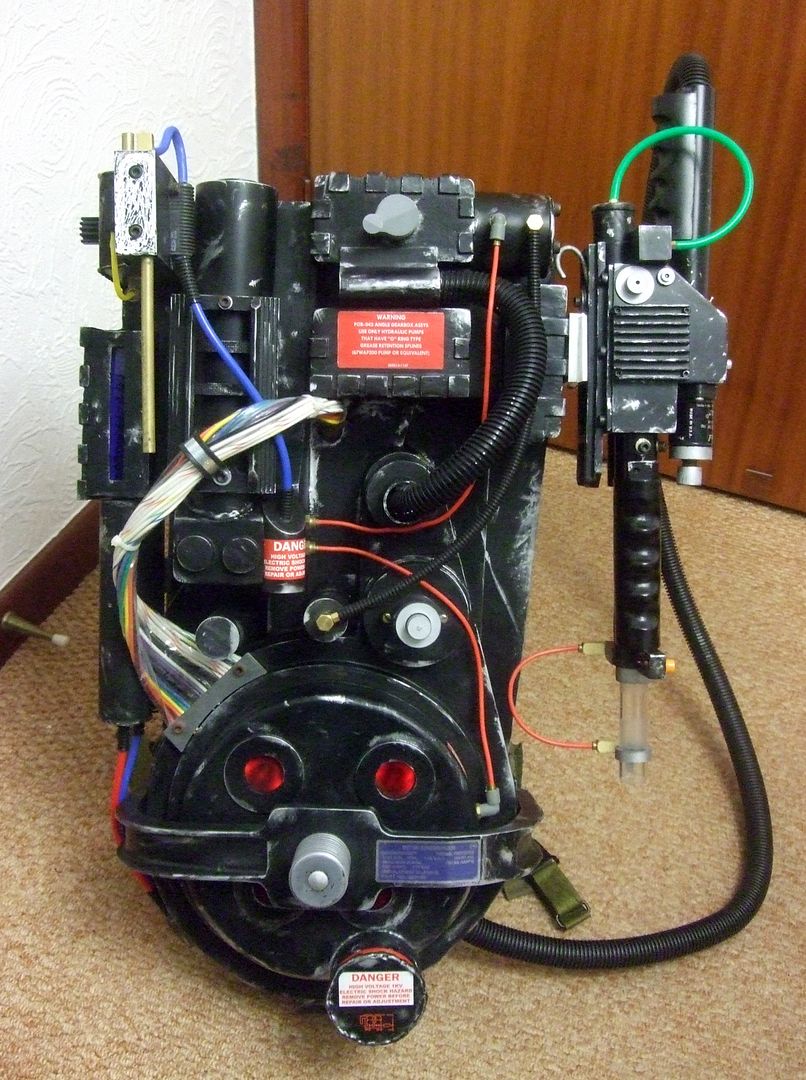

And here u can see the holes drilled to allow for the sound from my speakers, the MP3 player i have connected to it and also the kill switch i added into the design to stop the battery being constantly drained by the Amplifier.


Well that's it folks, the pack is complete and im sickeningly in love with it haha!! I'm so pleased how it turned out. It's been a long 9 months in the making, but i believe it has all been worth the hard work put into it. Once i replace the Bar Graph dry-rub transfer i will video the pack working and upload it here for you all to see. I hope you have enjoyed this build thread and that it helps you with your own build.
A few shots of it attached to the pack
And here u can see the holes drilled to allow for the sound from my speakers, the MP3 player i have connected to it and also the kill switch i added into the design to stop the battery being constantly drained by the Amplifier.
Well that's it folks, the pack is complete and im sickeningly in love with it haha!! I'm so pleased how it turned out. It's been a long 9 months in the making, but i believe it has all been worth the hard work put into it. Once i replace the Bar Graph dry-rub transfer i will video the pack working and upload it here for you all to see. I hope you have enjoyed this build thread and that it helps you with your own build.
Ghosthead1
New Member
where did you get the hat lights and dry rub transfers?
Similar threads
- Replies
- 2
- Views
- 711
- Sale
- Replies
- 8
- Views
- 1,097