Fujimi Blade Runner Police Spinner (yes, another one!). Pic heavy!

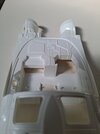
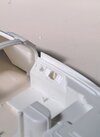
The reason I cut the existing styrene and replaced it was so that I got the same quality of illumination in all the 'translucent' lighted areas. I tried backlighting the white styrene but it looked really very different from the areas I inserted the diffusion sheet (having a heavily yellowish cast as I recall). Also, the provided clear inserts in those areas looked completely different from the other lit areas, even when the car was unilluminated (and leaving them out would lose the flush appearance of those areas. Having places that were supposedly 'the same'on the car looking so different triggered my OCD(!) so I decided that I'd treat all the lit areas in the same way for consistency. It would certainly have been easier to have backlit the white styrene, though, you're right! :D
Food for thought indeed. Thanks for that!
 
wayouteast - my kit arrived this past week and I have begun work with the preparation and cutting for the panels that I intend to light. A question I have is what sort of glue did you use for the coloured gel sheeting you applied to the various panels?
 
wayouteast - my kit arrived this past week and I have begun work with the preparation and cutting for the panels that I intend to light. A question I have is what sort of glue did you use for the coloured gel sheeting you applied to the various panels?
I was a bit worried about using any sort of glue - even canopy glue - on such tiny areas, both from a 'mess' perspective and for robustness. So what I did in the end was to use thin clear double-sided adhesive tape. I cut the tape to fit the underside of the panels, pressed it into place and then simply applied the tiny scraps of gel to the back side of the tape in the places where I wanted the various colours.

I used Paragrafix's etched brass detailing set, so it was sometimes a case of sticking the tape directly to the 'wrong' side of the brass sheet, applying the gel, and then gluing the completed panel - brass, tape and gel - onto the plastic console, in place of the moulded panel which had had the whole origianl area drilled out and removed. That made it easier for working on the lighting too.

There are two downsides:

One, it's a really fiddly job. You need fine tweezers, a steady hand (or preferably a small clamp like a 'helping hands' or similar) and I used a magnifier too to place the gel correctly.

Two, you need to be careful to protect the 'top' of the panels and consoles until they're all safely closed into the cabin. Because the top side of the adhesive tape is exposed through the holes in the panels, it's a magnet for dust and other contaminants and almost impossible to clean if it does get mucky. I kept the pieces in an airtight plastic box whenever I wasn't actually working on them.

Hope this helps.
 
Thanks for that. I have the Paragrafix kit myself and I'm planning on doing a similar thing. This helps immensely!
This might not need saying(!) but just in case... make sure you paint the visible side of the brass pieces and/or consoles before applying the tape and gel on the back. You'll never be able to do it afterwards without spilling over into the cut-outs, the areas are so tiny! :cry:
 
This might not need saying(!) but just in case... make sure you paint the visible side of the brass pieces and/or consoles before applying the tape and gel on the back. You'll never be able to do it afterwards without spilling over into the cut-outs, the areas are so tiny! :cry:
Ohhhh yeah. I figured that one out really early. I'm not sure I'm looking forward to it.
 
Ohhhh yeah. I figured that one out really early. I'm not sure I'm looking forward to it.
Here's how I spent my Saturday afternoon. There's 3 hours of work in here alone.
 

Attachments

  • 20211107_092307.jpg
    20211107_092307.jpg
    746.1 KB · Views: 143
  • 20211107_092328.jpg
    20211107_092328.jpg
    228.9 KB · Views: 143
Back
Top