ecl
Sr Member
The latest prop build—A Fraggle Rock Doozer! Despite bring a fan of Jim Henson’s creations, I don’t know much about Fraggle Rock. But I’ve always thought the design of the Doozers to be instantly likable, and each one of them looks subtly unique.
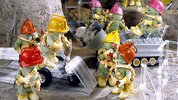
Photo of original Doozers for reference:

I got this incredible kit from a well known member here—who wishes to remain anonymous, so don’t ask me where I got it, haha—through a recent trade. The body is foam with a wire armature inside; resin hat, gloves, and boots; and urethane belt pieces. The parts have lineage to an original production piece, making it even more cool. All parts are very clean—I didn’t really need to do much prior to putting things together and getting ready for paint and flocking.
A quick cel phone shot of it in its raw state:

Some minor trimming here and there, and attaching the limbs (not glued in yet at this stage)


I gave the foam body a light coat of paint, to help make it easier for the flocking to blend with later, color wise. Also started to paint some of the accessories.

Flock test:


This was my first time working with flocking, but it worked out pretty well. I used a spray adhesive, but if i were to try it again I’d probably try using a brush on adhesive (I hear mod podge works too, but takes a very long time to cure). Blast the piece with the flocking tube. Afterwards, I gave the piece a few light sprays of matte medium mixed with water, to help make the flocking a bit more durable. I had to do the flocking outside—it’s a real mess and gets everywhere!

Experimenting with a few mustaches. I glued the hair to a small piece of thin wire, and the wire just simply pokes into the foam and stay put, while remaining removable. I also gave parts of his body a few light mist coats of Tamiya brown and green colors, to help create a very subtle hint of shading.


Belt material is very flexible urethane. A lot of really nice detailing captured in the castings:

Belt assembled and glued together with superglue. I also changed his mustache. The eyes are sewing pins!

The rest was fairly straightforward, but I decided to make a small pencil accessory for him, complete with a real eraser

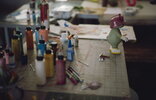
Tools:

Current—finished?—state. I may add a few more accessories to his belt, but it’s basically finished, aside from the two little ‘antenna’ that are often seen hanging out of the bottom of their helmets. This was easily one of the most fun builds I’ve ever done. I think the variety of different materials used makes the piece even more interesting!


Photo of original Doozers for reference:
I got this incredible kit from a well known member here—who wishes to remain anonymous, so don’t ask me where I got it, haha—through a recent trade. The body is foam with a wire armature inside; resin hat, gloves, and boots; and urethane belt pieces. The parts have lineage to an original production piece, making it even more cool. All parts are very clean—I didn’t really need to do much prior to putting things together and getting ready for paint and flocking.
A quick cel phone shot of it in its raw state:
Some minor trimming here and there, and attaching the limbs (not glued in yet at this stage)
I gave the foam body a light coat of paint, to help make it easier for the flocking to blend with later, color wise. Also started to paint some of the accessories.
Flock test:
This was my first time working with flocking, but it worked out pretty well. I used a spray adhesive, but if i were to try it again I’d probably try using a brush on adhesive (I hear mod podge works too, but takes a very long time to cure). Blast the piece with the flocking tube. Afterwards, I gave the piece a few light sprays of matte medium mixed with water, to help make the flocking a bit more durable. I had to do the flocking outside—it’s a real mess and gets everywhere!
Experimenting with a few mustaches. I glued the hair to a small piece of thin wire, and the wire just simply pokes into the foam and stay put, while remaining removable. I also gave parts of his body a few light mist coats of Tamiya brown and green colors, to help create a very subtle hint of shading.
Belt material is very flexible urethane. A lot of really nice detailing captured in the castings:
Belt assembled and glued together with superglue. I also changed his mustache. The eyes are sewing pins!
The rest was fairly straightforward, but I decided to make a small pencil accessory for him, complete with a real eraser
Tools:
Current—finished?—state. I may add a few more accessories to his belt, but it’s basically finished, aside from the two little ‘antenna’ that are often seen hanging out of the bottom of their helmets. This was easily one of the most fun builds I’ve ever done. I think the variety of different materials used makes the piece even more interesting!
Attachments
Last edited: