jorgos
New Member
I'm very new to this - so I wasn't sure to post - but I think I could use some help and might as well show the whole thing in that case.
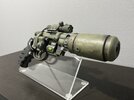
Like everyone I recently fell in love with the Enforcer KMS design, and since it's not really available and I wanted to model something myself, I foolishly took on the challenge of making my own version...
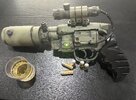
My research was not extensive, and I only focussed on the silencer, connector-bit and laser, so this is what I ended up with.

I worked off of this pretty basic snub design I found on Thingsiverse, thinking that I might switch to a more detailed version at some point, but I got excited and stuck to this simple model. (Who knowns some day...). I ended up only adding some little things from this full-size model.
Not sure what the policy around this is, but I'm more than willing to share any files.
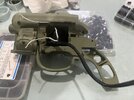
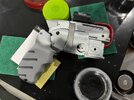
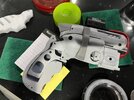
The prints came out mostly okay on my Prusa Mini in white PLA. The only part I couldn't clean up very well was the laser. I printed it in one piece, which was probably not very smart. I split it into more pieces and might redo it at some point... I also modelled some of the details a little too small to print on my machine. So a lot of the knurling didn't come out very well.

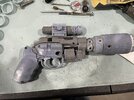
I went a little crazy and decided that as long as it's sorta fan-fiction anyway, might as well try something different with the colors...
Ended up looking a bit like it belongs to Iron Man


In the end, I'm happy the overall shape got pretty close and the silencer still disconnects, but disappointed in the paint job.
This was my second time painting any model and I tried paint chipping with hair spray for the first time, but that had some strange effects on some of the paints... So it ended up looking a bit scruffy...
Any tips on how to improve the paint on this or future builds is much appreciated!
Maybe some dirt weathering could help hide some crimes? There are also some details that I didn't paint separately that might have benefited the end result.
Like everyone I recently fell in love with the Enforcer KMS design, and since it's not really available and I wanted to model something myself, I foolishly took on the challenge of making my own version...
My research was not extensive, and I only focussed on the silencer, connector-bit and laser, so this is what I ended up with.
I worked off of this pretty basic snub design I found on Thingsiverse, thinking that I might switch to a more detailed version at some point, but I got excited and stuck to this simple model. (Who knowns some day...). I ended up only adding some little things from this full-size model.
Not sure what the policy around this is, but I'm more than willing to share any files.
The prints came out mostly okay on my Prusa Mini in white PLA. The only part I couldn't clean up very well was the laser. I printed it in one piece, which was probably not very smart. I split it into more pieces and might redo it at some point... I also modelled some of the details a little too small to print on my machine. So a lot of the knurling didn't come out very well.
I went a little crazy and decided that as long as it's sorta fan-fiction anyway, might as well try something different with the colors...
Ended up looking a bit like it belongs to Iron Man
In the end, I'm happy the overall shape got pretty close and the silencer still disconnects, but disappointed in the paint job.
This was my second time painting any model and I tried paint chipping with hair spray for the first time, but that had some strange effects on some of the paints... So it ended up looking a bit scruffy...
Any tips on how to improve the paint on this or future builds is much appreciated!
Maybe some dirt weathering could help hide some crimes? There are also some details that I didn't paint separately that might have benefited the end result.
")