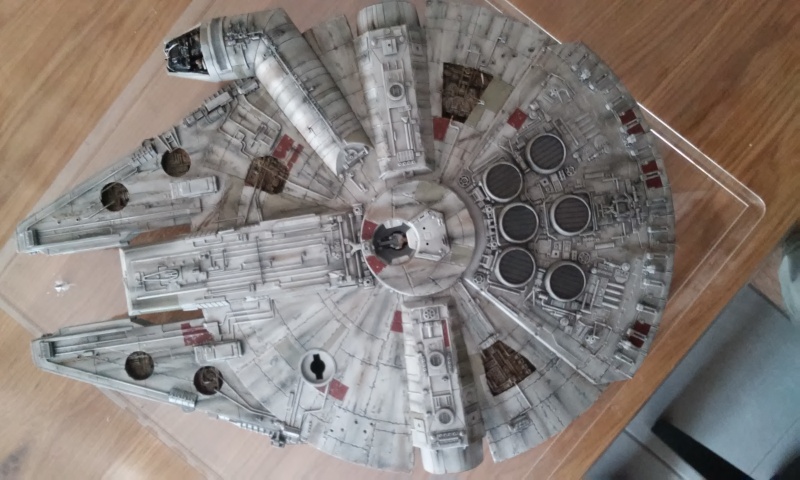
Fine Molds 1/72 Millennium Falcon Build ... Jumping into the deep end!

Nice work James!!!

Awesome!! It's incredible how you fitted into the cabin all the fiber optics!!!

The lighting looks really amazing, for the fibers and the electronics.

Congrats for the hard work!

Those little figurines look very nice!!!

And many thanks for the compliments!!! Working on the corridor now!

MILLENNIUM FALCON FM 1_72 ENTRANCE RENDER 2.jpg MILLENNIUM FALCON FM 1_72 ENTRANCE RENDER 3.jpg
 
Last edited:
Well, TonyRR's part came in and WOWOWOWOW it looks fantastic. If you are interested in his parts, check him out on Shapeways. That sentence sounds a little odd...lol.
So, most of my time lately has been spent on the TOS Bridge I am working on, but, have dome some work on the Falcon. I am experimenting with the oils for weathering. So far, only working on the top quad cannon flat pieces, and have gotten 2 layers down. Looks pretty good. It takes about 6 days to dry per layer though :O, so this is going to be a long process. FichtenFoo's videos are very helpful in this regard.
I got the corridor modified and placed into the model. It is looking pretty darn good. I have also modified the model to accept the aftermarket boarding ramp. Now that these are both in the model, I need to finish up the light box for the engines, that will hold the 39 LEDs and figure out where to place the servo that will control the boarding ramp, and then start working on the ground defense laser that you see in Empire and then, figure out how to get a smoke effect into the model.
She is slowly coming together. The Falcon is much more difficult compared to the TOS Bridge though for the modeling aspects, I am not sure so much on the painting. The code that needs to be written for both models is about the same difficulty level. I am not sure why I spend more time on the TOS Bridge though?

Cheers,
James
P2200055.JPG
P2210056.JPG
P2220001.JPG
P2220002.JPG
 
Got some of the oil work down, well, three layers of it. It needs a few more days of drying, before I go back in and do some of the dark grey sections. I plan on doing them in oil at first. If I don't like it, will fall back to acrylic. The picture looks darker than in person, and not as well blended, so I wonder why that is. I have no picture taking skills. One concern is over doing the amount of weathering and streaking, but this sure is fun to do with oils. I still need to find a softer brush though for blending, any ideas would be welcome.

Cheers,
James

P2250061.JPG
 
You are just building the Falcon I dreamed.
Due to my limited skills, I was able to reach a limited point, but I was satisfied.
See it https://www.youtube.com/watch?v=lT8IIUgPW9s

If I can give a very little suggestion... Using leds (flloodlights) on the undersurface was a challenge for me. I wanted to have the lights, but without the holes or the leds pointing out.
I came to a nice solution: I drilled the right holes for the floodlights. Then I closed them with clear resin. After painting the model, the holes just dissapeared. But as lights are switched on, you see the floodlights perfectly!!

Please keep posting!!!!!
 
This is a very entertaining build to follow. I like how the 3D printed corridor sits on the top of the landig ramp and how the ramp itself has those side protrusions. Very nice! I have one FM on the shelf with all the PE-goodies just waiting for it's turn. That is, unless Bandai is working 1/72 Millennium Falcon, too, and it turns out far superior...

That's a nice video, Erredois, Final Cut? It's a very nice build too, didn't see "limited" there.
You are just building the Falcon I dreamed.
Due to my limited skills, I was able to reach a limited point, but I was satisfied.
See it https://www.youtube.com/watch?v=lT8IIUgPW9s

If I can give a very little suggestion... Using leds (flloodlights) on the undersurface was a challenge for me. I wanted to have the lights, but without the holes or the leds pointing out.
I came to a nice solution: I drilled the right holes for the floodlights. Then I closed them with clear resin. After painting the model, the holes just dissapeared. But as lights are switched on, you see the floodlights perfectly!!

Please keep posting!!!!!
 
Well, I finally got the fiber installed, the cockpit tube put together, and the LED driver board hooked up. Took way too many hours to get this step done, however, I am pretty happy that the 354 FO in there are lit. They are a little bright, but, the LEDs that drive all of the FO, are turned on by a transistor, so I can hook this up to a PWM and basically dial in the voltage to the LEDs, I will dim them down some. For now though, I am basking in their lit glory. I do have the board turned the wrong way, not sure how that happened, so I will have some issues when I start working on the boarding ramp, I will have to figure out how to get this turned back around.

It was very difficult to get everything to close up, and route the fiber. I am not sure how to make it better in the future. The FO are all twisted around to get them to fit into the various LED heat shrink used in tying the FO into the LED.

I would have liked to have spread the blinkies out more, but it was a crap shoot pulling fiber for the different LEDs, you don't know where exactly they are coming from, since everything was closed up.

Pics 1 - 3 show the fiber and hull parts getting closed up.

Pics 4 - 5 show the LED board on and off. I used 5mm LEDs, should have gone with 3mm LEDs for all but thered.

Pic 6 shows the LEDs on and a quarter for scale.

Check out the video of the cockpit lit.

https://www.youtube.com/watch?v=OepnOBzNeoE&feature=youtu.be

Cheers,
James

View attachment 421237
View attachment 421238
View attachment 421239
View attachment 421240
View attachment 421241
View attachment 421242

Are you using leds that flash themselves, or do you use an ic board for that? No electronics man myself and the only thing holding me back in finishing my Slave I project is getting the leds to flash..
 
Amazing work.

I really wish I knew more about electronics to use some of those servers and lighting effects. I can write C# code but never tried programming microcontrollers or circuits. My lighting attempts exist of nothing more than a battery, resistors and LEDs connected using wire wrap or eletrical tape and twisted wires
 
This model is not making a whole lot of progress, I will get some work done on it in the near future. I have been going crazy on some 40k stuff, molding and casting and a lot of work on my TOS Bridge. I had a friend help me design a dome that goes around the AMT TOS Bridge model, so that it will hide all of the electronics behind a cool dome. The dome is in 16 pieces and magnetized to each other, so you can take pieces out to do repair work, or take a look at what is going on behind the scenes. The Falcon is starting to percolate back up to the top of the work heap though.

DJSLY - thanks for the link!!! That is where I learned how to do what needed to be done, and what paints, colors stuff is needed to do that. The only issue is that I have been thinking about adding a few more colors, but very little of them. I am probably going to go buy a $20 20 oil color beginning artist set and add a bit of pink, red, yellow, purple etc VERY sparingly throughout the model.

erredois - limited skill my *****, WOW, that is amazing, and it is built!!!! What a great video, loved it, it is fantastic. What a great inspiration. That whole diorama is 1/72? Your suggestion for the floods is exactly what I intend to do. On my 1/350 Enterprise, I got very good at using clear resin to fill in windows and LED flood lights, I don't want a round thing poking out, want it flat, completely agree that is a better look.

Avanuat - if Bandai comes out with one of these, I will probably procure, but it will sit on the shelf, have waaaayyyyy to many $s put into this one to start over on something else. All of the printed parts cost more than the model.

knievel - I am using LEDs that flash on their own. I bought them from Fiber Optic Products, Inc although many people carry them. I am not sure if you can change the rate at which they blink, but I have not played with changing the voltage going to them, so who knows.

blakeh1 - Thanks! If you can write C, then you are almost there. There are a ton of great Arduino tutorials out there, you can get an Arduino mini for $4 delivered on Ebay, which is cheaper than most flasher boards you buy from folks. A little bit of soldering and you are there. All you need to do, is add the Arduino in there to control the LED, your skills, from your post, are already there! Good luck.

Cheers,
James
 
This thread is more than 9 years old.

Your message may be considered spam for the following reasons:

  1. This thread hasn't been active in some time. A new post in this thread might not contribute constructively to this discussion after so long.
If you wish to reply despite these issues, check the box below before replying.
Be aware that malicious compliance may result in more severe penalties.
Back
Top