So back in August, after I had finished my MPC Blue 5, I started on my 1/48 Fine Molds X-Wing. So here's the thing: my wife and I were visiting my parents in Seattle for a few weeks, and my dad has an airbrush (which I didn't have at the time). Well, I decided to start this on our last day with them, so I was in the hobby room modeling like a crazy man for about 12 hours or so, and the following WIP pics are from that first day.

It's a lovely kit!

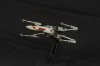
Gluing the wings together. Don't know how I did it without these little clamps!

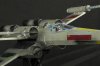
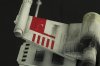
Painting the stripes and canopy.


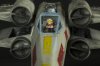
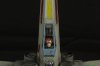
Detailing the cockpit.

This was the only clunky part of the whole assembly, but it works!

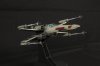
Gluing the fuselage together. Rubber bands are indispensable!

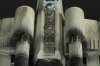
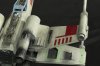
Put the bast coat on (Model Masters Camo Gray), and then some engine paint.

And that's where I was left after about 12 hours.
Some more WIP pics (mostly weathering).

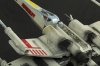
Did a wash with water, pastels, and a drop of soap. It actually ended up being like 10 drops of soap, and I don't really like how it dried. Oh well.

A neat oil streak idea I found online.


Yellow pastel for the engine color. I tried making it subtle, and I think I may have made it too subtle.
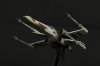
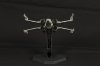
So anyway, we came home, and I acquired an airbrush, and now I've finished it. I used the Fine Molds decals, and I'm on the fence about them. It was my first time really applying decals, and so I mucked-up a few of them (ie: poor Artoo).


It's a lovely kit!
Gluing the wings together. Don't know how I did it without these little clamps!
Painting the stripes and canopy.
Detailing the cockpit.
This was the only clunky part of the whole assembly, but it works!
Gluing the fuselage together. Rubber bands are indispensable!
Put the bast coat on (Model Masters Camo Gray), and then some engine paint.
And that's where I was left after about 12 hours.
Some more WIP pics (mostly weathering).
Did a wash with water, pastels, and a drop of soap. It actually ended up being like 10 drops of soap, and I don't really like how it dried. Oh well.
A neat oil streak idea I found online.
Yellow pastel for the engine color. I tried making it subtle, and I think I may have made it too subtle.
So anyway, we came home, and I acquired an airbrush, and now I've finished it. I used the Fine Molds decals, and I'm on the fence about them. It was my first time really applying decals, and so I mucked-up a few of them (ie: poor Artoo).
Attachments


Last edited:


")