Fiberglass Restoration (Yellowed gelcoat)

Docmani

Well-Known Member
Hey all, I know this is the "Replica Prop" forum but I thought I have more luck in a fiberglass specific problem here than the modeling forum.

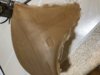
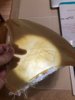
So at Wonderfest this weekend I managed to pick up a Rich Long Fiberglass Enterprise D kit. This kit is circa 2009 and has been sitting in a garage for the last decade. I'm pretty sure these were originally cast with a clear gelcoat so that the windows could be lit. As you can see from the picture below, its clearly amber right now.

I doubt this has been out in the sun, but I imagine its spent a great deal of time in heat. The upper dome actually has a dent/warp in it that I'm going to have to try to push back out (but thats another subject)

So right now I'm trying to figure out:
a) Was this the original color -is my assumption these were parts were clear gelcoat (transclucent white) correct? I've seen casts of this model where its clearly translucent white, but I'm not sure if they were cast by Rich or Jim Key.
b) If this has yellowed, can it be restored via some of the hydrogen peroxide techniques I'm seen online?
c) Is there a better way? (I've seen some marine products but nothing for something this dark)
d) Am I stuck with amber windows forever? :)

Any comments are appreciated. I'm out of my element with fiberglass, but I'm very excited about building this model (regardless of the white/yellow window outcome)
 

Attachments

  • enterprise-neck.jpg
    enterprise-neck.jpg
    2.3 MB · Views: 164
The color looks very even in the photo. That may just be the color it was cast in.
Is the underside a different color?
 
Good questions. The underside still appears to be clear. Shining a light through it you can see yellow streaks. It’s not uniform.

I’m still open to the possibility this might be the original color. I simply don’t know.

I will likely run some peroxide experiments on this part as it has lots of material that will never show when built.

Additionally if I can just lighten the windows a tad I think I’ll be good.
 

Attachments

  • 9A58E472-1BFB-4313-95C0-84BDAF412028.jpeg
    9A58E472-1BFB-4313-95C0-84BDAF412028.jpeg
    1.5 MB · Views: 147
Well, I guess it couldn't hurt to try the peroxide cleaning method.
One more question:
-Do you know if it's epoxy or polyester resin?

I believe they both yellow as they age, but I think polyether does more.
 
Ive worked with and built fiberglass boat's and helped/repaired gel coat. and I think that is just a straight up fiber glass pull. "to me" there is no gel coat. the discoloring is the resin used to cure the fiberglass weave into it's shape. when we built boat's (imagine a 30ft long mold) we would spray the gel coat first onto the inside of the mold, (all those colorful paint schemes on boat's are actually different colored gel coat's) then-you spray on fiberglass with resin to cure the fiberglass (our's was a pinkish color). then when you pull it out of the mold, you have your painted (gel coat outer skin) and the fiber glass inside. in your lighted picture I think the "lines" your speaking of is just the weave of the fiber glass used. you should actually paint the outside and your suppose to cut out the window's and add your own clear window's. but that's just my opinion, I know nothing of this particular kit... :ninja:
 
Yes, as "Funboy1013xx" said, this looks like straight polyester laminating resin, no gel-coat. That is the color.
 
REL's fiberglass kits were made with clear epoxy and glass cloth. The "gel coat" is epoxy thickened with Cabosil, a bit cloudy but clear enough for lighting. Then more epoxy was added to wet out the glass. It was meant to be lit through the clear window areas, but this kit has yellowed too badly for that. Cutting out the windows is certainly an option if necessary.
 
Thanks for the input. You guys seem to know what you’re looking at

I shudder at the thought of drilling out that many windows. The number doesn’t bother me as much as I doubt I can do it consistently.

I’ll need to give this some thought.
 
Drill them inside the "Cut line" and file them with a carbide file.
Here is a tip / observation for trimming anything precisely:
When someone says, "Sand to the line" or "Trim to the line" most people try to run the saw blade down the middle of the line, or sand into the line. The problem; is once the line is gone, you have no reference to tell how far past it you have gone.
But, if you are asked to "Walk to the door", do you run into the door, or stop just before it? When sanding or cutting, do the same thing. Leave a gap between the line and where you have cut or sanded too. This will leave a parallel "Line". (your cut and the original line.) The human eye / brain is very good at seeing parallel lines, that is, if they are parallel or not.
The finer the line (sharp scribe verses fat "Sharpie") the better. A scribe line is about one thousands of an inch wide (.001") if you sand to within 5 times that, which with good light and a little attention, is fairly easy, you are only 5 thousandths of an inch away. (.005") That's standard aerospace tolerance.
Files are GREAT tools. The problem, is most people have used old, dull, POS files and they are not very effective. But new sharp files remove material very fast and effectively.
So cut well inside your trim point, then file "To the line" not past it, and you can be very consistent with little effort.
 
Last edited:
Back
Top