You are using an out of date browser. It may not display this or other websites correctly.
You should upgrade or use an alternative browser.
You should upgrade or use an alternative browser.
Female Captain America
- Thread starter laurend
- Start date
laurend
Member
Get a wig cap to hide your hair. My hair goes down to my mid back and I can shove it all in one of those caps and wig to my heart's content. Assuming you can wear one with a lace front wig. I've never used one of those before.
I have a wig cap already and it's not so much finding a way to hide the bulk of my hair but the roots. I have super dark, almost black hair at the roots and it shows on my temples and some of the 'baby hairs' at the back of my neck like to poke out of the wig. It's not a problem with most wigs but this one is so much lighter than my natural color that it's pretty noticeable. I know a method of hiding it but it involves glue and a bunch of make up so I'm probably not going to do it very often.
laurend
Member
Well, I caved. Once I got my tax refund I couldn't help it and I got one of the airsoft shields. I managed to get it for about the same they went for when they first came out so I don't feel too bad.
Oddly, my box wasn't cut up like most and the website on the back of the shield was in tact, not sure if this is just a supplier thing or not but the site doesn't work either way.


Sorry about the glare in that second one. I could only get the 'tan' though the color was definitely a greenish color to me, but either way it was not what I wanted and I know these can be tough to paint well so I wanted to give myself every chance for success, which meant stripping that paint off and without a sander it was definitely not easy. But, 4 hours and lots of dust later I've got this:

I didn't really takk the paper to the back but I did sand down a few imperfections and the company information down flat. I havent done anything about the indent from the star or the dip in the plastic in the middle but I have some styrene hanging around so I might put some of that in there like someone else here did. At this point I don't think I'm going to do the screen-accurate brakets though, my costume isn't really anything that's been in the movies and the comics have a different strap system depending on who's drawing it, so I'll probably just figure out something on my own.
I've got a friend coming over with a dremel later tonight so hopefully I can get the engraving in the star and start painting soon. I've ordered the dupicolor anodized colors and I already have a primer and 'brushed aluminum' from them so I'm hoping it'll all work out. I've also got some rub 'n buff in silver that I might try out for the silver ring and star to get a little more shine out of it, I'll probably test it first though.
Oddly, my box wasn't cut up like most and the website on the back of the shield was in tact, not sure if this is just a supplier thing or not but the site doesn't work either way.
Sorry about the glare in that second one. I could only get the 'tan' though the color was definitely a greenish color to me, but either way it was not what I wanted and I know these can be tough to paint well so I wanted to give myself every chance for success, which meant stripping that paint off and without a sander it was definitely not easy. But, 4 hours and lots of dust later I've got this:
I didn't really takk the paper to the back but I did sand down a few imperfections and the company information down flat. I havent done anything about the indent from the star or the dip in the plastic in the middle but I have some styrene hanging around so I might put some of that in there like someone else here did. At this point I don't think I'm going to do the screen-accurate brakets though, my costume isn't really anything that's been in the movies and the comics have a different strap system depending on who's drawing it, so I'll probably just figure out something on my own.
I've got a friend coming over with a dremel later tonight so hopefully I can get the engraving in the star and start painting soon. I've ordered the dupicolor anodized colors and I already have a primer and 'brushed aluminum' from them so I'm hoping it'll all work out. I've also got some rub 'n buff in silver that I might try out for the silver ring and star to get a little more shine out of it, I'll probably test it first though.
Last edited:
laurend
Member
So my dremel got delayed until tomorrow but I messed with the back instead. The styrene I had was definitely too thin for this job and when I did the star it just looked..bad. So I decided to try the whole middle circle which I definitely like better but I'm still not sure. The thin plastic made it a little...lumpy and I couldn't get the curve I wanted heating up the plastic so I had to add a seam. I'm undecided but I've already tried this thing like 4 different ways and I'm done for tonight. I still have to clean up the glue a little bit but here's what I've got:


What do you guys think? Should I just leave it and hope the silver paint will cover it or try something else? Though I'm kind of out of ideas at the moment.
What do you guys think? Should I just leave it and hope the silver paint will cover it or try something else? Though I'm kind of out of ideas at the moment.
laurend
Member
I'm a little confused as to what you're trying to do here, exactly. What are you dremeling?
I haven't done any yet, sorry if that was confusing. The star is supposed to have some lines engraved in to it but the airsoft shields don't come with them so I'm going to add them in later.
You can see them here:
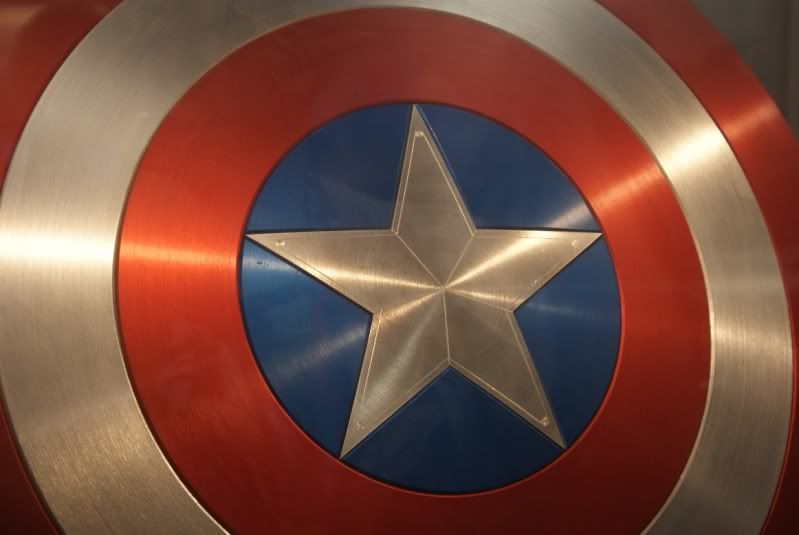
The thing I'm doing on the back was to cover up the dip where the star was. When the shield comes there is a hollow on the back opposite the shield that shouldn't be there and a large, kind of ugly imperfection smack in the middle.

I wanted to cover that up so I'm trying to get some styrene on there.
msleeper
Sr Member
It would probably be a billion times easier to fill in the divet on the back with body filler or something along those lines.
As far as scribing the lines on the front of the star, I'd try sticking with manual tools like needle files. If that's your only shield, I would personally be afraid of my dremel catching and doing more damage than good.
As far as scribing the lines on the front of the star, I'd try sticking with manual tools like needle files. If that's your only shield, I would personally be afraid of my dremel catching and doing more damage than good.
laurend
Member
nice job, watching this as it turns out.
Thanks!
It would probably be a billion times easier to fill in the divet on the back with body filler or something along those lines.
As far as scribing the lines on the front of the star, I'd try sticking with manual tools like needle files. If that's your only shield, I would personally be afraid of my dremel catching and doing more damage than good.
I was thinking about doing that but kind of as a last resort. I don't really have the supplies or space to do too much and the sanding I'd need to do there would take forever by hand. But I may end up doing it anyway, I don't know, I think I'm just going to let it be for a day or two and see how I feel looking at it again later.
I have an engraving attachment for it that I was going to use which I'm pretty comfortable with, I use it to label knives and electronic pretty often. I really don't have many hand tools available anymore, which sucks because I'm used to having a whole workshop on hand.
Korrigan
Active Member
Same thing here, seriously... I wouldn't have guessed that it's a wigIf you hadn't said that was a wig, I would have thought it was your own hair! It's a really nice wig.")
As far as scribing the lines on the front of the star, I'd try sticking with manual tools like needle files. If that's your only shield, I would personally be afraid of my dremel catching and doing more damage than good.
Yes! A Dremel is asking for a disaster. You can even use the back of a #11 hobby knife to scribe the lines. Most hobby shops sell scribers also.
MightyEssoq
Active Member
Subscribed to this one! I love everything you've done so far and can't wait to see the final product. Keep up the ggod work!
Brent
Brent
metal wood
Well-Known Member
metalwood's wife here, loving this, very excited to watch for more progress. great work!
Fly4v
Sr Member
Love the wig. Had to take a second look and it still doesn't look like a wig.
Great find on the shield. As a collector, very jealous that you found a minty box and shield but I would have removed the marking for a carried prop also.
That is a great idea to make the back of the shield your own design. It will allow more options at a reduced cost.
For making your filler disk on the back can you jury rig a compass with a stick and nail to cut a perfect circle with out the seam?
If that doesn't work could try a Tupperware lid or make a five point star on the back.
The drummel on the star should work if you have a guide and all the lines drawn.
When sanding are you maintaining the circular pattern? Found that maintaining a perfect circle far for the edge was difficult and it shows when viewed up close.
Edit: Because I can't type on a tablet.
kenobibale
Sr Member
hey i am digging this thread and its nice to see some more airsoft shields. i have one and i love it. i painted it and used rub n buff too. i have some pics in my thread http://www.therpf.com/f9/painting-airsoft-captain-america-sheild-138133/
if you have any questions about it please ask i am happy to help.
look forward to your progress
if you have any questions about it please ask i am happy to help.
look forward to your progress
laurend
Member
Thanks for all the interest! Glad people seem to like the idea
I did have a perfect circle on the styrene but there's a bit of a curve to the back of the shield so it was impossible to get it to lay just right with the flat circle. I've decided to just bite the bullet and pulled all the styrene/glue off and get some bondo for it. It'll be a pain to sand by hand but I think it'll probably end up looking the best.
And I did use the dremmel, but I used a scribing 'pen' attachement. I don't know if they're still available but I've been borrowing this one for years and was pretty comfortable with it. I only used a metal ruler to guide the first go, then once I had a slight groove I went in by hand to deepen them. Just have to go in with a bit of sandpaper to smooth out the edges and all should be good for painting.
As far as the sanding went, I did do it all in the circular pattern but once I had all the paint off I went in with both a fine (~160 grit I think) paper and then a very fine foam block-not sure of the grit since it's not printed anywhere, but it felt like something 200+ so you can't really see any of the sanding direction.
Thanks! I've been thinking of doing what you ended up with (doing a basecoat of silver auto paint and adding the rub n buff after the rest was painted) so I'm glad to see that this worked out for someone. How hard was it to control where the rub n buff ended up? I've been thinking about whether I should mask off the rest of the shield or not.
For making your filler disk on the back can you jury rig a compass with a stick and nail to cut a perfect circle with out the seam?
If that doesn't work could try a Tupperware lid or make a five point star on the back.
The drummel on the star should work if you have a guide and all the lines drawn.
When sanding are you maintaining the circular pattern? Found that maintaining a perfect circle far for the edge was difficult and it shows when viewed up close.
I did have a perfect circle on the styrene but there's a bit of a curve to the back of the shield so it was impossible to get it to lay just right with the flat circle. I've decided to just bite the bullet and pulled all the styrene/glue off and get some bondo for it. It'll be a pain to sand by hand but I think it'll probably end up looking the best.
And I did use the dremmel, but I used a scribing 'pen' attachement. I don't know if they're still available but I've been borrowing this one for years and was pretty comfortable with it. I only used a metal ruler to guide the first go, then once I had a slight groove I went in by hand to deepen them. Just have to go in with a bit of sandpaper to smooth out the edges and all should be good for painting.
As far as the sanding went, I did do it all in the circular pattern but once I had all the paint off I went in with both a fine (~160 grit I think) paper and then a very fine foam block-not sure of the grit since it's not printed anywhere, but it felt like something 200+ so you can't really see any of the sanding direction.
hey i am digging this thread and its nice to see some more airsoft shields. i have one and i love it. i painted it and used rub n buff too. i have some pics in my thread http://www.therpf.com/f9/painting-airsoft-captain-america-sheild-138133/
if you have any questions about it please ask i am happy to help.
look forward to your progress
Thanks! I've been thinking of doing what you ended up with (doing a basecoat of silver auto paint and adding the rub n buff after the rest was painted) so I'm glad to see that this worked out for someone. How hard was it to control where the rub n buff ended up? I've been thinking about whether I should mask off the rest of the shield or not.
kenobibale
Sr Member
i didn't bother masking it off, i was afraid of having the paint lift off again. i was just very careful and used my finger tip to rub the edges and took a cloth to any bits that accidently ran over. if you get it quick enough its ok. then i made sure to buff in a direction away from the lines to avoid and mess. you do have to buff pretty hard so it is more time consuming when you are trying to be careful. there were 1 or 2 spots on mine were the edges blurred over but you would hardly notice. i think the rub n buff could work well for adding battle damage too if you wanted. i think for a plastic shield the rub n buff is the way to go for the silver parts. as for the red and blue they just wont have the same shine due to the base. i dont know if clear coating the red and blue and then adding rub n buff would help match up the level of shininess? not sure you can clear coat rub n buff, it sort of defeats the purpose but at least oyu could polish the red and blue
laurend
Member
I'm definitely going to coat the red and blue, I've done a few tests and have a nice shiny enamel coating that looks awesome on the styrene test sheet. I'm thinking I might clear coat the red and blue and then mask them off to do the buffing, that way I won't have to worry about peeling so much and then I'll be able to buff without worrying so much. I'm terrible with keeping in the lines
kenobibale
Sr Member
i cant wait to see the results. im happy to see these shields getting some love
Ladydetemps
Jr Member
The hair clip idea is so clever I may have to borrow the concept.
Similar threads
- Replies
- 2
- Views
- 660
- Replies
- 2
- Views
- 775
- Replies
- 5
- Views
- 160
- Replies
- 14
- Views
- 2,313