Fallout, Stimpak built from real parts

Pyrotech I think the oilers may be a good idea. However there is a bit of a "+" shape inside that sort of looks like a jean rivet to me, but I never found any with a "+" shape inside, so I went for the hex screw. I have also 3D modeled a version I can 3D print that is perfectly accurate, but wouldn't be metal.

I am also still working on the internal guts, and recently came across a video on how dial indicators work and am going to re-design some of the guts to make it a bit simpler than the series of gears I have now.
 
I watched that video as soon as it game out. While Adam did a great job of piecing everything together in one day. But the clear step in the tubing really doesn't sell it as real for me. I also want the gauge to be activated by the pushing of the needle.

He also didn't end up with any fake liquid (which is hard). I have thought of a few way to have the liquid appear to disappear, but all of them involve a plunger or pump which there just isn't room for. Mine will at least have real liquid trapped in the chamber.
 

So after watching the Clickspring series on dial indicators it gave me some ideas that made me dig up my Stimpak project.
My existing design was really quite close and just needed some tweaking to get working.

My goal with this project is to make a "functional" Stimpak. In that you stab the needle into something and the pressure gauge drops, and stays at zero. My current design wasn't reliable. But I just had to get the right springs and make the overall mechanism stiffer. I did this by adding a few metal bits from SendCutSend to the 3D prints so that the gears are all held between metal plates and no able to move.

Getting the mechanism to lock at zero was tricky, but in the end simpler than I was making it out to be. What I did was make it so that one tooth of the center gear locks with the reset button at zero. This has the added effect that the reset button stays flush with the enclosure until activated.

I also now have access to a SLS 3D printer, so I can make parts with any shape I need, far better than the laser-cut stacks I was limited to in 2018 when I started this project.


2024Animation-ezgif.com-video-to-gif-converter.gif
 
So the new Fallout show has me motivated to get working on my props again.
The Stimpak is the closest to being complete, and is a purely mechanical build.

The ones used on the show are smaller, and look to be a departure from what is seen in the game. (They also don't have gauges that move)

---------------------


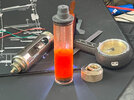
Last week I prototyped making some of the liquid that will be inside the canister on the Stimpak. I tried a few different mixes of things. The one I settled on is a mix of baby oil, fluorescent alcohol inks, and embossing powders. All stolen from my wife's huge collection of card making supplies. It is hard to capture on camera, but the goo looks like the last thing you want to see injected into your self. There are bits of stuff floating around inside in clumps and the color changes from red to orange depending on the lighting.

---------------------

Goop prototype.jpg


The canister all on it's own looks like a sci-fi prop. I may even make a few "refills" for the Stimpak as extra props.

---------------------

Canister.jpg


The glass canister itself required some development. At first I was hoping to just use some flat rubber gaskets, just like the original tube had. However the center glass tube needs something to hold it centered in place. Also putting liquid into the tube when the ends are somewhat loose just doesn't work well. So I restored to 3D printed end caps with rubber o-rings to seal the glass. My first protoype leaks from the middle, so I will tweak the o-ring channels a bit until they seal fully.
 

Attachments

  • Goop prototype.jpg
    Goop prototype.jpg
    1.5 MB · Views: 90
Very cool! The series makes me want to have another look at the bottles and Predicta TV again. Why'd you go with an oil based solution instead? I'd figured you'd have gone with a UV reactive water cooling fluid instead.
 
The liquid is oil based so that it doesn’t ever get algae growth. The canister will be sealed basically forever.
I nearly had the entire things build except the gauge, but the canister was leaking a bit. So I re-printed the end caps with tighter tolerances and then proceeded to shatter the outer glass tube. Amazing what a 0.2mm difference makes.
Fortunately I had the foresight to order the same size glass tubing from McMaster, I cut off a piece using a diamond cutter and then proceeded to shatter that one. So I have a carbide glass tube cutter on the way and will try the score and snapping method in order to have less fracture points. I also re-did the o-ring slots once again with a bit looser tolerance. If it still has a tinyleak it can be sealed with silicone or something.

Broken Glass.jpg
 
Last edited:
Stimpak, 2024 April 19.jpg


Photos can't really express how cool this looks in person. (Videos coming soon)
The liquid sloshing around inside really sells the effect, and the weight of it moves oddly in your hand.
The powder inside tends to clump up together and looks like old blood or something you don't want to inject into yourself.

I have a friend with a fiber laser so hopefully the gauge will be completed this weekend. Then I can do a full assembly video.
 
Stimpak parts.jpg


I don't make props that are needlessly complicated, I need all these parts!

I haven't totaled up all that I have spent yet but its in the hundreds. Off camera are the dozens and dozens of 3D printed prototypes, jigs, and test parts. But now I am ready to do a final build of the Stimpak.
 
Stimpak, Master Photo.jpg


The Stimpak is finally built! I started this project in 2018, and it feels good to finally get one of them done!

The end result is everything I wanted it to be. It heavy, the liquid sloshes around and looks like the last thing you would want to inject into yourself. There is nothing on the outside that gives this away as a prop. It is still game accurate in the overall dimensions and proportions.

Full build video coming soon. (I have already been editing for 8 hours and got to call it a day)
 
View attachment 1814108

The Stimpak is finally built! I started this project in 2018, and it feels good to finally get one of them done!

The end result is everything I wanted it to be. It heavy, the liquid sloshes around and looks like the last thing you would want to inject into yourself. There is nothing on the outside that gives this away as a prop. It is still game accurate in the overall dimensions and proportions.

Full build video coming soon. (I have already been editing for 8 hours and got to call it a day)
I started making one of these a long time ago as well! Great to see you finished yours up! Sometimes it just takes a little reminder and the spark is there again!
 
zapwizard This is such an awesome build!!!

I already bought the Dräger Airpressure Gauge and the Vintage Syringe as I really would love to rebuild this awesome Stimpak for myself.

I also bought the digital Manual from your website as I love what you did.

Would it be possible to share or buy the 3d Files for the mechanism and the other 3d printed parts, the files for the jig to drill the holes in the right places and the Laser Files for the brass faceplate that are needed to complete this build from you?

Would really be so thankful for any help on this.

Again, I'm so stunned by your build and would really love to get this stimpak build.

Thanks in advance

Cheers from Germany

Dennis
 
Last edited:
I think I may have already chatted with your via email or my discord, however for others:

The CAD files are included with my Stimpak manual purchase (Digital or physical).
I have detailed STEP versions of all the parts, these can be opened in any Solid type 3D modeler (SolidEdge, Fusion 360, Solidworks, etc…)
The jig and laser etch artwork is included in those files.

I still need to make a fabrication drawing for the various parts that require some machining.

The Drager gauge is the hardest (or most expensive) part to find. However, since it is painted part anyways, you can always just 3D print that part of the design. A SLA or SLS printer is recommended as the built-in threads are quite fine.
 
Back
Top