First off: This thread is just to get this project started, and these initial ideas put out for discussion. It may be a while before I complete this project.
-------------------------------------------


The stimpak is a iconic Fallout prop. Its basic design hasn't changed much since the original release of Fallout.
I have been wanting to build this prop, but since I like things to be more real, I didn't want to just 3D print it.
-------------------------------------------

While on a recent road-trip, I stopped at every antique store I could find. I scored the above syringe in an amazing store in Brady, TX.
I am not sure it was ever used as a needle injector. It is for sure a measured dispensing syringe. It has an adjustable stop for setting the amount of liquid that is pushed out.
Thanks to @EmmaInCandyland, the gauge on top was identified as a Drager branded vintage tire pressure gauge. I found a broken, and pre-aged one on eBay.
-------------------------------------------

It is almost criminal how well these two parts fit together. All I have done here was to remove the top handle, and the base of the tire gauge and push the parts together. Obviously the original designer of the 3D model used parts like this as reference for the design, but it doesn't mean they had to keep the same relative scale of the two parts.
-------------------------------------------

There is probably some vintage Porsche owner screaming at this image of the gauge taken apart.
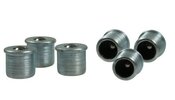
Taking it apart was very tricky. The front glass (curved plastic), is held in using a retaining spring jammed into a channel on the silver ring. Getting the needle off was straight forward, but took way more pressure than I expected.
Removing the silver face was very tricky. It is held in place using a clever technique, where a wire was pushed into a channel in-between the ring and the black housing. I removed it by first oiling the channel, and then shoving another steel wire into the hole, and pushing it out the other side.
Educational aside:
Analog air pressure gauges work by pushing air into one or more flattened copper tubes. The pressure causes the tubes to unroll, and pull up on a lever arm. The lever arm is connected to gear teeth that turn the center needle. This gauge has a "set and hold" feature, which was nothing more than a spring pushed up against the needle spindle. Pressing the button on the side released the spring, and the lack of pressure forces the copper tubes to return to their original position.
-------------------------------------------

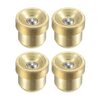
At the right is another pressure gauge I got at the same store in Brady. It doesn't read out from 0-300. I don't know if I could even find a 300psi pressure gauge in this size anyways. I may just try to transpose the gauge face directly over, or just it it as reference for making my own new face.
-------------------------------------------

I am working on identifying the other components of the Stimpak. For the metal bar across the middle, I will probably just cut down some metal to size, and use a drill to add the divots, then age it. But for the two "arms" that connect to the electrical wires, they remind me of metal medical bandage clips. They can also be easily fabricated from scratch if ii comes to it.
The two protrusions on the side are a bit of an unknown. They sort of look like a small vent or adjustment screw. Its not super important, after all the 3D prop maker didn't even fully align the texture in this area. I guess I don't want to just shove a screw there, but a thumb-screw would be almost perfect.
-------------------------------------------
Now I have to decide how functional I want to make this thing. I guess it is my own curse that I can't just smash the parts together and call it done.
I want the needle to be animated at least. Activated by a retracting needle at the bottom. I am still working through how to do this. Push-rods, magnets, full electronics?
If I can make it look like the liquid is being dispensed that would be even cooler I have an idea or two on this, but it probably wouldn't be worth it.
-------------------------------------------
The stimpak is a iconic Fallout prop. Its basic design hasn't changed much since the original release of Fallout.
I have been wanting to build this prop, but since I like things to be more real, I didn't want to just 3D print it.
-------------------------------------------
While on a recent road-trip, I stopped at every antique store I could find. I scored the above syringe in an amazing store in Brady, TX.
I am not sure it was ever used as a needle injector. It is for sure a measured dispensing syringe. It has an adjustable stop for setting the amount of liquid that is pushed out.
Thanks to @EmmaInCandyland, the gauge on top was identified as a Drager branded vintage tire pressure gauge. I found a broken, and pre-aged one on eBay.
-------------------------------------------
It is almost criminal how well these two parts fit together. All I have done here was to remove the top handle, and the base of the tire gauge and push the parts together. Obviously the original designer of the 3D model used parts like this as reference for the design, but it doesn't mean they had to keep the same relative scale of the two parts.
-------------------------------------------
There is probably some vintage Porsche owner screaming at this image of the gauge taken apart.
Taking it apart was very tricky. The front glass (curved plastic), is held in using a retaining spring jammed into a channel on the silver ring. Getting the needle off was straight forward, but took way more pressure than I expected.
Removing the silver face was very tricky. It is held in place using a clever technique, where a wire was pushed into a channel in-between the ring and the black housing. I removed it by first oiling the channel, and then shoving another steel wire into the hole, and pushing it out the other side.
Educational aside:
Analog air pressure gauges work by pushing air into one or more flattened copper tubes. The pressure causes the tubes to unroll, and pull up on a lever arm. The lever arm is connected to gear teeth that turn the center needle. This gauge has a "set and hold" feature, which was nothing more than a spring pushed up against the needle spindle. Pressing the button on the side released the spring, and the lack of pressure forces the copper tubes to return to their original position.
-------------------------------------------
At the right is another pressure gauge I got at the same store in Brady. It doesn't read out from 0-300. I don't know if I could even find a 300psi pressure gauge in this size anyways. I may just try to transpose the gauge face directly over, or just it it as reference for making my own new face.
-------------------------------------------
I am working on identifying the other components of the Stimpak. For the metal bar across the middle, I will probably just cut down some metal to size, and use a drill to add the divots, then age it. But for the two "arms" that connect to the electrical wires, they remind me of metal medical bandage clips. They can also be easily fabricated from scratch if ii comes to it.
The two protrusions on the side are a bit of an unknown. They sort of look like a small vent or adjustment screw. Its not super important, after all the 3D prop maker didn't even fully align the texture in this area. I guess I don't want to just shove a screw there, but a thumb-screw would be almost perfect.
-------------------------------------------
Now I have to decide how functional I want to make this thing. I guess it is my own curse that I can't just smash the parts together and call it done.
I want the needle to be animated at least. Activated by a retracting needle at the bottom. I am still working through how to do this. Push-rods, magnets, full electronics?
If I can make it look like the liquid is being dispensed that would be even cooler I have an idea or two on this, but it probably wouldn't be worth it.

")