mwmuir12
New Member
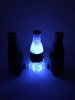
Hello everybody, I just wanted to make quick thread about the Nuka Cola bottles I just finished. I spent a lot of time looking through other threads and other sites for reference and how other people have made these bottles and thought I would show what I've learned if anyone else is looking for more reference.
All three of there are 3D printed and painted. The Nuka Cola and Nuka Cherry were painted with normal acrylics and a glassy top coat then weathered with more acrylics. The Nuka Cola Quantum was printed in a clear plastic and smoothed with XTC 3D tinted blue. The idea was to just use the blue tint for the color but after a few coats it was clear the tint didn't hide the print lines well enough. I ended up painting a translucent white airbrush paint to diffuse the light, followed with a translucent blue. Had I had more time for this project I would have spent more time testing dilutions of the blue to achieve a lighter blue that is more accurate but overall I'm happy with the finish

In the quantum I installed four white, diffused LED's and wired them to a 3V coin battery holder and a on/off switch which protrudes from the back. The bottle also snaps together in the center under the label so the internals can be accessed.


The labels were drawn in inkscape and printed on a normal inkjet printer and sealed with the same clear gloss as the bottles, then weathered. Because the labels are paper and they are going on a rounded surface there were creases but I used them to simulate water damage.
All three of there are 3D printed and painted. The Nuka Cola and Nuka Cherry were painted with normal acrylics and a glassy top coat then weathered with more acrylics. The Nuka Cola Quantum was printed in a clear plastic and smoothed with XTC 3D tinted blue. The idea was to just use the blue tint for the color but after a few coats it was clear the tint didn't hide the print lines well enough. I ended up painting a translucent white airbrush paint to diffuse the light, followed with a translucent blue. Had I had more time for this project I would have spent more time testing dilutions of the blue to achieve a lighter blue that is more accurate but overall I'm happy with the finish
In the quantum I installed four white, diffused LED's and wired them to a 3V coin battery holder and a on/off switch which protrudes from the back. The bottle also snaps together in the center under the label so the internals can be accessed.
The labels were drawn in inkscape and printed on a normal inkjet printer and sealed with the same clear gloss as the bottles, then weathered. Because the labels are paper and they are going on a rounded surface there were creases but I used them to simulate water damage.