Mr Mold Maker
Master Member
Hey folks!
I just recently finished this up and thought I’d post it here with a little write up on how I did it. This paint job is on a Bio Helmet but it could be applied to anything you want to look metal and heavily distressed. The great thing is all of the metal painting was done with no airbrush.

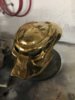
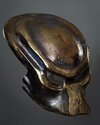
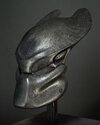
So here is what I’m working with. This is a Bio Helmet pulled from original Stan Winston Studio molds. Often called the P1 “Stunt” Bio.
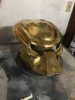
I took it and lightly bodyshopped it, and fabricated the laser shroud and hose tube just as the effects team did in Mexico. There is some distortion in the original sculpture and I later correct that, but for now we won’t worry about it.


The first step when I paint anything metal is to usually put down a metallic base coat. Often that means sanding the piece glass smooth and base coating gloss black, with a metal such as Alclad or Alumaluster airbrushed over top. In this case, knowing I wanted the finished paint to look beat to hell I went with a dark gunmetal Metallic from Duplicolor.

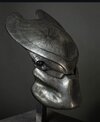
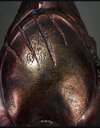
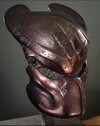
Here is when the fun stuff started happening and unfortunately I got lazy with my photo taking. I started by stippling on black, a rust color, a green patina, and on top of that, stippled on Imperial Surface Shrapnel. Shrapnel is most similar to something like Alclad Aluminum. People wrongly assume that it can only be airbrushed and only put over high gloss black bases and this simply isn’t the case. Sponging it on gives a nice aged Metallic look. From there it was a back-and-forth between the colors and the Shrapnel until I found the right mix. This photo was taken right around the middle of the process.

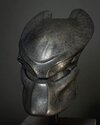
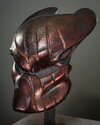
The next step was to bring the shine up further in areas. To do this I used another Imperial Surface product called Alumaluster. (Alclad chrome would be comparable product) Once again I stippled the metal paint on with a sponge, this time being a lot more careful to avoid leaving distinctly “spongy” marks. I went over top of that with a few more stippling passes, shading gray, rust, patina, and then the metal base was done!
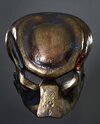
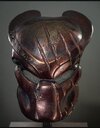
To step it up just one level higher, I added some highlights and shadows. Highlights were pink Copic ink, shadows were blue. I can’t for the life of me photograph them but they play in the light very well. Other than the Copic the darker spots which was Golden’s Shading Gray, there was no airbrush used in the painting of this helmet.
The very last thing I did was add some fine weathering to the surface. I did this by spraying a foam sanding block with silver spray paint and lightly scratching it over the surface. I like this technique because when the light is moved around you can see there is actual damage there, not just a painted silver line.
I hope this helps someone! This can be amplified or toned down, done with silver or gold, rusted or clean. Play with it and you may find something you like!


I just recently finished this up and thought I’d post it here with a little write up on how I did it. This paint job is on a Bio Helmet but it could be applied to anything you want to look metal and heavily distressed. The great thing is all of the metal painting was done with no airbrush.
So here is what I’m working with. This is a Bio Helmet pulled from original Stan Winston Studio molds. Often called the P1 “Stunt” Bio.
I took it and lightly bodyshopped it, and fabricated the laser shroud and hose tube just as the effects team did in Mexico. There is some distortion in the original sculpture and I later correct that, but for now we won’t worry about it.
The first step when I paint anything metal is to usually put down a metallic base coat. Often that means sanding the piece glass smooth and base coating gloss black, with a metal such as Alclad or Alumaluster airbrushed over top. In this case, knowing I wanted the finished paint to look beat to hell I went with a dark gunmetal Metallic from Duplicolor.
Here is when the fun stuff started happening and unfortunately I got lazy with my photo taking. I started by stippling on black, a rust color, a green patina, and on top of that, stippled on Imperial Surface Shrapnel. Shrapnel is most similar to something like Alclad Aluminum. People wrongly assume that it can only be airbrushed and only put over high gloss black bases and this simply isn’t the case. Sponging it on gives a nice aged Metallic look. From there it was a back-and-forth between the colors and the Shrapnel until I found the right mix. This photo was taken right around the middle of the process.
The next step was to bring the shine up further in areas. To do this I used another Imperial Surface product called Alumaluster. (Alclad chrome would be comparable product) Once again I stippled the metal paint on with a sponge, this time being a lot more careful to avoid leaving distinctly “spongy” marks. I went over top of that with a few more stippling passes, shading gray, rust, patina, and then the metal base was done!
To step it up just one level higher, I added some highlights and shadows. Highlights were pink Copic ink, shadows were blue. I can’t for the life of me photograph them but they play in the light very well. Other than the Copic the darker spots which was Golden’s Shading Gray, there was no airbrush used in the painting of this helmet.
The very last thing I did was add some fine weathering to the surface. I did this by spraying a foam sanding block with silver spray paint and lightly scratching it over the surface. I like this technique because when the light is moved around you can see there is actual damage there, not just a painted silver line.
I hope this helps someone! This can be amplified or toned down, done with silver or gold, rusted or clean. Play with it and you may find something you like!