Making body first.
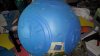
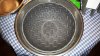
Got a beach ball that inflates to around 18 1/2 inches. I them made a mixture of water and wood glue and applied several layers of paper. I also added a layer of paper towel and every 2 layers I just applied a coat of water and wood glue. I left the valve clear so I could deflate the ball once everything was dry.
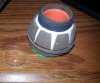
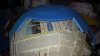
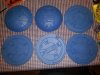
To make the panels I am using 1 cm thick EVA foam floor tiles. I made the templates all by hand and cut them out in card. Then I traced around them on to the foam. the next step was to carefully score all the lines with a very sharp scalpel blade. Now because EVA foam is open cell (lots of holes) the foam needs to be sealed before painting or the foam will drink the paint like a sponge in water. I have tried many different ways to seal foam form using plastidip to PVA glue, the method I like to use is heat. I always run an iron over the foam pieces, it melts the top of the foam and seals the cells. I have also found that by heating the foam it shrinks it a little. So when cut the detail lines in to the foam and then applied heat to the foam to seal it it also opens the cut lines revealing the detail lines.
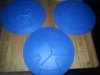
Once the panels were all done I then had to curve them. I did this by gently warming up the panels and then placing them in a silver mixing bowl and running it under cold water. This set the panels in a nice curved shape.
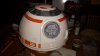
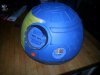
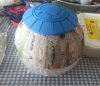
Now that the paper mache ball had dried I deflated the ball and removed it. Then marked out the 6 circles and made a template for the triangle pieces and made them all out of foam and did the same thing with making the markings as I did with the round panels. Then I started to glue everything in place. I use a high temperature heat gun.
There a few places where the measurements were off a little but I started at what I wanted to be the front of my BB-8's body so the patch work I had to do is at the back and bottom (it is only minor as well so not too bad).
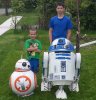
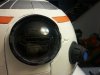
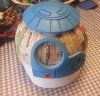
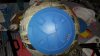
Then I started to paint it white. Once it had dried I noticed that you could still see the blue and yellow foam in the detail lines. (The paint wasn't getting inside enough). So I did a black wash (watered down black paint) the paint settled in the lines nicely. Once dried I then repainted white and as you can see in the pictures the lines look so much better.
- - - Updated - - -
more pictures.


Got a beach ball that inflates to around 18 1/2 inches. I them made a mixture of water and wood glue and applied several layers of paper. I also added a layer of paper towel and every 2 layers I just applied a coat of water and wood glue. I left the valve clear so I could deflate the ball once everything was dry.
To make the panels I am using 1 cm thick EVA foam floor tiles. I made the templates all by hand and cut them out in card. Then I traced around them on to the foam. the next step was to carefully score all the lines with a very sharp scalpel blade. Now because EVA foam is open cell (lots of holes) the foam needs to be sealed before painting or the foam will drink the paint like a sponge in water. I have tried many different ways to seal foam form using plastidip to PVA glue, the method I like to use is heat. I always run an iron over the foam pieces, it melts the top of the foam and seals the cells. I have also found that by heating the foam it shrinks it a little. So when cut the detail lines in to the foam and then applied heat to the foam to seal it it also opens the cut lines revealing the detail lines.
Once the panels were all done I then had to curve them. I did this by gently warming up the panels and then placing them in a silver mixing bowl and running it under cold water. This set the panels in a nice curved shape.
Now that the paper mache ball had dried I deflated the ball and removed it. Then marked out the 6 circles and made a template for the triangle pieces and made them all out of foam and did the same thing with making the markings as I did with the round panels. Then I started to glue everything in place. I use a high temperature heat gun.
There a few places where the measurements were off a little but I started at what I wanted to be the front of my BB-8's body so the patch work I had to do is at the back and bottom (it is only minor as well so not too bad).
Then I started to paint it white. Once it had dried I noticed that you could still see the blue and yellow foam in the detail lines. (The paint wasn't getting inside enough). So I did a black wash (watered down black paint) the paint settled in the lines nicely. Once dried I then repainted white and as you can see in the pictures the lines look so much better.
- - - Updated - - -
more pictures.
Attachments
-
 20160129_233514.jpg492.7 KB · Views: 194
 -
 20160325_160459.jpg221.6 KB · Views: 194
 -
 20160325_151155.jpg307.9 KB · Views: 189
 -
 20160325_150132.jpg222 KB · Views: 162
 -
 20160325_142938.jpg320 KB · Views: 179
 -
 20160204_202942.jpg307.6 KB · Views: 196
 -
 20160202_193725.jpg262.7 KB · Views: 186
 -
 20160202_164901.jpg200.8 KB · Views: 189
 -
 20160129_233624.jpg396.1 KB · Views: 202
 -
 20160129_233529.jpg397.9 KB · Views: 199
Last edited: