You are using an out of date browser. It may not display this or other websites correctly.
You should upgrade or use an alternative browser.
You should upgrade or use an alternative browser.
ecl's Kermit the Frog Puppet Replica (later builds, using my newest patterns)
- Thread starter ecl
- Start date
ecl
Sr Member
Im looking at the “Frog“ Nylon fleece from puppet pelts for Kermit but what do you recommended?
That’s the one I’ve been using; it’s about as close to the right color without going through all the trouble of dyeing your own. The color and material has changed a bit since I started making my Kermits though. The older fleece had a more ruffled look and ‘pilled’ more easily (which I thought was pretty cool, as it had a slightly more ‘vintage‘ look). The latest stuff is more smooth and also slightly darker green. The texture is more reminiscent of the more modern era Kermits. But it still works fine for a Kermit build!
isaacnorton
New Member
Hey! I'm working on my first build of Kermit and I'm enjoying it a lot! I tried the both the Henson stitch and the whip stitch, which actually worked better for me. Do you have any advice on how to make the stitches look so invisible like yours? I haven't been able to get mine to look that good.
Gophertee
New Member
Simple....PRACTICE & PATIENCE.Hey! I'm working on my first build of Kermit and I'm enjoying it a lot! I tried the both the Henson stitch and the whip stitch, which actually worked better for me. Do you have any advice on how to make the stitches look so invisible like yours? I haven't been able to get mine to look that good.
")
ecl
Sr Member
Hey! I'm working on my first build of Kermit and I'm enjoying it a lot! I tried the both the Henson stitch and the whip stitch, which actually worked better for me. Do you have any advice on how to make the stitches look so invisible like yours? I haven't been able to get mine to look that good.
Good to hear! It’s a fun process I think. As for hiding the stitch, that depends on a couple things. Which fabric are you using? One of the main reasons why antron fleece (puppet fleece) is often used is because its easier to hide seams with it. But the seams would need to ‘picked‘ out after the stitch is done. Essentially, the ‘henson’ stitch (or ladder stitch) pulled the fabric inward, which you would then need to take a needle or pin afterwards and carefully ’fluff’ or pick out the fibers, to help hide the seam. Below is what it tends to look like before I do that.
Certain fabrics, like regular fleece, may be more difficult to work with for hiding seams. It does take some patience and time regardless.
Here’s a photo I took before of one of my builds that shows before and after contrast of a seam that I’d started to finish.
One thing to keep in mind is that even on the originals, the seams are often somewhat visible depending on the angle of light. They can look invisible from certain angles, only to show up to a degree at another—mostly as a kind of shadowy looking line:
Originals of Kermit and Ernie
Keep working at it, and most importantly, find what works for you and keep experimenting!
Last edited:
isaacnorton
New Member
Simple....PRACTICE & PATIENCE.
Good to hear! It’s a fun process I think. As for hiding the stitch, that depends on a couple things. Which fabric are you using? One of the main reasons why antron fleece (puppet fleece) is often used is because its easier to hide seams with it. But the seams would need to ‘picked‘ out after the stitch is done. Essentially, the ‘henson’ stitch (or ladder stitch) pulled the fabric inward, which you would then need to take a needle or pin afterwards and carefully ’fluff’ or pick out the fibers, to help hide the seam. Below is what it tends to look like before I do that.
View attachment 1300335
Certain fabrics, like regular fleece, may be more difficult to work with for hiding seams. It does take some patience and time regardless.
Here’s a photo I took before of one of my builds that shows before and after contrast of a seam that I’d started to finish.
View attachment 1300342
One thing to keep in mind is that even on the originals, the seams are often somewhat visible depending on the angle of light. They can look invisible from certain angles, only to show up to a degree at another—mostly as a kind of shadowy looking line:
Originals of Kermit and Ernie
View attachment 1300336
View attachment 1300337
Keep working at it, and most importantly, find what works for you and keep experimenting!
I'm going to use antron fleece for the final Kermit, but I've been using random spare fabric to create my patterns. There's a lot of trail and error there, so I didn't want to use antron because it's pretty pricey.
It's such an interesting and fun process. Especially because there are so many little changes to be made. I'm making one for me, then one for my grandpa. I was already pretty happy with my patterns, but I can already see some things that I want to change when I make his. I'll make sure to post some pictures on here when I'm done.
Thank you guys for the responses! Reading though this forum has helped a lot.
Harris23H
New Member
Hello ecl I’ve been working on trying to make my own Kermit with lots of help from this post and another post by you and one I would like to say thank you so so much for your help it’s so great to be able to see all these designs and diagrams I wouldn’t be able to do it without them and I also have 2 questions when putting the fleece on the body how is it attached to the holes at each end of the puppet because I can’t seem to understand it as this is the next step I need to take and also how do you attach the head to the body because me and my mom (who is helping me with the process) both don’t really know because this is our first time making a puppet. Anyway thank you again for all this help your Kermit look so amazing. I have attached photos of what I currently have done below)
)Attachments
ecl
Sr Member
Hello ecl I’ve been working on trying to make my own Kermit with lots of help from this post and another post by you and one I would like to say thank you so so much for your help it’s so great to be able to see all these designs and diagrams I wouldn’t be able to do it without them and I also have 2 questions when putting the fleece on the body how is it attached to the holes at each end of the puppet because I can’t seem to understand it as this is the next step I need to take and also how do you attach the head to the body because me and my mom (who is helping me with the process) both don’t really know because this is our first time making a puppet. Anyway thank you again for all this help your Kermit look so amazing. I have attached photos of what I currently have done below
You’re welcome! I’ve been amazed at how many people want to try making a Kermit puppet, although, it’s not all that surprising—he’s a great character!
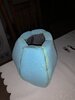
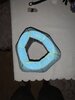
As for how I attach the fleece around the openings: I leave around an inch and a half extra fabric around the top and bottom of the fabric so that it sort of wraps inward. I then use contact cement to affix that part to the inside of the foam. It may take some trimming and making adjustments to get it to work, but I’ve found this work pretty well, since contact cement forms a really strong bond.
I know it can seem kind of confusing at first, but below is an attempt at trying to explain how I do the body. Although in the illustration I made, it doesn’t really show that the fabric is a little taller on top and bottom compared to the foam body (the part that‘ll wrap into the openings). You only need to apply glue on the inside where it folds into, which means when you sew the head on, you can just pin it to the perimeter of the top opening, and just sew the head on. It helps to temporarily add stuffing into the neck so that it’ll be easier for you to sew it (it would be very floppy otherwise), and pinned of course. These days, I just make the neck of Kermit very long so that it goes all the way through his body (see second sketch below) and then sewn around the bottom opening of his body and also around the top opening, so that it doesn’t move around; this in effect also creates an inner liner in the process. I actually recommend doing it this way. Just take your head pattern, and then simply draw an extension from the neck about the length of the body.
Harris23H
New Member
Thank you so so much I’m very excited to see how it turns out and I will probably reply with photos when it’s all done again thank you so much for your helpYou’re welcome! I’ve been amazed at how many people want to try making a Kermit puppet, although, it’s not all that surprising—he’s a great character!
As for how I attach the fleece around the openings: I leave around an inch and a half extra fabric around the top and bottom of the fabric so that it sort of wraps inward. I then use contact cement to affix that part to the inside of the foam. It may take some trimming and making adjustments to get it to work, but I’ve found this work pretty well, since contact cement forms a really strong bond.
I know it can seem kind of confusing at first, but below is an attempt at trying to explain how I do the body. Although in the illustration I made, it doesn’t really show that the fabric is a little taller on top and bottom compared to the foam body (the part that‘ll wrap into the openings). You only need to apply glue on the inside where it folds into, which means when you sew the head on, you can just pin it to the perimeter of the top opening, and just sew the head on. It helps to temporarily add stuffing into the neck so that it’ll be easier for you to sew it (it would be very floppy otherwise), and pinned of course. These days, I just make the neck of Kermit very long so that it goes all the way through his body (see second sketch below) and then sewn around the bottom opening of his body and also around the top opening, so that it doesn’t move around; this in effect also creates an inner liner in the process. I actually recommend doing it this way. Just take your head pattern, and then simply draw an extension from the neck about the length of the body.
View attachment 1300402
View attachment 1300404
)MrFormal
New Member
I'm trying to make a Kermit now... all thanks to ecl. I'm wondering about the mouth plate, the collar, and the antron fleece. How hard is the rubber on the durometer scale (or whatever)? Walmart is selling them at 70A. Is that soft and flexible enough? I have no idea as I'm new to this. How do you attach it to the head? I'd think contact cement, right? How does it fit relative to the head pattern? The collar... how do you get it to fit and what angles/lengths are the pointy bits? And the antron fleece... do you think Georgia Stage's "Greenzilla" is ok? (13.75 oz Nylon Puppet Fleece NFR - Greenzilla) And how much would I need for one perfect Kermit? I have no clue. Any help would be appreciated (possibly patterns?)! Thanks!
P.S. I'm annoying. Thank you for putting up with me.
P.S. I'm annoying. Thank you for putting up with me.
Last edited:
superchimp
New Member
Ive looked the thread up and down, wondering if you could tell me what type of foam you used for the body? Or at least what thickness? I am prototyping so the kind isn’t really that critical at this stage
isaacnorton
New Member
Hey man! It took me a while to find too. I eventually ended up landing on either 1 inch or 1/2 inch thick unholstery foam. I prefer 1/2 inch because it feels more comfortable for me. You can get it at Joann's and probably most other craft or fabric stores.Ive looked the thread up and down, wondering if you could tell me what type of foam you used for the body? Or at least what thickness? I am prototyping so the kind isn’t really that critical at this stage
This is where I got mine from.
Airtex 0.5'' 16 oz High Density Foam | JOANN
Shop Airtex 0.5'' 16 oz High Density Foam at JOANN fabric and craft store online to stock up on the best supplies for your project. Explore the site today!
 www.joann.com
Hope that helps! Good luck with your build
ecl
Sr Member
Foam always comes In handy! It’s too bad the Joann’s stores are still closed here. I need some more haha! The 1/2” stuff works great for the body. They also sell 3” thick ones that also come in handy if you need to cut out wedges—like for the inside of his head (to give it shape) if you want to display your puppet Kermit on a shelf.
superchimp
New Member
One more question, Im also was wondering how you are sewing attaching the mouth, Ive seen a lot of puppet tutorials and I have an idea but specifically on kermit what kind of allowance are you giving for the inner mouth?
are you stitching gluing or both?
are you doing this inside out then attaching the rubber plate or attaching the plate and stitching the head to the mouth right side out
it looks like the mouth fabric and plate extend under where the green lip edge of the head meats the interior mouth
are you stitching gluing or both?
are you doing this inside out then attaching the rubber plate or attaching the plate and stitching the head to the mouth right side out
it looks like the mouth fabric and plate extend under where the green lip edge of the head meats the interior mouth
ecl
Sr Member
I glue the mouthplate to the head—some people sew it on, so it’s kind of a preference. The original kermit puppet that I saw appeared to have it glued on, as the edge of the fabric was clearly visible on that one. Glued about 1/4” Around, slightly more towards the back.
I generally glue it on like this in this picture (below). The notes on top was for during my pattern development phase when I wasn’t sure exactly how things would fit, so I would test fit it and trim if necessary. The evolved patterns that I use for my builds fit without trimming...took me forever to get them that far. :

I generally glue it on like this in this picture (below). The notes on top was for during my pattern development phase when I wasn’t sure exactly how things would fit, so I would test fit it and trim if necessary. The evolved patterns that I use for my builds fit without trimming...took me forever to get them that far. :
superchimp
New Member
This is so awesome!!
the lip has this poofed look like the edge is being rolled under but your instruction indicates it is being lain flat and trimmed, just double checking I am not missing anything?
also,
do you have a patreaon or venmo?
the lip has this poofed look like the edge is being rolled under but your instruction indicates it is being lain flat and trimmed, just double checking I am not missing anything?
also,
do you have a patreaon or venmo?
ecl
Sr Member
This is so awesome!!
the lip has this poofed look like the edge is being rolled under but your instruction indicates it is being lain flat and trimmed, just double checking I am not missing anything?
also,
do you have a patreaon or venmo?
That’s correct, it’s just glued flat, and if necessary, trimmed to clean up the edge of the fabric. That ‘poofed’ look around the edge will show up as if the head is fit well around the hand, it has a tendency to naturally look like that—you don’t want it to be too tight, or too baggy. The fabric will naturally want to roll around the ‘lip’ of the mouthplate. The best way I can describe the ‘right’ feeling is that the head should feel snug (not too tight or big) around your hand, and responsive to the movements of your fingers to give it expressions. Naurally, this is going to vary from person to person, which is why I recommend people to play around with the patterns.
I do have Venmo that I sometimes use!
Similar threads
- Replies
- 1
- Views
- 265
- Replies
- 0
- Views
- 231