Dwemer armor - The Elder Scrolls : Skyrim

NoxRocks

Jr Member
I recently started making my costume for Dragoncon 2014 and wanted to share!

DwarvenArmor_Skyriim.jpg

I have a few pictures, and I have begun pepping the helmet, but I think it may be about an inch to small, so I'll have to post pictures of that later. I've been trying to get little things done here and there after work, so progress is somewhat slow, but I should have plenty of time I think.

For now, I started on the boots, and I'm not sure why. They just looked fun to tackle first :D

I started by taking a few screenshots in game, and making a blueprint off of that. Transferred all of that to a sheet of EVA foam, and started gluing on details. Speaking of details... The "rivet" areas are bolts that I purchased from Home Depot and dremmeled/hacksawed the threads off of. It was a major pain in the rear and I'm pretty sure I've found a much easier/lighter/cheaper replacement that looks roughly the same, so this will be fixed for the rest of the armor.

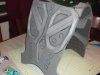
On the left is a finished boot, and on the right is the basic shape underneath. The shoes were an old pair of dress shoes that roughly fit the shape I wanted, so they were quickly added:

1.jpg

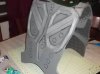
Finally finished the 2nd boot:

2.jpg

Fast forward to the next week and I was coating the boots in Smooth On's Epsilon:

3.jpg

Luckily I don't need the dwemer to be absolutely smooth due to the way it is naturally in game, so I only spent a small bit of time sanding the plastic down. Any drips were hit with a file and then 220 grit sandpaper, and the rest was light sanded. Time for primer:

4.jpg
5.jpg

And now one is completely done. I had to wait for the 2nd boot to cure so I painted the first one, and I must say that I'm pretty happy with how it looks so far! I need to light sand the second one and paint. I'm still not sure what part to work on next..

6.jpg
7.jpg


I'll try to keep this thread updated as I progress, but you can also find updates more often on Facebook if you'd like! (Link in the signature)
 
Last edited:
For sure! I'm actually heading downstairs now to start the arm/glove portion.

My plan was to paint the other boot today but there is currently a thunder storm rolling through :(
 
I knocked out a decent bit today.

Transferred the arm pattern to foam and cut everything out. Took the pieces over to the ol' bench grinder and beveled some edges. Sanded the pattern off the back where I had to glue the pieces together, and eventually came up with this:

arm2.jpg
arm.jpg

It fits fairly snug, and mobility isn't an issue! Woo! I still have to add the details obviously, but that will have to wait until I take a few more screenshots in game. I've never made a costume before so the strapping on the inside was kind of tricky... I basically ended up coating the strap in hot glue on the inside and outside to make sure it would stay in place. It seems pretty strong, but I'm kind of worried about Atlanta heat and whether it'd be hot enough to weaken it.. Any tips or suggestions?
 
Last edited:
I'm so glad you posted here! I didn't want to necro your threads to say how awesome it is, but it is pretty darn cool!

Do you by chance remember how you scaled the helmet? and did the paper patterns work properly for the chest piece or did you have to make it a bit bigger?
 
Thanks! I want to remake the shoulder pauldrons as they're not round enough to me....eventually :p!

The Pep file for the helmet was good. It was a little big at first, but after the resin and Bondo...it skrunk. About 2 sizes. It hurt to get over his ears, so keep that in mind.

I didn't use a Pep file for the chest pieces...I actually drafted them myself using huge sheets of paper and then cut them in EVA!
 
I've been slowly working on the forearm guards and I've run into a slight problem. I sanded the pattern off the back of the foam pretty well, but the Epsilon has only made it worse... I tried sanding down some more but I'll basically have to completely remove the plastic to get it out.

forearm.jpg

The good thing is that I do have a big ol' thing of Bondo that I bought awhile back, and rather than sand all the plastic off I'll just fill in the small little holes. The part that it's being applied to doesn't flex at all, so I shouldn't have to worry about any cracking or pieces breaking off(hopefully). I've never worked with Bondo before, so I'm making sure to test mixing ratios and such before I even think about putting it on the foam.

I present to you my first ever batch of Bondo mixed(via smear method, not stirring)! It is only the beginning:

bondo.jpg

I'll make sure to update after this stuff is on and sanded down! I finally got some decent weather outside so I'm trying to make the best of it!
 
I don't know what's behind the recent increase in skyrim costume threads, but I'm glad to see it happen. Keep up the good work!
 
Made a bit more progress today. I have the front and back pieces cut out and have to figure out how I'm going to do the sides still, but I have a general idea.

1925080_1547327072160477_3325934575933218698_n.jpg

Yes, those are googly eyes. I was at the craft store with my little brother and he gave me the idea to use them, and I'm pretty sure they'll work just fine! I actually used them on the bracers first to test, and you can see them in the last post! One of the best ideas ever haha
 
First off, thanks Montayva13! It's nice to have some more people in here :D

More reference: (Many thanks to CelticRuins because it was in her thread originally!)
dwemerref.jpg

Today I worked on the back plate a fair bit. I originally cut the raised areas of the back as one piece but quickly realized that trying to bevel the edges was proving near impossible, so I cut them into 3. This made beveling much, much easier, and after gluing them back together it's hardly noticeable!

After that fiasco I started trying to figure out how I was going to connect the front and back, and eventually landed on a triangle piece of foam. This is after a bit of trying the pieces on constantly with duct tape holding them together until I could get it just right. I really need to get a cast of myself, or even a torso mannequin... Anyway, the pieces were glued together with contact cement, and then hot glued along the edges. I also glued in a strap that should(if I planned everything out correctly) serve as extra fortification for the breastplate shoulder area and something that my pauldrons will be able to hook to via some sort of strap.

And the progress shots for the day:

1236126_1547894038770447_3044802109293448837_n.jpg
 

Attachments

  • 10255893_1547894045437113_1863780591053428183_n.jpg
    10255893_1547894045437113_1863780591053428183_n.jpg
    16.1 KB · Views: 71
  • 10255893_1547894045437113_1863780591053428183_n.jpg
    10255893_1547894045437113_1863780591053428183_n.jpg
    26.8 KB · Views: 73
Last edited:
It's been awhile since I've posted an update but...

I haven't really gotten much done, and it's most likely not going to be finished by Dragoncon, but I am going to finish it. I'm determined!

Car problems, and lots more hours spent at work will do that!

Sad update :(
 
I realize that it's been FOREVER since I've updated, but life kind of jumped out and hit me!

I am still working on it, and I started sculpting the helmet! I'm still roughing out the shape, but it's coming along well I think!

If anyone has any tips on smoothing out monster clay I could sure use them.. I feel like no matter how many times I go over it I always seem to find little holes and tool marks :(

I'll be updating my Facebook more often than here, but I'll try to keep this thread updated as I progress as well.

helmet2.jpg
helmet.jpg
 
This thread is more than 9 years old.

Your message may be considered spam for the following reasons:

  1. This thread hasn't been active in some time. A new post in this thread might not contribute constructively to this discussion after so long.
If you wish to reply despite these issues, check the box below before replying.
Be aware that malicious compliance may result in more severe penalties.
Back
Top