IronRanger88
New Member
Dumb and Dumber is one of my favorites to this day. There are few movies that stick in my mind like this classic comedy.. most of all "THE HOG"!
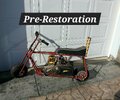
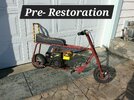
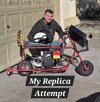
I've wanted to make a replica of this mini bike since I was 6years old. My first attempt with a huffy bicycle and a chainsaw motor zip tied to it was probably a sight to see, but after many years of research I think I've gotten a little closer this time.
100% Honorable mention to "Revzilla’s Ari Henning and Zack Courts" on thier REAL LIFE adaptation of the Minibike with a more modern engine which could actually carry two full grown men up a hill at speed. Great video to watch for this build.
Now: onto THE MASTER LIST.
(All of my techniques and measments are estimated to the best of my ability, DO NOT try this at home. Making frame alterations to any motorized vehicle frame is EXTREMELY DANGEROUS)
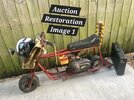
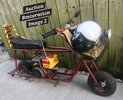
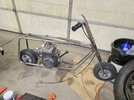
1- Frame: AZUSA Engineering 5" minibike kit. Comes with Basically everything that you need to make this bike Function! Based in Azusa, CA, they've been making this frame since the beginning and is likely the exact frame / kit used for the prop bikes.
Currently about $600.
YOU WILL ALSO need to order "custom forks", 19" seat, kill switch button, and the 60" brake cable.
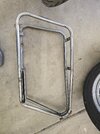
1a- Forks: the current iteration of fork/handlebars are bent rearward, the "old style" had a straight bar all the way through the handlebar / fork.. I was able to get these, but it was a custom order from AZUSA.
1b- Frame extention tubing. After placing the photos of the actual bike used in photoshop, I used known measurements on the frame/wheels, I figured that the frame was stretched 7.5-8 inches using 9 inches of 1 1/16 x .95 wall "Cromoly" Tubing. The frame was likely cut 5 inches from the neck on top and 1 inch from the front bend on the bottom.
The extentions slid approximately 1 inch into the stretch tubes to reach the desired overall length.
Where I took liberty was inside the frame. I used a 3/4 round stock and built the frame "properly" with 7/8th chromoly tubing, THEN slipped the larger tubes overtop to get the desired "look" which has 100% stronger than if I just used a "slip over" pipe. All visible welds are trash.. (just like the real thing)
1c- You'll also have to relocate the seat cross members to fit the longer seat.
1d- at the bottom of the front rail, there are triangle gussets. I just cut a triangle out of 1/4 mild steel with a 4.5 inch edge, then ground the other two sides until it fit.
1e- "highway bar/ kickstand holder" I used a 3/4 round stock semi-centered higher than halfway up the frame. 4.5ish inches off both sides. Makes for a foot rest, also there is an Aluminum bicycle kickstand "hose clamped" to the left side of the bike. (I cheated and drilled a small bolt through the center to stabilize it a bit) you can see in the movie that the kickstand appears in many different positions and is not a great set up.. some might say "dumb?" Lol
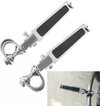
1f- Foot pegs: The included AZUSA pegs go in the back and the front pegs are a generic "Clamp on" motorcycle foot peg. You bolt each on the frame where they look good. (Theae also moved around a lot in the movie / depending on which bike they were filming with) I again cheated a bit and put some tack welds on the inside of each clamp so I can actually use them as foot pegs.
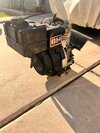
2- Engine: the film used a small Tecumseh brand motor. Likely a HS30/HS40/HS50.
These motors were super common on minibikes and Go-karts "back in the day". They're not very powerful and only have an idle or FULL THROTTLE Carburetor setting (for the most part) BUT that's what they had in there..
I personally went with the HS50. 5HP and 200cc will get you the MOST out of the bike and still look correct. Currently with the correct carb, but again, it sucks... if you want something practical, you'll have to add an aftermarket "slide carb".
Here is a FULL guide of how to best set these engines up. (Tecumseh Engine Rebuild for Mini Bikes, Conversion from Snow Blower to Minibike )
Particularly the carburator section.
2a- Gas tank: I had to custom make a bracket to relocate the gas tank to the front from the origonal side position. I think this is because of the HS50 vs the HS30 likely used in the movie.
Simply painted yellow, red on the top sides with LOTS of over spray.
Painted the "lighting bolts" with a red enamel modle paint as close to the reference images I could get.
3a- clutch/ torque converter.. no idea. I couldn't find the correct one exactly, but the $50-60 ones on Amazon work.. the cover has a lot of holes which have to be filled with putty, but it works. I used a 12 tooth gear for the front sprocket.
Although I've ordered "Lighning bolt" vinyl stickers, they haven't come yet, these are printed paper and taped on for the time being
4. Sissybar: non-weight bearing, so I just used a 7/8 mild steel tube. Bottom rail is 12 inches long bolted to the frame with 5/16 bolts. I put the back 10.5 inch rise bent rearward a "smidgen" and a 5 inch top rail.
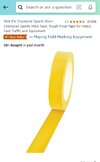
4a- The yellow tape i found best match was a "1" vinyl floor marker tape" like what's used for theature or MOVIE STUDIOS to mark where actors should stand in a scene... makes sense to me.
4b- racoon tail: I found an 8 inch Keychain. Ripped off the key ring attachment, punched a hole in the leather and zip tied it. Simple.
5- "Wheelie bar": 17-18 inch 7/8 DOM or cromoly tubing bolted to the bottom frame with 5/16 bolts, the rear 1/4" x 3.5" mild steel strap. There are two "hardware store" wheels bolted to the flatbar.
The one I currently have on is a bit bigger/longer than the above measurements. I'm going to remake it to the above spec.. later.
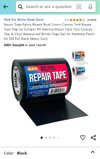
6- 19" seat: covered with some kind of duct tape? I used a 3" vinyl seat repair tape that is incorrect, bit the size it right. Real duct tape leave a LOT of glue on your jeans.. not fun to stick to everything you sit on!
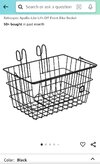
7- Bicycle Basket: generic black wire bicycle basket with a "shopping basket" style removable handle. There are large hooks on the back that are cut off with a die grinder, same with the front center wire to a-fix the custom headlight bracket.
8- Headlight/ tail light/ generator. Another Amazon find. Generic bicycle headlight generator kit. The movie one looks chrome and painted black.
I have not found the "correct" kit yet.
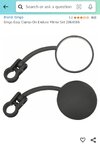
9- Mirror: I have not found the correct mirror, so I went with the same EMGO brand that they used in the Restoration Auction bike. Still looking for the right one.
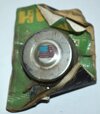
10- Huffy Bell: I've found that the bell resembled a Huffy American flag bicycle bell. Been made since the 40s? Maybe earlier. Very common to find decent knock offs.
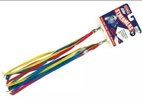
11- Handlebar streamers: I found this reproduction set with colors that I believe are exact to the movie used set.

I've wanted to make a replica of this mini bike since I was 6years old. My first attempt with a huffy bicycle and a chainsaw motor zip tied to it was probably a sight to see, but after many years of research I think I've gotten a little closer this time.
100% Honorable mention to "Revzilla’s Ari Henning and Zack Courts" on thier REAL LIFE adaptation of the Minibike with a more modern engine which could actually carry two full grown men up a hill at speed. Great video to watch for this build.
Now: onto THE MASTER LIST.
(All of my techniques and measments are estimated to the best of my ability, DO NOT try this at home. Making frame alterations to any motorized vehicle frame is EXTREMELY DANGEROUS)
1- Frame: AZUSA Engineering 5" minibike kit. Comes with Basically everything that you need to make this bike Function! Based in Azusa, CA, they've been making this frame since the beginning and is likely the exact frame / kit used for the prop bikes.
Currently about $600.
YOU WILL ALSO need to order "custom forks", 19" seat, kill switch button, and the 60" brake cable.
1a- Forks: the current iteration of fork/handlebars are bent rearward, the "old style" had a straight bar all the way through the handlebar / fork.. I was able to get these, but it was a custom order from AZUSA.
1b- Frame extention tubing. After placing the photos of the actual bike used in photoshop, I used known measurements on the frame/wheels, I figured that the frame was stretched 7.5-8 inches using 9 inches of 1 1/16 x .95 wall "Cromoly" Tubing. The frame was likely cut 5 inches from the neck on top and 1 inch from the front bend on the bottom.
The extentions slid approximately 1 inch into the stretch tubes to reach the desired overall length.
Where I took liberty was inside the frame. I used a 3/4 round stock and built the frame "properly" with 7/8th chromoly tubing, THEN slipped the larger tubes overtop to get the desired "look" which has 100% stronger than if I just used a "slip over" pipe. All visible welds are trash.. (just like the real thing)
1c- You'll also have to relocate the seat cross members to fit the longer seat.
1d- at the bottom of the front rail, there are triangle gussets. I just cut a triangle out of 1/4 mild steel with a 4.5 inch edge, then ground the other two sides until it fit.
1e- "highway bar/ kickstand holder" I used a 3/4 round stock semi-centered higher than halfway up the frame. 4.5ish inches off both sides. Makes for a foot rest, also there is an Aluminum bicycle kickstand "hose clamped" to the left side of the bike. (I cheated and drilled a small bolt through the center to stabilize it a bit) you can see in the movie that the kickstand appears in many different positions and is not a great set up.. some might say "dumb?" Lol
1f- Foot pegs: The included AZUSA pegs go in the back and the front pegs are a generic "Clamp on" motorcycle foot peg. You bolt each on the frame where they look good. (Theae also moved around a lot in the movie / depending on which bike they were filming with) I again cheated a bit and put some tack welds on the inside of each clamp so I can actually use them as foot pegs.
2- Engine: the film used a small Tecumseh brand motor. Likely a HS30/HS40/HS50.
These motors were super common on minibikes and Go-karts "back in the day". They're not very powerful and only have an idle or FULL THROTTLE Carburetor setting (for the most part) BUT that's what they had in there..
I personally went with the HS50. 5HP and 200cc will get you the MOST out of the bike and still look correct. Currently with the correct carb, but again, it sucks... if you want something practical, you'll have to add an aftermarket "slide carb".
Here is a FULL guide of how to best set these engines up. (Tecumseh Engine Rebuild for Mini Bikes, Conversion from Snow Blower to Minibike )
Particularly the carburator section.
2a- Gas tank: I had to custom make a bracket to relocate the gas tank to the front from the origonal side position. I think this is because of the HS50 vs the HS30 likely used in the movie.
Simply painted yellow, red on the top sides with LOTS of over spray.
Painted the "lighting bolts" with a red enamel modle paint as close to the reference images I could get.
3a- clutch/ torque converter.. no idea. I couldn't find the correct one exactly, but the $50-60 ones on Amazon work.. the cover has a lot of holes which have to be filled with putty, but it works. I used a 12 tooth gear for the front sprocket.
Although I've ordered "Lighning bolt" vinyl stickers, they haven't come yet, these are printed paper and taped on for the time being
4. Sissybar: non-weight bearing, so I just used a 7/8 mild steel tube. Bottom rail is 12 inches long bolted to the frame with 5/16 bolts. I put the back 10.5 inch rise bent rearward a "smidgen" and a 5 inch top rail.
4a- The yellow tape i found best match was a "1" vinyl floor marker tape" like what's used for theature or MOVIE STUDIOS to mark where actors should stand in a scene... makes sense to me.
4b- racoon tail: I found an 8 inch Keychain. Ripped off the key ring attachment, punched a hole in the leather and zip tied it. Simple.
5- "Wheelie bar": 17-18 inch 7/8 DOM or cromoly tubing bolted to the bottom frame with 5/16 bolts, the rear 1/4" x 3.5" mild steel strap. There are two "hardware store" wheels bolted to the flatbar.
The one I currently have on is a bit bigger/longer than the above measurements. I'm going to remake it to the above spec.. later.
6- 19" seat: covered with some kind of duct tape? I used a 3" vinyl seat repair tape that is incorrect, bit the size it right. Real duct tape leave a LOT of glue on your jeans.. not fun to stick to everything you sit on!
7- Bicycle Basket: generic black wire bicycle basket with a "shopping basket" style removable handle. There are large hooks on the back that are cut off with a die grinder, same with the front center wire to a-fix the custom headlight bracket.
8- Headlight/ tail light/ generator. Another Amazon find. Generic bicycle headlight generator kit. The movie one looks chrome and painted black.
I have not found the "correct" kit yet.
9- Mirror: I have not found the correct mirror, so I went with the same EMGO brand that they used in the Restoration Auction bike. Still looking for the right one.
10- Huffy Bell: I've found that the bell resembled a Huffy American flag bicycle bell. Been made since the 40s? Maybe earlier. Very common to find decent knock offs.
11- Handlebar streamers: I found this reproduction set with colors that I believe are exact to the movie used set.
Attachments
-
 1000000028.jpg534.2 KB · Views: 76
 -
 1000000029.jpg562.4 KB · Views: 76
 -
 1000007496.jpg348.9 KB · Views: 69
 -
 1000007494.jpg344.4 KB · Views: 73
 -
 1000007495.jpg283.1 KB · Views: 68
 -
 1000007492.jpg331.5 KB · Views: 72
 -
 1000008201.jpg2 MB · Views: 88
 -
 1000008206.jpg1.9 MB · Views: 90
 -
 1000008315.jpg167.8 KB · Views: 78
 -
 1000008316.jpg284.3 KB · Views: 62
 -
 1000008317.jpg286.7 KB · Views: 59
 -
 1000008318.jpg224.5 KB · Views: 54
 -
 1000008319.jpg145.4 KB · Views: 46
 -
 1000008320.jpg134.8 KB · Views: 49
 -
 1000008321.jpg283.3 KB · Views: 49
 -
 1000008323.jpg487.6 KB · Views: 52
 -
 1000008325.jpg209.2 KB · Views: 51
 -
 1000008327.jpg320.5 KB · Views: 48
 -
 1000007862.jpg1.1 MB · Views: 50
 -
 1000007689.jpg4.4 MB · Views: 50
 -
 1000007672.jpg2.4 MB · Views: 58
Last edited: