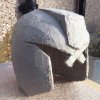
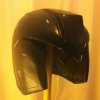
Dredd 3D pep helmet - files now available

Hi all.

I'm hoping someone out there can help.
I see a lot of you have had success with Dung0Beetle's PDO file for a DREDD 3D pep helmet. However as i'm working on a mac, it simply isn't useable. I've tried everything suggested online to no avail. Is it possible one of you already has a PDF of this you could send my way that I could print out? Or perhaps take pity on me and convert it for me?
I wouldn't normally ask but this is a last resort and I don't want to step on any toes because someone at some point has spent a lot of time creating these files. I won't be passing them on to anyone, it's purely for my own use.

Thank you kindly for any help
 
I run a Mac as well and just installed windows on BootCamp then installed pepakura viewer.
Hope that helps
 
Thanks. I've managed to get my hands on the pep file and made quick progress. I'll probably add pics on this thread if nobody minds...
 
This is my first attempt at this so here goes.

OK, so pep stage 1.
photo 1.JPG

Stage 2 with resin coating
photo 2.JPG

Stage 3 fibre glass inside with braces to try to help hold shape as it dries.
photo 3.JPG

Stage 4. It's not very clear but i've started to sand down the outside edges and round them off so the ridges are less pronounced for the body filler stage. Still lots more sanding to do but I was getting impatient showing my progress and I haven't been able to work on it for a couple of days.
photo 4.JPG

The eye slots seem a little narrow to me so I may have to cut them back a fraction to open them up slightly. Other than that it seems to have held it's shape quite well.

Looking forward to finishing the sanding and starting on the next stage.

Any feedback appreciated by this noob!

Thanks millions to madmax for hooking me up with the pep for my mac too! Couldn't have got this far otherwise.
 
Great work! Much cleaner pep than my first go. Makes me think I should start from scratch and relegate my first one to the scrap pile.

Sent from my Nexus 4 using Tapatalk
 
I didn't get a pic of the excess fibreglass sticking out everywhere before I trimmed it with the dremel. So it looks tidier than it did. Thanks for the nice comments.
 
Your pep work looks a **** load cleaner and smoother than mine did at that stage. Well done

Sent from my brain via telepathy.
 
So, here are the next few stages for anyone who's interested.

IMG_3502.jpg
First layer of car body filler. UK equivalent to your bondo from what I can gather.

IMG_3503.jpg
First layer sanded back to reveal the imperfections.

IMG_3524.jpg
Second layer of filler done and sanded. Then I marked out rough lines of where the slightly raised parts are.

On that point, has anyone perfected a technique?
I was thinking of building another layer with masking tape to create the edge if that makes sense?


Thanks, Rookie.
 
Then I marked out rough lines of where the slightly raised parts are. On that point, has anyone perfected a technique?
I was thinking of building another layer with masking tape to create the edge if that makes sense?

On one of the threads, someone used craft foam to make a raised edge. Or you could use cardboard or layers of masking tape.

Great work so far. Keep the pics coming!
 
There Is A Thick Electrical Tape Available At Most Improvement Stores Its What I Planned On Using Before I Got Sidetracked. I Think Its The Only Way To Go.
 
Second layer of filler done and sanded. Then I marked out rough lines of where the slightly raised parts are.

On that point, has anyone perfected a technique?
I was thinking of building another layer with masking tape to create the edge if that makes sense?

I went through this process a short while ago. After marking out my lines, I used masking tape to mask it off first, then used a strip of foam tape (was double sided, but I just didn't peel the top layer off). The foam tape was about 2mm thick.

Once your bondo reaches the 'rubbery' stage... quite soon after applying, where you can touch it with your finger, peel off the tape. This creates a really sharp line which looks great.

(The masking tape was used to make removing all the tape easier. The foam tape has stronger glue and may stick to your helm too much)

Good luck!
 
Last edited:
Thanks for the suggestions. In the end I layered masking tape. It worked quite well. If I was doing it again i'd probably use the masking tape and foam tape approach. Here are a few photos of my progress.

IMG_3530.jpg
IMG_3531.jpg
Masking tape stage.

IMG_3532.jpg
Raised sections
IMG_3534.jpg
And raised imperfections filled once sanded back.

IMG_3552.jpg
Primer

IMG_3553.jpg
Silver/metal effect base coat after battle scars cut into it with the dremel.

IMG_3557.jpg
Vaseline put in the cuts. Black paint applied. Vaseline wiped off once paint dried.

Next update in a few days if all goes according to plan!
 
Just about to have a go at this, gonna do a cardboard build as I'm quite beginning to like the medium
Just printed the file off this morning and just about to cut it out now

Also been asked to do a Lawgiver II, should be getting the donor Glock towards the end of the week, plan on casting it in PT Flex 85
@Judge Gregg: I'm in Gillingham, maybe we could get together sometime
 
Last edited by a moderator:
Just about to have a go at this, gonna do a cardboard build as I'm quite beginning to like the medium
Just printed the file off this morning and just about to cut it out now

Also been asked to do a Lawgiver II, should be getting the donor Glock towards the end of the week, plan on casting it in PT Flex 85
@Judge Gregg: I'm in Gillingham, maybe we could get together sometime

I'm up for that. I'll send you a PM.

I've just cut the visor to size. I started with a replacement motorcycle visor dead cheap off ebay. Flipped it upside down so the straight edge is at the bottom. The weather has beheld me back a bit with the lacquer stage but the badge is finished. Also just waiting on the padding to arrive. I opted for a camping roll. Time will tell if that was the right choice.
Photos coming soon!
 
Last edited by a moderator:
OK, still minus the lacquer and the padding, but so close now.

I used Holts auto spray paint. The red is code HDRE07. I'm pleased with the colour. The lighting isn't great to show the badge, but it's card cut out and sprayed then dirtied up a bit with brass and black paint mixed and rubbed in.

photo-2.JPG
 
OK, still minus the lacquer and the padding, but so close now.

I used Holts auto spray paint. The red is code HDRE07. I'm pleased with the colour. The lighting isn't great to show the badge, but it's card cut out and sprayed then dirtied up a bit with brass and black paint mixed and rubbed in.

View attachment 270147

nice one Gregg, that's funny I was looking at the Holts colors the other day in The Range and thinking that red was looking pretty good :D
 
This thread is more than 5 years old.

Your message may be considered spam for the following reasons:

  1. This thread hasn't been active in some time. A new post in this thread might not contribute constructively to this discussion after so long.
If you wish to reply despite these issues, check the box below before replying.
Be aware that malicious compliance may result in more severe penalties.
Back
Top