They are smd's on leads
You are using an out of date browser. It may not display this or other websites correctly.
You should upgrade or use an alternative browser.
You should upgrade or use an alternative browser.
Done! Quantum Leap Handlink from season 4
- Thread starter replicaprops
- Start date
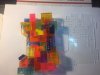
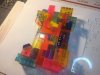
This may look like a mess, but it is an important part in working out the led blinking feature. Only a few leds are connected for this test. The rough cut acrylic sheet is just to see the location of each of the leds before going to a full prototype.
Last edited by a moderator:
Moviefan2k4
New Member
Very nice; it looks to be on the right track.
This may look like a mess, but it is an important part in working out the led blinking feature. Only a few leds are connected for this test. The rough cut acrylic sheet is just to see the location of each of the leds before going to a full prototype.
https://youtu.be/tB8NtaPdWtw
The first episode of season 4 should give you a good idea of the various LED flash patterns, as there is a great close-up of the Handlink whilst it is switched on.
From memory I think some blocks had all their LEDs light together then a few within the block would flash on their own.
Good luck finishing this off.
I look forward to seeing a finished hero Gummy Handlink!
Last edited by a moderator:
Yes, we found lots of great footage on Al's place. Lot's of it from an HD source.
https://www.facebook.com/replicapropscom/videos/1594261470597041/
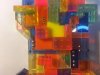
Clearly there is a nice random pattern we are trying to replicate. There is also a speed difference, likely from the director trying to capture the intensity of the scene being filmed. Fast for action scenes, slow for regular. There are also times when the lights are solid when Al is not holding it.
Programming is underway now, but eventually we will have a decent blink pattern.
If anyone has already determined the pattern feel free to post it.
We determined the zones in this image.
https://www.facebook.com/replicapropscom/videos/1594261470597041/
Clearly there is a nice random pattern we are trying to replicate. There is also a speed difference, likely from the director trying to capture the intensity of the scene being filmed. Fast for action scenes, slow for regular. There are also times when the lights are solid when Al is not holding it.
Programming is underway now, but eventually we will have a decent blink pattern.
If anyone has already determined the pattern feel free to post it.
We determined the zones in this image.
The first episode of season 4 should give you a good idea of the various LED flash patterns, as there is a great close-up of the Handlink whilst it is switched on.
From memory I think some blocks had all their LEDs light together then a few within the block would flash on their own.
Good luck finishing this off.
I look forward to seeing a finished hero Gummy Handlink!
Last edited:
For the touch sensitive switches, I wanted the m1.5 stainless steel half round rivets. Could only find them for sale in China. Took over a month to arrive. But boy was it worth the wait. These look great! Turns out I have a few acrylic tiles to recut though. I forgot to take into account the 3 mm head width of the rivets. So on some of the closer together rivets, they over lap. Hey, just gives me a reason to fire up the laser cutter and jam to some music while I wait for the correct tiles to cut. Also upgraded my soldering station for the tiny leds and circuitry needed for this project.


.jpg")


.jpg")

Last edited by a moderator:
For the touch sensitive switches, I wanted the m1.5 stainless steel half round rivets. Could only find them for sale in China. Took over a month to arrive. But boy was it worth the wait. These look great! Turns out I have a few acrylic tiles to recut though. I forgot to take into account the 3 mm head width of the rivets. So on some of the closer together rivets, they over lap. Hey, just gives me a reason to fire up the laser cutter and jam to some music while I wait for the correct tiles to cut. Also upgraded my soldering station for the tiny leds and circuitry needed for this project.
View attachment 727373View attachment 727374View attachment 727375View attachment 727376View attachment 727377View attachment 727378View attachment 727379View attachment 727380
Looking great!
Last edited by a moderator:
The original was a combination of cut acrylic and now discontinued square and rectangular led's So to compensate for the now impossible to find led blocks, I am making my own by laser cutting the acrylic with holes channeled into them for smd leds to fit inside.
Nice work. I forgot about this prop from this show. Does anyone know how the original was made?
The original was a combination of cut acrylic and now discontinued square and rectangular led's So to compensate for the now impossible to find led blocks, I am making my own by laser cutting the acrylic with holes channeled into them for smd leds to fit inside.
Awesome.
These little black screws took over a month from China and they are just a hair too short. Now I know what I need to order, so I ordered 4 times as much as I'm going to use just so I have extra. This was me being a bone head and forgetting to take into account one measurement. I forgot to account for the 1/16 inch thick clear face plate between the color tiles and the frame of the body. The screws look great though. Just wish they were at the hardware store instead of overseas.


Last edited by a moderator:
KrangPrime
Master Member
These little black screws took over a month from China and they are just a hair too short. Now I know what I need to order, so I ordered 4 times as much as I'm going to use just so I have extra. This was me being a bone head and forgetting to take into account one measurement. I forgot to account for the 1/16 inch thick clear face plate between the color tiles and the frame of the body. The screws look great though. Just wish they were at the hardware store instead of overseas.
View attachment 730191View attachment 730192View attachment 730193View attachment 730194
sadly hardware stores are all closing
 .
.Radio shack is long not what it used to be.
Sears Hardware is closing it's doors.
there IS McMaster Carr though as a replacement.
Last edited by a moderator:
Swapped out 2 light blue tiles for a darker shade. I think this looks better. Not sure yet of some of the other front blue tiles are dark or if that is just the effect of something behind them. So for right now just swapping these two. Also recut the few tiles where the rivets over lapped. Also recut the face plate to match the new drill holes.


Attachments
Looks great!
Curious as to what you're planning on using for the battery...? J types seem to be getting more and more rare these days...
Sean
Curious as to what you're planning on using for the battery...? J types seem to be getting more and more rare these days...
Sean
The battery will be simulated. It's shape is an important visual aspect of the handlink, but like you mentioned and for other reasons, it can not be used. So the idea I came up with is to simulate the visual appearance of the battery with a printed paper photo of the battery affixed to the inside of the face plate. The electronics I plan on using do not look anything like the original electronics. So in order to maintain visual appearance close to screen accurate, the parts visible through the clear acrylic will need to be simulated.
Just to give an idea of what it may look like inside. This is in no way the final layout but shows how little space I'm working with.

Just to give an idea of what it may look like inside. This is in no way the final layout but shows how little space I'm working with.
Looks great!
Curious as to what you're planning on using for the battery...? J types seem to be getting more and more rare these days...
Sean
Last edited:
Tenaciousbt
Well-Known Member
Everything is looking so great. I'm giddy at the thought of holding mine for the first time.
Is it possible to use the same EPROM that was used for the original prop?
The original electronics only controlled the lights. I'm putting sound in as well. So right now i'm collaborating with someone who knows a little about raspberry pi to see if we can do an all in one solution for the electronics requirements.Is it possible to use the same EPROM that was used for the original prop?
Is it possible to use the same EPROM that was used for the original prop?
Is the original eprom available?
I would have to know the part number of the eprom to answer that.Is the original eprom available?
Similar threads
- Replies
- 0
- Views
- 415
- Replies
- 0
- Views
- 1,123
- Replies
- 232
- Views
- 25,107
- Replies
- 4
- Views
- 2,467