DiggsBarklightr
Sr Member
Greetings! Old guy here, long time lurker, longer time SW fan. Figured it was time to jump in with a build of mine I started with my son over the weekend.
I was sitting in a counter terrorism meeting a few weeks ago, we had just stopped for a break and I was looking out the window atop the 50 story building and I snapped this picture...

My first thought after looking at it, "Trench Run!!". The next half hour I couldn't concentrate and pew pew pew thoughts were in my head, and, so I did what every other geek would do while sitting in a meeting trying to look as if they were paying attention...I order this!

Let me first start off by saying I appreciate the attention to detail you all take. This build is for fun for me and my son so the attention to details you'll see here are more so along the lines of what I can pass along to him of my knowledge of tools and craftsmanship and what I've also learned from here; a conglomerate of everything. In no way will it be screen accurate, but it will be a good 10 footer hopefully to the average person") .
.
Didn't feel like sanding for hours so after going the Johnny 5 route and dissembling her we hit it with some Aircraft Remover (paint stripper).


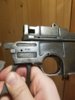
After about 10 to 15 minutes just scrub it with a wire brush and it easily falls off. I honestly couldn't tell what was used to color this replica. It was almost too thick to be a bluing but to thin to be an epoxy base. Some of the pitted areas of the casting need to addressed with sandpaper, so we chose to use a 600 grit as to not score the alloy too much. Not a super soft alloy, but definitely not the hardest.
The photo above with the green glove really shows the casting dimples after the black has been removed. Our replica dimples were rally deep and we were really worried were were going to have to fill them with putty which I really wanted to avoid.
Next order of business was to tackle the seam lines after we rinsed the castings thoroughly of the Aircraft Remover. You can clearly see the difference in the image below from the top of the hammer where I am still sanding and bottom where the seam is still there where I haven't sanded yet.

Same with the larger casting dimples. I figured there was enough alloy to where we could feather down using a file first then use sandpaper.


Looking better, but still needs to be refined before finishing

I grew up in a garage working on cars with my Dad all my life. I've had some of the nicest muscle cars known to man and women and still do. Working on them have taught me a lot of values and tricks/ways to do things so you'd be surprised as to how many of those things carry over to making a replica blaster.
One of those we are going to use to fix a defect in our replica. The area on the left side which is a raised rectangle that covers what would originally be the Lock Frame on a real Mauser came to use crushed on the corner. So much that it was split, raised and spread out of alignment as you can see in the photos below.


So, how does one fix something like this? Well, if it were a dent in a 65 Chevelle hood I would heat it up and then cool it down rapidly and it would pop right up. But I have a bigger issue here and that the split. The best I could do was to heat it up and pull it with a putty knife and rapidly cool it, then shape. See below for results.
Had some high spots after pulling so we needed to shape and refine the best we could. The whole point in doing this was to not go the route of using any type of filler. I want to show the people this forum you can still get great results without using filler. Character flaws shouldn't matter too much as long as it doesn't bother you

And here it is after some light sanding. You can see the walls are even all the way across and no more huge dent as the gap is closed too. The crack is still there but something we can live with. Way better than it was, we think. You'll also notice in some of our photos a white or off-white dusting on the alloy. It's basically what is called a guide coat to tell us what are the high and low points of the alloy. where to sand and not sand just as if we are sand a cars surface. It's basically a light powder.

Now we can move on to my favorite part of the build so far, the removal of the Denix Logo. At some point Denix changed their logo and stamped it into the casting. Filling it was easy enough, but made it ugly once you started to blue it etc, so we decided to see if filing it down would make a difference in the appearance. If this has been done, I guess I have missed it and I'm the idiot around here, move along. Otherwise, take a gander and this is how we tackled it. We figured there was enough alloy there as to not tamper with the overall aesthetics of it, but as it was so close to the milling of the Lock Frame milling area, we had to be careful as to how we would file as we could file "straight" on as it would diminish the milled wall entirely. So we milled at an ever so slightly 2 or 3 degree angle until it was gone never reaching the edge of the wall above the logo. See progress pictures below.


Checking for high spots, throwing on some guide coat


And finally...

From the rear you can barely tell on the left side there was any alloy taken off where the logo would have been. So glad we did this rather than fill it with putty.

Time to do some more refinement, sanding and play with these little treats!

I was sitting in a counter terrorism meeting a few weeks ago, we had just stopped for a break and I was looking out the window atop the 50 story building and I snapped this picture...
My first thought after looking at it, "Trench Run!!". The next half hour I couldn't concentrate and pew pew pew thoughts were in my head, and, so I did what every other geek would do while sitting in a meeting trying to look as if they were paying attention...I order this!
Let me first start off by saying I appreciate the attention to detail you all take. This build is for fun for me and my son so the attention to details you'll see here are more so along the lines of what I can pass along to him of my knowledge of tools and craftsmanship and what I've also learned from here; a conglomerate of everything. In no way will it be screen accurate, but it will be a good 10 footer hopefully to the average person
. Didn't feel like sanding for hours so after going the Johnny 5 route and dissembling her we hit it with some Aircraft Remover (paint stripper).
After about 10 to 15 minutes just scrub it with a wire brush and it easily falls off. I honestly couldn't tell what was used to color this replica. It was almost too thick to be a bluing but to thin to be an epoxy base. Some of the pitted areas of the casting need to addressed with sandpaper, so we chose to use a 600 grit as to not score the alloy too much. Not a super soft alloy, but definitely not the hardest.
The photo above with the green glove really shows the casting dimples after the black has been removed. Our replica dimples were rally deep and we were really worried were were going to have to fill them with putty which I really wanted to avoid.
Next order of business was to tackle the seam lines after we rinsed the castings thoroughly of the Aircraft Remover. You can clearly see the difference in the image below from the top of the hammer where I am still sanding and bottom where the seam is still there where I haven't sanded yet.
Same with the larger casting dimples. I figured there was enough alloy to where we could feather down using a file first then use sandpaper.
Looking better, but still needs to be refined before finishing
I grew up in a garage working on cars with my Dad all my life. I've had some of the nicest muscle cars known to man and women and still do. Working on them have taught me a lot of values and tricks/ways to do things so you'd be surprised as to how many of those things carry over to making a replica blaster.
One of those we are going to use to fix a defect in our replica. The area on the left side which is a raised rectangle that covers what would originally be the Lock Frame on a real Mauser came to use crushed on the corner. So much that it was split, raised and spread out of alignment as you can see in the photos below.
So, how does one fix something like this? Well, if it were a dent in a 65 Chevelle hood I would heat it up and then cool it down rapidly and it would pop right up. But I have a bigger issue here and that the split. The best I could do was to heat it up and pull it with a putty knife and rapidly cool it, then shape. See below for results.
Had some high spots after pulling so we needed to shape and refine the best we could. The whole point in doing this was to not go the route of using any type of filler. I want to show the people this forum you can still get great results without using filler. Character flaws shouldn't matter too much as long as it doesn't bother you
And here it is after some light sanding. You can see the walls are even all the way across and no more huge dent as the gap is closed too. The crack is still there but something we can live with. Way better than it was, we think. You'll also notice in some of our photos a white or off-white dusting on the alloy. It's basically what is called a guide coat to tell us what are the high and low points of the alloy. where to sand and not sand just as if we are sand a cars surface. It's basically a light powder.
Now we can move on to my favorite part of the build so far, the removal of the Denix Logo. At some point Denix changed their logo and stamped it into the casting. Filling it was easy enough, but made it ugly once you started to blue it etc, so we decided to see if filing it down would make a difference in the appearance. If this has been done, I guess I have missed it and I'm the idiot around here, move along. Otherwise, take a gander and this is how we tackled it. We figured there was enough alloy there as to not tamper with the overall aesthetics of it, but as it was so close to the milling of the Lock Frame milling area, we had to be careful as to how we would file as we could file "straight" on as it would diminish the milled wall entirely. So we milled at an ever so slightly 2 or 3 degree angle until it was gone never reaching the edge of the wall above the logo. See progress pictures below.
Checking for high spots, throwing on some guide coat
And finally...
From the rear you can barely tell on the left side there was any alloy taken off where the logo would have been. So glad we did this rather than fill it with putty.
Time to do some more refinement, sanding and play with these little treats!
Last edited: