You are using an out of date browser. It may not display this or other websites correctly.
You should upgrade or use an alternative browser.
You should upgrade or use an alternative browser.
Die Cast Lighted 1/350th TOS Enterprise (TOMY crowd funded)
- Thread starter CessnaDriver
- Start date
That’s what prompted my last post. It will be a challenge using the “normal” gauge wiring in the Amazon kits and squeezing into the gap in the batt compartment door. The Fusion Reactor stuff uses very thin wire (enameled magnet wire). It is thin enough to run out of the tiny battery compartments on 1/6 scale figures and still allows you to close/screw the compartment door (carefully) pinching the wire without cutting it. You can do this yourself if you have the soldering skills needed for 40+ gauge magnet wire. Maybe buy the Amazon kits and solder the magnet wire to the dummy batts - at least long enough to run along the ship to where you can’t see the wires anymore.Nice! I get how the dummy batteries work. But How would they thread the wire out of the compartments?
I'm a little surprised to see so many of you express bewilderment at the Ebay prices.
Prices for sold out, limited edition items have always fetched a premium, but they've gone through the roof in the last several years. Movies, books, albums, figurines, shoes, jewellery, the list goes on and on. Scalpers have taken over all of it, and it's the norm now for prices to skyrocket the moment an initial inventory is exhausted. I fully expected to see the prices we're seeing now. I am a little surprised they've gone up so quickly, but then this item is somewhat unique and a one-off, plus there aren't many of them.
Exactly. That's why I ultimately kept both mine. I have seen some really weird sci-fi items that command high prices just because they are unique and rare, not because they don't have seams and plug holes. So yeah with less then 2900 of these and now even less since they are cannibalizing the returned for replacements. There is no way these things will lose much value over time. Now if they made 10k of them or even 5k it may be a different story.
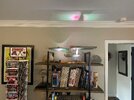
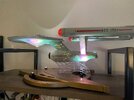
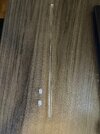
So, I wanted to remove the saucer stand without worry and turn the ship around to hide the screw plugs. Based on an earlier post, I ordered 1/4" plastic doll rods. I also ordered rubber end caps (as not to scratch the ship). I would have went with one (or two) long rods (cut down to about 9") but because I have these brackets at the top of my book shelf, I went with two short rods (for stability). You can barely see them from 8' away during the day and nearly invisible at night. Super happy with this. I decided to keep the saucer base (the lights tuck in there nicely) while storing the old saucer stand away. I'm still looking into hooking up AC with dummy batteries.
Here are some links to the components and a few pics...
Rods ($10) - Amazon.com
Caps ($6) - Amazon.com
Lights ($29) - Amazon.com
Here are some links to the components and a few pics...
Rods ($10) - Amazon.com
Caps ($6) - Amazon.com
Lights ($29) - Amazon.com
Attachments


Last edited:
weisshaupt
Active Member
What guage wire is required depends on the current draw. Because there are no motors up there, the draw should be pretty low, so a pretty small gauge wire can be used. Use something too small on a long enough run however it will have high resistance, inadequately powering the model and possibly requiring the use of a much higher voltage supply to overcome the resistance. ( possibly causing damage with transient high voltage spikes due to capacitive/inductive effects) - and then it could become a heating element and then burn out., probably adding "battle damage" as it does so. To do this correctly one must measure the current draw of the model and do the math on the gauge and wire length to see what size wire one can "get away with" - If you don't do the match and don't up the voltage to account for the wire resistance you should 1) measure the output across a load to ensure you have something in the range of what those batts would provide 2) Keep touching the wire to ensure it doesn't get too hot.That’s what prompted my last post. It will be a challenge using the “normal” gauge wiring in the Amazon kits and squeezing into the gap in the batt compartment door. The Fusion Reactor stuff uses very thin wire (enameled magnet wire). It is thin enough to run out of the tiny battery compartments on 1/6 scale figures and still allows you to close/screw the compartment door (carefully) pinching the wire without cutting it. You can do this yourself if you have the soldering skills needed for 40+ gauge magnet wire. Maybe buy the Amazon kits and solder the magnet wire to the dummy batts - at least long enough to run along the ship to where you can’t see the wires anymore.
xlowes
Sr Member
Or #3. Leave it as is if you don't know how to do it ! Better safe than sorry !What guage wire is required depends on the current draw. Because there are no motors up there, the draw should be pretty low, so a pretty small gauge wire can be used. Use something too small on a long enough run however it will have high resistance, inadequately powering the model and possibly requiring the use of a much higher voltage supply to overcome the resistance. ( possibly causing damage with transient high voltage spikes due to capacitive/inductive effects) - and then it could become a heating element and then burn out., probably adding "battle damage" as it does so. To do this correctly one must measure the current draw of the model and do the math on the gauge and wire length to see what size wire one can "get away with" - If you don't do the match and don't up the voltage to account for the wire resistance you should 1) measure the output across a load to ensure you have something in the range of what those batts would provide 2) Keep touching the wire to ensure it doesn't get too hot.
Yep. That’s why I buy Fusion Reactor’s custom kitsWhat guage wire is required depends on the current draw. Because there are no motors up there, the draw should be pretty low, so a pretty small gauge wire can be used. Use something too small on a long enough run however it will have high resistance, inadequately powering the model and possibly requiring the use of a much higher voltage supply to overcome the resistance. ( possibly causing damage with transient high voltage spikes due to capacitive/inductive effects) - and then it could become a heating element and then burn out., probably adding "battle damage" as it does so. To do this correctly one must measure the current draw of the model and do the math on the gauge and wire length to see what size wire one can "get away with" - If you don't do the match and don't up the voltage to account for the wire resistance you should 1) measure the output across a load to ensure you have something in the range of what those batts would provide 2) Keep touching the wire to ensure it doesn't get too hot.

Agreed. This is all a workaround anyway until/unless we can open up the ship. I won’t be hanging wires (however thin) out of the battery compartments just to avoid changing batts.Or #3. Leave it as is if you don't know how to do it ! Better safe than sorry !
weisshaupt
Active Member
Or #3. Leave it as is if you don't know how to do it ! Better safe than sorry !
I don't really want to discourage anyone from trying. Just be aware of what you are doing. If you bump up the voltage supply you could get into trouble, and even destroy the electronics. But if you are just pushing the 6 volts that batteries would normally supply the wire with , its likely to just under-power the electronics to the point where they don't work right. If that happens scale up the wire. With a thin enough wire you could generate a little heat. Its probably not going to burn the house down- just destroy the wire, and then the heat stops cause there is no longer a current . All wires are transmission lines and all will have inductive and capacitive effects. These can be neglected on short runs and/or larger wires. The smaller the wire and the longer the run, the more they come into pay and can cause issues. Magnet wire typically is in a similar gauge as most hookup wire, but seems smaller because the insulation is so much thinner. This is done because you WANT the fields generated and the inductive effects to be as powerful as possible.
Powering the drive section and the motors -- that will take more current, and you will need a larger wire there. But then that wire is far easier to hide.
Thin copper tape? it's wide and not a little skinny magnetic wire, should handle the current. painted hull color to disguise.
Not a lot of options really.
Not a lot of options really.
Ah I got it, make the deflector dish and planetary sensor into microwave receiver antennas and beam energy to the ship! Yes this would work. Be a hulluva project and $$$ but it should work. LOL May need to hire an RF engineer.
weisshaupt
Active Member
Yeah maybe make the whole diecast hull the antenna.. Though a laser would be cooler, and if directed att he bottom of the saucer it would always look pretty dang cool. ( plus that way you can see and focus the directed energy better and don't accidently cook yourself and the cat)Ah I got it, make the deflector dish and planetary sensor into microwave receiver antennas and beam energy to the ship! Yes this would work. Be a hulluva project and $$$ but it should work. LOL May need to hire an RF engineer.
At some point , someone is going to risk pulling those plugs.. Most of us don't care about the separation (but even if one did... it would have been SO easy to make those "bumps" that connect the saucer to the drive hull into electrical connections.. ) The right way to do this is run a connection internally, and then down the posts of whatever stand you are using. Again.. two posts.. would have been so easy to make those electrical connections.
Yeah maybe make the whole diecast hull the antenna.. Though a laser would be cooler, and if directed att he bottom of the saucer it would always look pretty dang cool. ( plus that way you can see and focus the directed energy better and don't accidently cook yourself and the cat)
At some point , someone is going to risk pulling those plugs.. Most of us don't care about the separation (but even if one did... it would have been SO easy to make those "bumps" that connect the saucer to the drive hull into electrical connections.. ) The right way to do this is run a connection internally, and then down the posts of whatever stand you are using. Again.. two posts.. would have been so easy to make those electrical connections.
Yeah it’s painful a DC plug on the bottom and contacts in the neck would not have been hard for them to have put in.
Tomy customer service responded to my initial request for a set of plugs by asking me for video of the issue. Their reply instructed me to ship the hull section back for exchange. I was told their "team" had reviewed the video and advised I needed to have the hull section replaced. Considering the likelyhood they only have a limited number of extra ships to pull parts from, I would not wait too long to contact Tomy about your ship. Sounds like they consider any amount of play at the strut connections to be a manufacturing defect.
I'll hold off for now. It's really very slight and I honestly would not have noticed until I actually tried to move the Nacelle. I'm also not optimistic that what I'll receive will be much better/different. Heck, it could have other flaws. And yes, I expect that the Tomy group will make sure it's fine before shipping, but it will get tossed around by shippers too so...
If it gets worse, or especially if the nacelles start to droop, I'll strongly reconsider while I'm in the return window. Seems they definitely have some for that purpose (and have already sold off any spares/returns).
I do think the Nacelles may be positioned a smidge too low in relation to the saucer on this model. And that's not just based on mine, but photos and videos of others as well. I seem to be the only one raising any concern about it though.
Hyde35
New Member
They look fine. They remind me of car fuses.So, I wanted to remove the saucer stand without worry and turn the ship around to hide the screw plugs. Based on an earlier post, I ordered 1/4" plastic doll rods. I also ordered rubber end caps (as not to scratch the ship). I would have went with one (or two) long rods (cut down to about 9") but because I have these brackets at the top of my book shelf, I went with two short rods (for stability). You can barely see them from 8' away during the day and nearly invisible at night. Super happy with this. I decided to keep the saucer base (the lights tuck in there nicely) while storing the old saucer stand away. I'm still looking into hooking up AC with dummy batteries.
Here are some links to the components and a few pics...
Rods ($10) - Amazon.com
Caps ($6) - Amazon.com
Lights ($29) - Amazon.com
Reign1701A
New Member
I think it's time to change the batteries in the engineering hull, but wanted to check with the hive mind here to ensure my ship isn't just acting up since it's a bit of a hassle to change the batteries on this thing. The lights in the engineering hull blinked in and out a few times slowly, and then turned off. This only seems to happen when the fanblade motors are running. However, everything powers back on if I wait a few minutes. Has anyone else noticed similar behavior from their ship when the batteries are about to die?
Hyde35
New Member
I friend of mine on Facebook had the same issue. It was the batteries. He changed them and the problem went away. On mine, I will be looking to see what others do re: installing a 6V source that doesn't use the batteries.I think it's time to change the batteries in the engineering hull, but wanted to check with the hive mind here to ensure my ship isn't just acting up since it's a bit of a hassle to change the batteries on this thing. The lights in the engineering hull blinked in and out a few times slowly, and then turned off. This only seems to happen when the fanblade motors are running. However, everything powers back on if I wait a few minutes. Has anyone else noticed similar behavior from their ship when the batteries are about to die?
On another note: I know folks have complained about the plugs, but what about that garish seam on the saucer?
Everyone has now come to live with all seams and plugs......
Yep. Took me a while to make it to the fifth stage but I’m there now.Everyone has now come to live with all seams and plugs......
Similar threads
- Replies
- 9
- Views
- 2,598