Here is my build process for my Destiny Titan Trials gear. This is my 2nd suit of armor, and cosplay I've made. I waited til the last minute on this build, and i do not plan to be as bad ever again! i also have this album uploaded on my newly setup cosplay page, that i just made as a collection of projects, new and old.
http://www.facebook.com/dranzercosplay
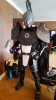
Here is the finished product, that i debuted at Katsucon 2016
(sorry its sideways)

This was my MAIN reference photo, i used a couple others, but this was the one i always went to.

templates for sizing. (looking back on it now, i need to figure out a better way, or just have more people's opinions)


first wave of materials in. the gloves i went with were cheap, and they worked well with my new suit.


first test of shin/boot covers. I originally wanted the top piece to wrap around the boot, but i ended up not using that.

pieces cut for template. hardest part was taking the middle section that was at an angle and trying to make it into a symmetrical pattern


first pieces cut, the gray foam is 1/2inch, and the black is 3/8inch.

testing out the square mesh pattern

shin/boot covers glued. again the top section was intended to be attached to the long band to wrap around the top of the boot. but i ended up gluing these pieces together

Cut 1st layer of chestpiece out of 1/2inch foam, and then cut on reverse side to get the angle. Then 2nd layer is 4 pieces of 1/2inch cut and glued to first layer


2 layers of EVA foam glued together. First is 1/2inch, and 2nd is mostly 1/2inch as well, the smaller black section is 3/8
I also cut out a small battery box on inside of first layer, for the blue Circle LED(still needs added)


Will update, and work on this thread more,
http://www.facebook.com/dranzercosplay
Here is the finished product, that i debuted at Katsucon 2016
(sorry its sideways)
This was my MAIN reference photo, i used a couple others, but this was the one i always went to.
templates for sizing. (looking back on it now, i need to figure out a better way, or just have more people's opinions)
first wave of materials in. the gloves i went with were cheap, and they worked well with my new suit.
first test of shin/boot covers. I originally wanted the top piece to wrap around the boot, but i ended up not using that.
pieces cut for template. hardest part was taking the middle section that was at an angle and trying to make it into a symmetrical pattern
first pieces cut, the gray foam is 1/2inch, and the black is 3/8inch.
testing out the square mesh pattern
shin/boot covers glued. again the top section was intended to be attached to the long band to wrap around the top of the boot. but i ended up gluing these pieces together
Cut 1st layer of chestpiece out of 1/2inch foam, and then cut on reverse side to get the angle. Then 2nd layer is 4 pieces of 1/2inch cut and glued to first layer
2 layers of EVA foam glued together. First is 1/2inch, and 2nd is mostly 1/2inch as well, the smaller black section is 3/8
I also cut out a small battery box on inside of first layer, for the blue Circle LED(still needs added)
Will update, and work on this thread more,