You are using an out of date browser. It may not display this or other websites correctly.
You should upgrade or use an alternative browser.
You should upgrade or use an alternative browser.
Death Star interior door
- Thread starter Skywalker1973
- Start date
Skywalker1973
New Member
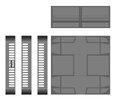
Hey folks. I haven't posted here in a while, but I wanted to update everyone on my Death Star door build. Its really coming along now and I've got the majority of the panels fabricated.
For reference of what I am building, here are examples from ANH of the interior door.
For reference of what I am building, here are examples from ANH of the interior door.
Attachments


Last edited:
Skywalker1973
New Member
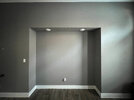
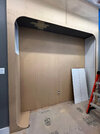
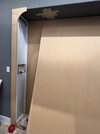
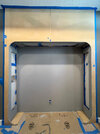
The size of the niche that I build the door around measures 8' tall x 8' wide x 16" deep. Yes, its slightly wider than the standard Death Star hallway door. There are two LED disc lights in the top that are controlled by the wall switch on the left side. I will be rewiring the wall switch to operate a 120V outlet which will power a low voltage transformer for the LED lights. I will keep the separate lower outlet in the door to maintain housing code and also in case I need it in the future. The second image shows the baseboards removed and the protective cardboard over the floor.
Attachments
Last edited:
Skywalker1973
New Member
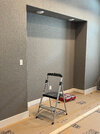
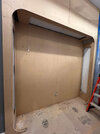
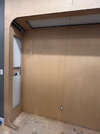
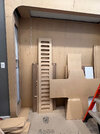
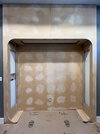
I hired a carpenter to help me with the framing and structural work. We started by removing the LED disc lights and then punching out a hole in the left wall to get to the wall switch wires. The carpenter added a 12"x 12" inset plywood box to allow for mounting the transformer and power outlet. This will also be the location of the light up Death Star door control panel. Then we framed the light boxes on all 3 sides, then adding white gloss marker hardboard panels inside.
Once that was done, we started adding 3/4" MDF sheets to the back wall surface. For the front frame face and corners, we used 1/2" MDF and brought it proud of the baseboard. Then we skinned the framing for the inner side panels in front of the light boxes.
Once that was done, we started adding 3/4" MDF sheets to the back wall surface. For the front frame face and corners, we used 1/2" MDF and brought it proud of the baseboard. Then we skinned the framing for the inner side panels in front of the light boxes.
Attachments

Skywalker1973
New Member
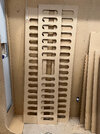
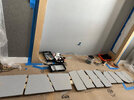
Using the measurements of the current framing, I designed the other surface panel shapes in vector using Adobe Illustrator and sent the artwork to a local CNC wood shop to cut them out. The side oval panels were cut from 1/4" MDF sheets and the back wall trapezoidal door shapes were cut from 1/2" MDF sheets.
Attachments
The panel shown uses the rebelscum dome lights…there are subtle differences to your iterationJust for the record, I don't think any of those parts are mine.
Sorry to derail this thread even more...will you add the "ridges" on the inside of these tubes as well?
Looking great so far Matthieu
")
I'll discuss that on my own thread when I do the interest thread, for now the inside will be resin printed. I have tested an aluminium inside, it's complex and expensive, you need 3m length aluminium rods per part, the price goes crazy very quickly. I think the mix aluminium and resin will be a good compromise.Sorry to derail this thread even more...will you add the "ridges" on the inside of these tubes as well?
Looking great so far Matthieu
I'll do those relatively soon too, need to finish my handcuffs, but dome lights and those are the next release.
Thank the maker! I’d love a set of these to finally finish my wall panel Eethan! Thanks
Skywalker1973
New Member
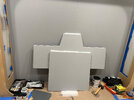
Some more progress… I used wood filler over the screws and sanded them down. I lightly scrubbed the surface with an orbital sander to smooth it flush with the MDF. Then, I cleaned off the excess debris and applied 2 coats of gray primer paint over the interior surfaces and the back wall shapes.
Attachments
Skywalker1973
New Member
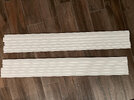
I found some 1/4” thick polystyrene moulding strips that I glued together to mimic the venting that will mount above the door.
The dark gray paint was applied to the back wall (door surface and the side mounts). I chose Behr Paint color Antique Tin PPU18-03 for the Imperial gray. I know there are a lot of opinions on what colors best represent the “correct” Imperial gray tones, but I chose this color because it worked well to compliment the wall color in my room. The photo of the panels on the floor looks a little distorted due to the camera angle.
My carpenter helped me assemble the door panel pattern on the wall. To avoid drilling a ton of holes in the panels and having to rework all that, I chose to use double-headed skirting nails and Liquid Nails caulk glue to hold them in place. That worked extremely well, as you can see.
Attachments


Skywalker1973
New Member
The corners and interior "oval" light panel surfaces are now assembled. I used a bendable 1/4” MDF board for the corner arches. The carpenter created 2 extra ribs to match the outer curve angles. Luckily, he had made a template when he cut the initial frame, so he just re-used it.
We used earth magnets to attach the oval light cover panels. The small earth magnets were inset halfway through the 1/4” MDF panel and the 60 LB heavy-duty earth magnets were counter-sunk screwed into the frame as shown in the photo. Each oval light panel has 10 magnets, so it holds very well, and that will allow me to remove the panels for any future electrical maintenance.
I also started stenciling in the upper left side of the top to get the exact measurements for the venting panels.
Attachments


Similar threads
- Replies
- 9
- Views
- 460
- Replies
- 7
- Views
- 1,134
- Replies
- 0
- Views
- 1,461