DeAgo Falcon on the kitchen table

So the interior of course looks too toy-like and the detail on the pieces that are there are bleak. I'm not going to go nuts with it, but I added a few things to busy it up a little, probably do more before it's over. I did order the game table (drilled for FO) and the grated floor from 308 bits. Along with a few other things. Interior not film accurate by any stretch, but it'll still end up looking better than a toy. One would think for 1200 bucks this stuff would at least have the detail of FM, if not PG. Have to say, I'm pretty disappointed with it so far. I thought about selling it before I started, but too late now. Follow thru...and I'm sure I'll have to get more Shapeways, much more...before this is over.
 

Attachments

  • int1.jpeg
    int1.jpeg
    128.9 KB · Views: 254
Btw...I don't understand the assembly sequence to this thing AT ALL. It's all over the map. Very strange set up.

It’s not like a usual kit’s instructions (sequential), but it was necessary due to how during production the parts were being released when they were originally.(n)
I didn’t always follow them either during the build, but when it eventually comes to securing of the panels to the metal framework then it’s advisable to - due to how some panels ‘overlap’ each other.
Regarding the sparsely detailed Hold area - 100% agreed that for what was paid for, it could’ve /should’ve been done better including the inaccurate flooring & corridor ‘rings’ ,shape of bunk opening etc..., but that’s also the beauty of it... kinda!?
Internally I ended up using the Paragrafix Hold & Corridor sets. Shapeways for items I couldn’t scratch - cargo, hold chairs, tools and light fixtures and the small component piece over the maintenance (kissy room)..., everything else seen was scratched and/or modded.(y)
You’re able to customise it (or not) to your hearts content. The basic foundations there, and it’s up to the builder to decide how far they want or are willing to take it (as with most builds).;)
Oh, one other thing to look out for when you come to it - the magazine instructions for the rear landing gear assembly isn’t accurate in showing how the ‘struts’ should face each other - if you want to be ‘screen accurate’ :whistle:.
 
Last edited:
Not too much, but I managed to stuff some FO in a couple of the appropriate places though it doesn't quite light as well as I had hoped. I used .25 and probably should go with .50 with a bigger mushroom at the end. Anyway...It's clear that I'll also need Tony's corridor floors. There's no way to light the edges on the stock pieces and I don't feel like slotting them, take way too long.
 

Attachments

  • int2.jpeg
    int2.jpeg
    68.8 KB · Views: 252
  • int3.jpeg
    int3.jpeg
    101.3 KB · Views: 224
Hall floors aren't too horrible...40 bucks...but I want the cockpit corridor as well...but 150 is a big pill to swallow:eek:
Also just figured out there isn't gear bay doors in the open position:mad: ARGH
 
I'm still working out how to illuminate the two lamps in from of the bunk...but I'll thing of something (y)

Suggestions only - I ended up using the tube/applicator off a WD-40 aerosol, it’s small (close to scale) strong, hollow and clear. Made a T - type structure, with a small hole where it’s joined and lit with a SMD led. The ends were capped off with a drop of CA glue and painted, as was the middle section.
Had to scratch the landing gear doors and hinges out of various styrene sheet, due to my falcon being eventually displayed grounded.
Course Shapeways have these items available as well, but I was trying to save money for things I couldn’t make..., and besides I enjoy/ed the scratch/modding process too - 99% of the time ;)
 
Thanks Ged,
that sounds like a good idea, some sort of translucent tubing. This thing comes with gear doors, like the FM, right? Perhaps I can cut them similarly to what I did with the FM, then just scratch some hinges. Tell me, is yours near completion? Just wondering about the weight...
I already ordered some Shapeways for this thing, but it looks like I'm going to need more. Cockpit rear ceiling, corridor lamps and I'm going to get the corridor flooring. I messed with drilling the stock ones but the plastic is too thick for any light to shine through good enough. I really want the cockpit corridor...but the price tag is heavy! I've got another shopping cart loaded on SW but it's just sitting there waiting for me to pull the trigger.
 
Hey Ross,

She’ll come in just over 10kg weight wise as is - not sure how much with added mods ?:D
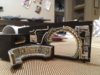
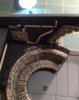
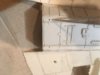
Deago supplies the landing bay doors, but they’re only good for displaying her in flight imho. I’ve heard that some people did as you intend, and cut them up for an ‘open’ finish, but as mentioned before I ended up scratching my own (not necessarily accurate but good enough) out of styrene sheets and rod.

When I started this back around May 2016 aftermarket parts weren’t even a consideration - a) didn’t really know about them much until a few months after I’d already completed my scratched & modded cockpit. b) when I eventually did, I had to think long and hard about what I wanted to achieve with this 1st kit (after a 30+yr hiatus & having limited funds), what’s important, not so necessary, what’s must have!..etc, etc..., (n)

In the end I decided to only purchase items that I knew would be relatively ‘seen’ and perhaps appreciated with the finished model. Also, items that I’d never be able to (for whatever reason) in my mind - successfully scratch or mod.

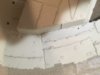
I’ve only just completed the weathering on the upper hull last week, work on this has taken long breaks throughout due to various personal issues. I guess I’m 85-90% done - interior lighting and electronics still need some attention.;)

I know you’re not a fan of FB mate (I’m only on there - late last year, for & because of this build), but there’s a few sites there that can be really helpful too. Plus it’d give me a chance to share my work with you (and anyone else from here interested).

Ged

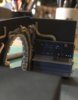
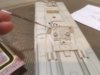
Bunk interior lighting sounds cool, wish I’d added a few fibre optic ones before gluing everything up on it !:unsure:
 
Had a box of SW goodies show up today so I pulled the rear gear panels back off and the front lower jaw. Drilled for the red hazard lights, drilled for all the smaller sized landing lights. mapping those was a bit tricky due to the metal framing but it worked out pretty well. The chopped pieces of MPC locators for their hulls that I saved were the perfect size for my landing light cans...it pays to not throw anything out that looks like it could be useful.
I planted my hazard lamp fixtures with the CA glue of course. I gotta say, it really annoys me that regular model glue doesn't work on this kit. I took an old fine tip paint brush that the bristles were all gone, (didn't throw it out either) and poked it through the holes from the inside to line up my lamps while I glued them down. thus insuring when I get the 2mm post style red LED's they will go in without any trouble.
Once I had the lamps fixed in place, I screwed the panels back in place temporarily and shot the lower with primer. There will be many more greebs to be added later but I wasn't going to try to dig for them now. Got the cockpit pieces I deemed necessary and probably start that soon. I have corridor floors coming so all those other pieces were by-passed for now. Also got the main hold floor but didn't realize the two opening grates were separate. Have to make a 3rd SW order I suppose.
 

Attachments

  • df1.jpeg
    df1.jpeg
    61.7 KB · Views: 293
  • df2.jpeg
    df2.jpeg
    37.7 KB · Views: 289
  • df3.jpeg
    df3.jpeg
    37.2 KB · Views: 286
  • df4.jpeg
    df4.jpeg
    106.2 KB · Views: 269
  • df5.jpeg
    df5.jpeg
    34.4 KB · Views: 286
  • df6.jpeg
    df6.jpeg
    71.7 KB · Views: 277
  • df7.jpeg
    df7.jpeg
    70.7 KB · Views: 245
  • df8a.jpeg
    df8a.jpeg
    93.9 KB · Views: 276
Looking good mate, and glad you’re sounding a little more ‘upbeat’ about this build again.(y)
I used the ventral lighting placement set out in ‘Chris Holland’s blog/website’ , he was providing a kit for this awhile ago - but I decided to make my own to save money, though the ‘mapping’ for the lights (where to) info came in handy.

Just wondering if you’ve had a chance to check out my FB page (only MF related) as yet ?
It’s under ‘Gerard MacDonald’ - I’ve managed to retrieve a heap of (earlier) WIP pics taken on separate phones (2) since the beginning and uploaded them onto it - not sure, but you may find some interesting ideas there maybe? (n)..., anyway just trying to share what/where I can ;)

Ged
 
D a m n! Didn't realize this thread got the boot to Studio Modeling - Commercial Kits... Great job so far, buddy! I'm jealous! I want a Deagostini Falcon!
 
Well my friends...
With all that's going on I've decided to mothball the DeAgo for now. All the sudden my heart wasn't in it so rather than slop it I put it away.
I may very well be moving to Wisconsin in the next few months for a new job and a new life. So it may be a while before I put up anything more on this, but rest assured I will at some point. Otherwise, to my close buddies here, stay in touch, brothers (y)
 
Once you're settled in the new place I'd recommend getting it out once again as soon as, get the frame together, find a spot out of the way to set it up permanently, somewhere near your work station where you can see it, and tinker when you feel like a distraction from other projects.
I've always been a 5'Falcon guy and nearly didn't get this kit but even with its chunkiness and issues with Deago its my favorite kit ever, that's including the Bandai PG.
Trust me, that thing grows on you.
Even in a half finished state, with that steel frame, it looks epic!
 
This thread is more than 4 years old.

Your message may be considered spam for the following reasons:

  1. This thread hasn't been active in some time. A new post in this thread might not contribute constructively to this discussion after so long.
If you wish to reply despite these issues, check the box below before replying.
Be aware that malicious compliance may result in more severe penalties.
Back
Top